


In the last two articles (Simplifying ADO.NET Code in .NET 6: Part 1 and Part 2), you learned how to retrieve data using a set of wrapper classes around ADO.NET. The code you wrote was about the same lines of code you might write when using the Entity Framework. In this article, you're going to build the appropriate methods to modify data in a table, perform transactions, validate data using data annotations, and add exception handling.
Insert a Product
As the first example of modifying data in a table, let's write code to insert a Product into the SalesLT.Product table within the AdventureWorksLT database. When inserting data into a SQL Server table, you need to be aware of whether the primary key field, or any other field for that matter, has an IDENTITY property assigned to it. If so, when building the INSERT statement to submit, you don't include this field(s) in the INSERT statement.
Specify an Incrementing Field
Just like you use the property names of the entity class to build the SELECT statement, you're also going to use them to build an INSERT statement. However, you need to add an attribute to any property that's an incrementing (IDENTITY) field. Microsoft has provided the [DatabaseGenerated] attribute just for this purpose. Open the Product.cs file and add the [DatabaseGenerated] attribute above the Id property because the ProductID field in the Product table is marked as an IDENTITY field.
[Key]
[DatabaseGenerated(DatabaseGeneratedOption.Identity)]
[Column("ProductID")]
public int Id { get; set; }
Modify the ColumnMapper Class
Just like you've checked for other attributes in the BuildColumnCollection() method and recorded the information in the ColumnWrapper class, you're going to do the same with the [DatabaseGenerated] attribute class. Open the ColumnWrapper.cs file and add a new property named IsAutoIncrementing.
public bool IsAutoIncrementing { get; set; }
Modify BuildColumnCollection() Method
Open the Repository.cs file and locate the BuildColumnCollection() method. Just below where you check for the [Key] attribute, add a check for the [DatabaseGenerated] attribute, as shown in the following code snippet:
// Check for [DatabaseGenerated] attribute Is the column an auto-incrementing column?
DatabaseGeneratedAttribute dg = prop.GetCustomAttribute<DatabaseGeneratedAttribute>();
if (dg != null)
{
    colMap.IsAutoIncrementing = dg.DatabaseGeneratedOption == DatabaseGeneratedOption.Identity || dg.DatabaseGeneratedOption == DatabaseGeneratedOption.Computed;
}
Add an ExecuteNonQuery() Method
ADO.NET uses the ExecuteNonQuery() method to submit queries that don't return result sets. Add the same named method to the RepositoryBase class. Open the RepositoryBase.cs file and add the method shown below to this class. This method accepts a command object, opens the connection on that command, and calls the ExecuteNonQuery() method to submit the SQL to the database.
public virtual int ExecuteNonQuery(IDbCommand cmd)
{
    int ret;

    // Open the Connection
    DbContext.CommandObject.Connection.Open();

    // Call the ExecuteNonQuery() method
    ret = DbContext.CommandObject.ExecuteNonQuery();

    return ret;
}
To provide additional flexibility, add an overload of the ExecuteNonQuery() method that accepts a SQL string. You're going to call this method most often from your repository classes.
public virtual int ExecuteNonQuery(string sql)
{
    // Store the SQL submitted
    SQL = sql;

    // Create Command object with SQL
    DbContext.CreateCommand(SQL);

    // Execute the Query
    return ExecuteNonQuery(DbContext.CommandObject);
}
Add Method to Build an INSERT Statement
You do not want to build an INSERT statement that has the actual values to insert within the string as that isn't secure. Instead, build an INSERT statement that contains the column names, and a set of parameters to match those column names, as shown in the following code snippet. You can then build a collection of SqlParameter objects to insert the value for each parameter.
INSERT INTO SalesLT.Product ([Name], [ProductNumber], [Color]) VALUES (@Name, @ProductNumber, @Color)
Add the new method named BuildInsertStatement() shown in Listing 1 to the RepositoryBase class. This method calls the BuildColumnCollection() method to create the collection of ColumWrapper objects. Call the SetTableAndSchemaName() method so the TableName and SchemaName properties are set. You need these values for the INSERT statement.
Listing 1: Create a method to build an INSERT statement
protected virtual string BuildInsertStatement<TEntity>(TEntity entity)
{
    StringBuilder sbCol = new(1024);
    StringBuilder sbParam = new(1024);
    string comma = string.Empty;
    Type typ = typeof(TEntity);

    // Build Column Mapping Collection
    Columns = BuildColumnCollection<TEntity>();

    // Set Table and Schema properties
    SetTableAndSchemaName(typ);

    // Build the INSERT statement
    sbCol.Append($"INSERT INTO {SchemaName}.{TableName} (");
    foreach (ColumnMapper item in Columns.Where(c => !c.IsAutoIncrementing))
    {
        // Add column
        sbCol.Append($"{comma}[{item.ColumnName}]");
        // Add Parameter
        sbParam.Append($"{comma} {DbContext.ParameterPrefix}{item.ColumnName}");
        comma = ", ";
    }
    sbCol.Append(") VALUES (");
    sbCol.Append(sbParam);
    sbCol.Append(')');

    return sbCol.ToString();
}
Create two StringBuilder objects, one to hold the comma-delimited list of column names, and one to hold the list of comma-delimited parameters. Loop through the columns where the IsAutoIncrementing property is false. Each time through the loop, build the comma-delimited list of column names and parameters. Use the DbContext.ParameterPrefix property to place the at (@) sign before the column name to build the parameter name.
Add Validate() Method Stub
Before inserting or updating the data in the database, it's a good idea to ensure that the data passes your business rules. You're going to learn about validation later in this article, but for now, create a Validate() method that simply returns a true value.
public virtual bool Validate<TEntity>(TEntity entity)
{
    return true;
}
Add Insert() Method
Add an Insert() method (Listing 2) to the RepositoryBase class. This method calls the Validate() method to verify that the data is correct. If that method returns a true value, the BuildInsertStatement() is called to create the INSERT statement and put that statement into the SQL property. Build a command object with that SQL statement. Next, take the values from the entity class and place the values from each property into the corresponding ColumnWrapper object built in the BuildInsertStatement() method by calling a new method named SetColumnValues(). Once you have those values set, you need to add to the Parameters property of the command object a SqlParameter object for each parameter in the INSERT statement. This is done in a new method named BuildParametersForModification(). Call the ExecuteNonQuery() method to submit the INSERT statement to the database.
Listing 2: The Insert() method builds an INSERT statement and submits the query to the database
public virtual TEntity Insert<TEntity> (TEntity entity)
{
    if (Validate<TEntity>(entity))
    {
        // Build INSERT Statement
        SQL = BuildInsertStatement<TEntity>(entity);

        // Create Command Object with SQL
        DbContext.CreateCommand(SQL);

        // Set Values into ColumnMapper Objects
        SetColumnValues<TEntity>(entity);

        // Build Parameters
        BuildParametersForModification(DbContext.CommandObject, Columns);

        // Submit the Query
        ExecuteNonQuery(DbContext.CommandObject);
    }

    return entity;
}
Set Entity Values into ParameterValue Property
Add the SetColumnValues() method to the RepositoryBase class. In this method, you iterate over the Columns collection built in the BuildInsertStatement() method. Each time through the loop, use reflection to get the value from the entity object and place the value into the ParameterValue property.
protected virtual void SetColumnValues<TEntity>(TEntity entity)
{
    // Loop through all properties
    foreach (ColumnMapper colMap in Columns)
    {
        // Set property value
        colMap.ParameterValue = colMap.PropertyInfo.GetValue(entity);
    }
}
Add Method to Build Parameter Objects for Inserting and Updating
As mentioned, you now need to build a collection of SqlParameter objects for each parameter in your INSERT statement. Add a new method to the RepositoryBase class named BuildParametersForModification(). Each time through the loop, create a new SqlParameter object by calling the DbContext.CreateParameter() method. Pass the column name and the value for the INSERT statement to the CreateParameter() method. If the parameter value is null, pass a DBNull.Value so the database receives the correct kind of null value. Add the new parameter to the command objects Parameters collection.
protected virtual void BuildParametersForModification(IDbCommand cmd, List<ColumnMapper> columns)
{
    // Add parameters for each value passed in
    foreach (ColumnMapper item in columns)
    {
        var param = DbContext.CreateParameter(item.ColumnName, item.ParameterValue ?? DBNull.Value);
        cmd.Parameters.Add(param);
    }
}
Modify ProductRepository Class
Later in this article, you're going to use data annotations for checking each property in the entity class for correct data. Using data annotations allows you to write generic code to validate the data in all your entity objects. However, you may need some additional validation logic that has to be custom written. For this, add a Validate() method to each of your repository classes. Open the ProductRepository.cs file and add a Validate() method, as shown below:
public virtual bool Validate(Product entity)
{
    bool ret = base.Validate<Product>(entity);
    // Perform any other validation here
    return ret;
}
Next, add an Insert() method to the ProductRepository class to call the Insert() method in the RepositoryBase class. Creating an Insert() method in your repository classes allows you the flexibility to perform actions either before or after you perform the insert for the table. For example, after inserting data into a table, you might wish to reread the data from the table to retrieve any auto-generated field values.
public virtual Product Insert(Product entity)
{
    entity = base.Insert<Product>(entity);
    // OPTIONAL: Re-read from database to
    // get any other generated values
    //entity = Find(entity.Id);
    return entity;
}
Try It Out
Open the Program.cs file, create a new Product object, and assign some valid values to the object. Modify the code after the using AdvWorksDbContext db = new(); statement to look like Listing 3. Run the application and see that the new Product was inserted. Notice that the ProductID property is not filled in; however, if you look in the Product table, you'll see that a value was generated. You're going to learn how to retrieve the value from the IDENTITY property in the next section of this article.
Listing 3: Call the Insert() method and report back the entity and the SQL submitted
Product entity = new()
{
    ProductName = "A New One",
    ProductNumber = "NEW-001",
    Color = "Red",
    StandardCost = 10,
    ListPrice = 20,
    SellStartDate = DateTime.Now
};

entity = db.Products.Insert(entity);

Console.WriteLine("*** Insert a Product ***");
// Display Result
Console.WriteLine($"Product: {entity}");
Console.WriteLine();
Console.WriteLine($"SQL Submitted: {db.Products.SQL}");
Console.WriteLine();
Get IDENTITY from Insert
The ProductID field in the SalesLT.Product table has an IDENTITY property assigned to it. This means that when you insert a new record, a new value is automatically assigned to this field. To retrieve this new value, you must immediately retrieve the identity on the same open connection using either @@IDENTITY or the SCOPE_IDENTITY() function. Let's add this functionality to the base classes.
Modify DatabaseContext Class
Open the DatabaseContext.cs file and add a new using statement at the top of the file.
using System.Reflection;
Add a new abstract method named GetLastAutoIncrement(). You need to override this method in your database-specific context class as each database engine retrieves their auto-incrementing fields in a different way.
public abstract void GetLastAutoIncrement<TEntity>(IDbCommand cmd, TEntity entity, PropertyInfo prop);
Modify SqlServerDatabaseContext Class
Open the SqlServerDatabaseContext.cs file and add a new using statement at the top of this file.
using System.Reflection;
Override the GetLastAutoIncrement() method you just added to the DatabaseContext class. If you're not using any triggers on your database, you can use the @@IDENTITY as I'm doing in the code shown below. If you're performing your inserts in a stored procedure, return the identity value using an OUTPUT parameter.
public override void GetLastAutoIncrement<TEntity>(IDbCommand cmd, TEntity entity, PropertyInfo prop)
{
    cmd.CommandText = "SELECT CONVERT(INT, @@IDENTITY);";

    cmd.CommandType = CommandType.Text;
    int? value = (int?)cmd.ExecuteScalar();
    if (value.HasValue)
    {
        prop.SetValue(entity, value, null);
    }
}
Add a GetLastAutoIncrement() Method to RepositoryBase
Open the RepositoryBase.cs file and add a GetLastAutoIncrement() method to this class. This method checks to see if there are any auto-incrementing fields for the table. If there are, it finds that field and passes the entity class and the PropertyInfo object for that property to the GetLastAutoIncrement() method to have that field set with the value returned from the @@IDENTITY function.
protected virtual void GetLastAutoIncrement<TEntity>(IDbCommand cmd, TEntity entity)
{
    if (Columns.Where(c => c.IsAutoIncrementing).Any())
    {
        ColumnMapper colMap = Columns.Find(c => c.IsAutoIncrementing);
        DbContext.GetLastAutoIncrement(cmd, entity, colMap.PropertyInfo);
    }
}
Modify the Insert() Method
Just after the call to the ExecuteNonQuery() in the Insert() method, add the call to the GetLastAutoIncrement() method to retrieve the value and put it into the primary key field.
// Get IDENTITY if needed
GetLastAutoIncrement<TEntity>(DbContext.CommandObject, entity);
Try It Out
Open the Program.cs file and change the values for the new product entity to insert so it doesn't conflict with the record you previously inserted.
Product entity = new()
{
    ProductName = "Identity Test",
    ProductNumber = "IDN-001",
    Color = "Blue",
    StandardCost = 20,
    ListPrice = 40,
    SellStartDate = DateTime.Now
};
Run the application and you should see the new ProductID show up in the console window.
Update a Product
Now that you know how to insert a new product, let's look at updating records through generic classes. The first step is to add a method to build an UPDATE statement. This method is very similar to the method you wrote to build an INSERT statement. Open the RepositoryBase.cs file and add a new method named BuildUpdateStatement(), as shown in Listing 4.
Listing 4: Add a method to build an UPDATE statement
protected virtual string BuildUpdateStatement<TEntity>(TEntity entity)
{
    StringBuilder sb = new(2048);
    string comma = string.Empty;
    string and = string.Empty;
    Type typ = typeof(TEntity);

    // Build Column Mapping Collection
    Columns = BuildColumnCollection<TEntity>();

    // Set Table and Schema properties
    SetTableAndSchemaName(typ);

    // Build the UPDATE statement
    sb.Append($"UPDATE {SchemaName}.{TableName} SET ");
    foreach (ColumnMapper item in Columns.Where(c => !c.IsAutoIncrementing))
    {
        // Add column
        sb.Append($"{comma}[{item.ColumnName}] = {DbContext.ParameterPrefix}{item.ColumnName}  ");
        comma = ", ";
    }
    sb.Append(" WHERE ");
    foreach (ColumnMapper item in Columns.Where(c => c.IsKeyField))
    {
        // Add WHERE Clause
        sb.Append($"{and}{item.ColumnName} = {DbContext.ParameterPrefix}{item.ColumnName}");
        and = " AND ";
    }

    return sb.ToString();
}
The UPDATE statement you're going to build looks something like the following SQL:
UPDATE SalesLT.Product SET
  [Name] = @Name,
  [ProductNumber] = @ProductNumber,
  [Color] = @Color
WHERE ProductID = @ProductID
Build the collection of columns to update from your entity class by calling the BuildColumnCollection() method. Next, set the table and schema name properties. Loop through the columns collection to build the list of columns and parameters. Then loop through the set of columns where the IsKeyField property is equal to true.
Add Update() Method
The next method to add is the Update() method to which you pass the entity object with the values to be updated, as shown in Listing 5. Call the Validate() method to ensure that the data is correct prior to attempting the update in the database table. Call the BuildUpdateStatement() method to build the SQL statement. Create the command object and pass it the SQL statement. Set the column values by calling the SetColumnValues() method just like you did in the Insert() method. Call the BuildParametersForModification() method to create the collection of SqlParameter objects and add them to the command object. Finally, execute the UPDATE statement by calling the ExecuteNonQuery() method.
Listing 5: The Update() method builds the UPDATE statement and submits it to the database
public virtual TEntity Update<TEntity> (TEntity entity)
{
    if (Validate<TEntity>(entity))
    {
        // Build UPDATE Statement
        SQL = BuildUpdateStatement<TEntity>(entity);

        // Create Command Object with SQL
        DbContext.CreateCommand(SQL);

        // Set Values into ColumnMapper Objects
        SetColumnValues<TEntity>(entity);

        // Build Parameters
        BuildParametersForModification(
          DbContext.CommandObject, Columns);

        // Submit the Query
        ExecuteNonQuery(DbContext.CommandObject);
    }

    return entity;
}
Modify the ProductRepository Class
Just like you did with the Insert() method, create an Update() method on your repository classes so you can perform any operations either before or after the update. Open the ProductRepository.cs file and add an Update() method, as shown in the code snippet below.
public virtual Product Update(Product entity)
{
    entity = base.Update<Product>(entity);
    // OPTIONAL: Re-read from database to get any other generated values
    //entity = Find(entity.Id);
    return entity;
}
Try It Out
Open the Program.cs file and we'll build a SQL statement to retrieve the largest value from the ProductID field, as that will be the last product record you added (Listing 6). Call the ExecuteScalar() method to get that product ID. Call the Find() method on the Products property in the database context object. Now that you have the entity object, modify a few properties to different values so you can see that the changes have been made in the products table. Call the Update() method to submit those changes to the database. Run the application and you should see the entity object and the SQL statement submitted. You should look at the data in your SQL Server to verify everything did get changed.
Listing 6: Update a record by setting values on an entity object, then invoking the Update() method on the repository class
string sql = "SELECT Max(ProductID) FROM SalesLT.Product";
int id = (int)db.Database.ExecuteScalar(sql);

Product entity = db.Products.Find(id);
entity.Color += "CHANGED";
entity.StandardCost = 99;
entity.ListPrice = 299;

entity = db.Products.Update(entity);

Console.WriteLine("*** Update Product Data ***");
Console.WriteLine($"Product: {entity}");
Console.WriteLine();
Console.WriteLine($"SQL Submitted: {db.Products.SQL}");
Console.WriteLine();
Delete a Product
The next functionality to add to the RepositoryBase class is to delete a specific record in a table. Open the RepositoryBase.cs file and add a new method named BuildDeleteStatement(), as shown in Listing 7. This code should look familiar by now as it's very similar to the BuildUpdateStatement() method. Build the collection of columns, set the table and schema name properties, then build the DELETE statement with the appropriate WHERE clause.
Listing 7: Add a method to build the DELETE statement
protected virtual string BuildDeleteStatement<TEntity>(TEntity entity)
{
    StringBuilder sb = new(2048);
    string and = string.Empty;
    Type typ = typeof(TEntity);

    // Build Column Mapping Collection
    Columns = BuildColumnCollection<TEntity>();

    // Set Table and Schema properties
    SetTableAndSchemaName(typ);

    // Build the DELETE statement
    sb.Append($"DELETE FROM {SchemaName}.{TableName}");
    sb.Append(" WHERE ");
    foreach (ColumnMapper item in Columns.Where(c => c.IsKeyField))
    {
        // Add WHERE Clause
        sb.Append($"{and}{item.ColumnName} = {DbContext.ParameterPrefix}{item.ColumnName}  ");
        and = " AND ";
    }

    return sb.ToString();
}
Add Delete() Method
Add a new Delete() method to the RepositoryBase class to match the code you see in Listing 8. This method calls the BuildDeleteStatement() method to create the SQL statement to submit. Call the SetColumnValues() method to add the entity object values into the ColumnWrapper object. You only need the primary key value, but because this method is already written, you can just use this method to set the value. Only pass those columns where the IsKeyField property is true to the BuildWhereClauseParameters() method to just add the primary key field(s) as a parameter to the command object. Call the ExecuteNonQuery() method to execute the UPDATE statement on the database table.
Listing 8: The Delete() method builds the DELETE statement and submits it to the database
public virtual bool Delete<TEntity> (TEntity entity)
{
    bool ret = true;

    // Build DELETE Statement
    SQL = BuildDeleteStatement<TEntity>(entity);

    // Create Command Object with SQL
    DbContext.CreateCommand(SQL);

    // Set Values into ColumnMapper Objects
    SetColumnValues<TEntity>(entity);

    // Build Parameters
    BuildWhereClauseParameters(DbContext.CommandObject, Columns.Where(c => c.IsKeyField).ToList());

    // Submit the Query
    ExecuteNonQuery(DbContext.CommandObject);

    return ret;
}
Add Delete() Methods in ProductRepository Class
Open the ProductRepository.cs file and add a couple of Delete() methods to this class. I like having options, so I have one method that accepts an integer ID of the primary key to delete, and the other accepts a complete Product object. The first option is used when writing web applications, and the other is typically used when writing desktop applications with WPF.
public virtual bool Delete(int id)
{
    Product product = base.Find<Product>(id);
    return Delete(product);
}

public virtual bool Delete(Product entity)
{
    return base.Delete<Product>(entity);
}
Try It Out
Open the Program.cs file and modify the code you used to update a product to look like the following snippet:
string sql = "SELECT Max(ProductID) FROM SalesLT.Product";
int id = (int)db.Database.ExecuteScalar(sql);

Product entity = db.Products.Find(id);

entity = db.Products.Delete(entity);

Console.WriteLine("*** Delete a Product ***");
// REST OF THE CODE HERE
Notice that most of the code is the same; you just eliminate the code to make changes to the entity variable, and call the Delete() method instead of the Update() method.
You can also remove the line that invokes the Find() method and pass the id variable to the other overloaded Delete() method. Which method you choose to call is completely up to you and your circumstances for your application.
// Delete by Primary Key
db.Products.Delete(id);
Run the application and you should see the product object deleted and the SQL statement. Check the SalesLT.Product table in your SQL Server database to ensure that the record was deleted.
Transactions
Now that you've built standard CRUD functionality into the generic ADO.NET classes, let's look at creating a transaction. A transaction is a set of data modifications statements that all must either complete successfully, or all of them must be rolled back. Add a CustomerRepository class to the RepositoryClasses folder and add the code shown in Listing 9.
Listing 9: Create a CustomerRepository class for working with the Customer table
#nullable disable

using AdoNetWrapper.Common;
using AdoNetWrapperSamples.EntityClasses;
using AdoNetWrapperSamples.Models;

namespace AdoNetWrapperSamples.RepositoryClasses;

public class CustomerRepository : RepositoryBase
{
    public CustomerRepository(AdvWorksDbContext context) : base(context)
    {
    }

    public virtual List<Customer> Search()
    {
        return base.Search<Customer>();
    }

    public virtual Customer Find(int id)
    {
        return base.Find<Customer>(id);
    }

    public virtual bool Validate(Customer entity)
    {
        bool ret = base.Validate<Customer>(entity);

        // Perform any other validation here

        return ret;
    }

    public virtual Customer Insert(Customer entity)
    {
        entity = base.Insert<Customer>(entity);

        // OPTIONAL: Re-read from database to
        // get any other generated values
        //entity = Find(entity.CustomerID);

        return entity;
    }

    public virtual Customer Update(Customer entity)
    {
        entity = base.Update<Customer>(entity);

        // OPTIONAL: Re-read from database to
        // get any other generated values
        //entity = Find(entity.Id);

        return entity;
    }

    public virtual bool Delete(int id)
    {
        Customer Customer = base.Find<Customer>(id);

        return Delete(Customer);
    }

    public virtual bool Delete(Customer entity)
    {
        return base.Delete<Customer>(entity);
    }
}
The code in Listing 9 is representative of the code needed to provide CRUD logic for each table in your database. Because you've built so much generic logic into the common base classes, your repository classes are easy to read and understand.
Modify Adventure Works Database Context Class
To expose the CRUD functionality for the Customer table, add a Customers property to AdvWorksDbContext class.
public CustomerRepository Customers { get; set; }
Modify the constructor of the AdvWorksDbContext class to create a new instance of the repository class and pass to the constructor the instance of the AdvWorksDbContext class.
Customers = new(this);
Add Functionality to Database Context Class for Transactions
Open DatabaseContext.cs file and add three new properties to the class. Because a transaction must be completed on a single connection, expose a connection object from the database context. Also, a transaction object should be exposed so you can commit or rollback the set of statements in the transactions. Add a Boolean property to specify whether a transaction is currently active on the connection. The three properties to add are shown in the following code snippet:
public bool IsInTransaction { get; set; }
public IDbConnection ConnectionObject { get; set; }
public IDbTransaction TransactionObject { get; set; }
Add a method named BeginTransaction() to create the connection object, open the connection, and begin a transaction by calling the BeginTransaction() method on the connection object. Set the IsInTransaction property to a true value to signify a transaction has been started.
public virtual void BeginTransaction()
{
    // Create Connection
    ConnectionObject = CreateConnection();

    // Open Connection
    ConnectionObject.Open();

    // Create Transaction
    TransactionObject = ConnectionObject.BeginTransaction();
    IsInTransaction = true;
}
Add a method named CommitTransaction() to the DatabaseContext class to check whether the ConnectionObject property is not null and is also open. If it is and the TransactionObject property is not null, call the Commit() method on the transaction object, close the connection, and set the IsInTransaction property to false.
public virtual void CommitTransaction()
{
    if (ConnectionObject != null && ConnectionObject.State == ConnectionState.Open)
    {
        if (TransactionObject != null)
        {
            TransactionObject.Commit();
            ConnectionObject.Close();
            IsInTransaction = false;
        }
    }
}
Add a method named RollbackTransaction() that also checks if the ConnectionObject property is not null and is open. If it is, and the TransactionObject property is not null, call the Rollback() method on the transaction object, close the connection, and set the IsInTransaction property to false.
public virtual void RollbackTransaction()
{
    if (ConnectionObject != null && ConnectionObject.State == ConnectionState.Open)
    {
        if (TransactionObject != null)
        {
            TransactionObject.Rollback();
            ConnectionObject.Close();
            IsInTransaction = false;
        }
    }
}
Because you added two new properties to this class, add code in the Dispose() method to release these objects if they are not null, as shown in the following code snippet. These lines of code should go at the very end of the Dispose() method.
// Close/Dispose of Transaction object
if (TransactionObject != null)
{
    TransactionObject.Dispose();
}

// Close/Dispose of Connection object
if (ConnectionObject != null) {
    ConnectionObject.Close();
    ConnectionObject.Dispose();
}
Modify SQL Server Database Context Class
There are a few key methods you must now modify to take advantage of transactions. First, modify the CreateConnection() method in the SqlServerDatabaseContext class and make this method look like the following code snippet:
public override SqlConnection CreateConnection(string connectString)
{
    if (IsInTransaction)
    {
        if (ConnectionObject == null)
        {
            ConnectionObject = new SqlConnection(connectString);
        }
        return (SqlConnection)ConnectionObject;
    }
    else
    {
        return new SqlConnection(connectString);
    }
}
Next, modify the CreateCommand() method to check whether a transaction is started, and if so, set the TransactionObject into the CommandObject.Transaction property.
public override SqlCommand CreateCommand(IDbConnection cnn, string sql)
{
    CommandObject = new SqlCommand(sql, (SqlConnection)cnn);
    CommandObject.CommandType = CommandType.Text;

    if (IsInTransaction)
    {
        CommandObject.Transaction = TransactionObject;
    }
    return (SqlCommand)CommandObject;
}
Modify Repository Base Class
The last place to modify is within the ExecuteNonQuery() method. You want to check to see if the connection object is open or not. If it isn't open, you need to open it.
public virtual int ExecuteNonQuery(IDbCommand cmd)
{
    int ret;

    // Open the Connection
    if (DbContext.CommandObject.Connection.State != ConnectionState.Open)
    {
        DbContext.CommandObject.Connection.Open();
    }

    // Call the ExecuteNonQuery() method
    ret = DbContext.CommandObject.ExecuteNonQuery();

    return ret;
}
Modify Customer Class
When you created the Customer class in the first article of this series, you just created enough properties to show retrieving some data. As you're now going to be attempting to insert data into the Customer table, you need to add some new properties, and mark the CustomerID property as an IDENTITY field. Open the Customer.cs file and above the CustomerID property, add the [DatabaseGenerated] attribute.
public partial class Customer
{
    [Key]
    [DatabaseGenerated(DatabaseGeneratedOption.Identity)]
    public int CustomerID { get; set; }

    // REST OF THE CODE
}
Toward the bottom of the class, add a few more properties that are required fields in the Customer table. These properties are PasswordHash, PasswordSalt, Rowguid, and ModifiedDate.
public string PasswordHash { get; set; }
public string PasswordSalt { get; set; }
public Guid Rowguid { get; set; }
public DateTime ModifiedDate { get; set; }
Add Transaction Code to View Model Class
Instead of writing a bunch of code in the Program.cs file, let's add the transaction functionality to the ProductCustomerViewModel class. Open the ProductCustomerViewModel.cs file and add a new method named InsertProductAndCustomer(), as shown in Listing 10. After creating an instance of the AdvWorksDbContext class, call the BeginTransaction() method to specify you are working on performing a series of data modifications. Specifically, you are inserting a new product and a new customer record. Wrap up this code within a try...catch so if anything goes wrong, within the catch block, you can rollback the transaction. However, if everything is successful, you call the CommitTransaction() method on the database context variable.
Listing 10: Create the code to perform a transaction and a commit or rollback
public bool InsertProductAndCustomer()
{
    bool ret = true;

    using AdvWorksDbContext db = new(ConnectString);

    try
    {
        db.BeginTransaction();

        Product product = new()
        {
            ProductName = "Product to Insert",
            ProductNumber = "INS-001",
            Color = "Green",
            StandardCost = 5,
            ListPrice = 25,
            SellStartDate = DateTime.Now
        };

        product = db.Products.Insert(product);

        Customer customer = new()
        {
            CompanyName = "New Customer",
            FirstName = "John",
            LastName = "Doe",
            Title = "Mr.",
            PasswordHash = "Qa3aMCxNq9GZSUxcTM=",
            PasswordSalt = "Ls05W4g=",
            Rowguid = Guid.NewGuid(),
            ModifiedDate = DateTime.Now
        };

        customer = db.Customers.Insert(customer);

        // Commit the Transaction
        db.CommitTransaction();
    }

    catch (Exception ex)
    {
        ret = false;
        Console.Write(ex.ToString());
        // Rollback the Transaction
        db.RollbackTransaction();
    }

    return ret;
}
Try It Out
Open the Program.cs file and add the code shown below to call the InsertProductAndCustomer() method to attempt the transaction.
ProductCustomerViewModel vm = new(ConnectString);

bool isSuccess = vm.InsertProductAndCustomer();

Console.WriteLine("*** Perform a Transaction ***");
// Display Result
if (isSuccess)
{
    Console.WriteLine("Transaction Successful");
}
else
{
    Console.WriteLine("Transaction WAS NOT Successful");
}
Run the application and check the two tables to ensure that both records were inserted correctly.
Validate a Product
In this article, you always specified correct data to insert a product and/or customer. However, when you're asking a user to enter data, all sorts of things can be entered incorrectly. Therefore, good data validation is a must. The goal here is to check the data in each property using a combination of data annotations, and the custom code you write in each repository class. If you find bad data, create an object to report which property is in error as well as the error message to display to the user.
Modify Product Class
Let's add some data annotations to a few of the properties in the Product class to ensure that proper data is entered. Open the Product.cs file and add the [Display] and [Required] attributes to the Id property. The [Display] attribute is typically used for displaying a label on a web page when using MVC, but it's also used as the label to add to any of the data annotations that use placeholders such as the [Required] attribute. In the [Required] attribute, if you specify a {0} placeholder, then the value in the Name property of the [Display] attribute is inserted into that location.
[Key]
[DatabaseGenerated(DatabaseGeneratedOption.Identity)]
[Column("ProductID")]
[Display(Name = "Product Id")]
[Required(ErrorMessage = "{0} must be filled in.")]
public int Id { get; set; }
Modify the ProductName property to add [Display], [Required], and [StringLength] attributes. The [Required] attribute is self-explanatory; the property must be filled in to be valid. The [StringLength] attribute allows you to specify a minimum and maximum length the string value must fall within.
[Column("Name")]
[Display(Name = "Product Name")]
[Required(ErrorMessage = "{0} must be filled in.")]
[StringLength(50, MinimumLength = 3, ErrorMessage = "{0} must be between {2} and {1} characters long.")]
public string ProductName { get; set; }
Modify the ProductNumber property and add [Display], [Required], [StringLength], and [MaxLength] attributes. You don't need to specify both [StringLength] and [MaxLength] attributes, but I want to show you the [MaxLength] attribute. Use [StringLength] attribute when you need both a minimum and maximum lengths, but use [MaxLength] when you only need a maximum length.
[Display(Name = "Product Number")]
[Required(ErrorMessage = "{0} must be filled in.")]
[StringLength(25, MinimumLength = 2, ErrorMessage = "{0} must be between {2} and {1} characters long.")]
[MaxLength(25)]
public string ProductNumber { get; set; }
Modify the Color property and add the [Display] and [StringLength] attributes.
[Display(Name = "Color")]
[StringLength(15, MinimumLength = 3, ErrorMessage = "{0} must be between {2} and {1} characters long.")]
public string Color { get; set; }
Modify the StandardCost property and add the [Display], [Required], [DataType], and [Range] attributes. The [DataType] attribute is generally used for formatting on MVC or other applications that can look at these attributes. The [Range] attribute is useful if you want to enforce the range a numeric or date field can fall within.
[Display(Name = "Standard Cost")]
[Required(ErrorMessage = "{0} must be filled in.")]
[DataType(DataType.Currency)]
[Range(0.01, 9999999, ErrorMessage =  "{0} must be between {1:c} and {2:c}")]
public decimal StandardCost { get; set; }
The ListPrice property should have the same attributes you added for the StandardCost property.
[Display(Name = "List Price")]
[Required(ErrorMessage = "{0} must be filled in.")]
[DataType(DataType.Currency)]
[Range(0.01, 9999999, ErrorMessage = "{0} must be between {1:c} and {2:c}")]
public decimal ListPrice { get; set; }
Add Class to Hold a Validation Message
When you wish to report the error message you gather from the data annotation attributes, you're going to want the property name that's in error, as well as the error message itself. Right mouse-click on the Common folder and add a new class named ValidationMessage to hold this information.
#nullable disable
namespace AdoNetWrapper.Common;
public class ValidationMessage
{
    public string PropertyName { get; set; }
    public string Message { get; set; }
    public override string ToString()
    {
        return $"{PropertyName} - {Message}";
    }
}
Modify RepositoryBase Class
Open the RepositoryBase.cs file and add a new property named ValidationMessages to hold a collection of the ValidationMessage objects.
public List<ValidationMessage> ValidationMessages { get; set; }
Locate the Init() method add code to initialize the ValidationMessages property to a new instance.
ValidationMessages = new();
Validate the Data Annotations
Locate the Validate() method stub you wrote earlier and modify the code to look like Listing 11. The first thing to do is to check whether the entity to be validated is not null. If it isn't, create an instance of a ValidationContext object passing in the entity variable. Create an instance of list of ValidationResult objects, as this collection is filled in when calling the TryValidateObject() method.
Listing 11: The Validate() method uses the ValidationContext class to validate the data annotations
public virtual bool Validate<TEntity> (TEntity entity)
{
    string propName;
    ValidationMessages.Clear();

    if (entity != null)
    {
        ValidationContext context = new(entity);
        List<ValidationResult> results = new();

        if (!Validator.TryValidateObject(entity, context, results, true))
        {
            foreach (ValidationResult item in results)
            {
                propName = string.Empty;
                if (item.MemberNames.Any())
                {
                    propName = item.MemberNames.ToList()[0];
                }
                ValidationMessages.Add(new()
                {
                    Message = item.ErrorMessage,
                    PropertyName = propName
                });
            }
        }
    }

    return ValidationMessages.Count == 0;
}
The TryValidateObject() method is responsible for checking all data annotations attached to each property in the entity object. If any validations fail, the appropriate error message along with the property name is returned in the results variable. Loop through the results collection and add a new ValidationMessage object to the ValidationMessages property. The Message property is filled in with the ErrorMessage property from the current ValidationResult item. The property name is retrieved from the first element of the MemberNames property on the ValidationResult item. It's possible for a data annotation to have two properties to which it applies, but for most simple properties, you only need to grab the first property name.
Try It Out
Open the Program.cs and replace the code to look like Listing 12. A Product object is created with many of the properties set to invalid data so you can see what the error messages look like. Call the new Validate() method to fill in the ValidationMessages property with the properties that have invalid data. Run the application and you should see several validation messages appear in the console window.
Listing 12: Create an invalid object and call the Validate() method
Product entity = new()
{
    ProductName = "a",
    ProductNumber = "NEW-001-A-REALLY-LONG-PRODUCT-NUMBER-TO-TEST-VALIDATION",
    Color = "Red-A-REALLY-LONG-COLOR",
    StandardCost = -1,
    ListPrice = -2,
    SellStartDate = DateTime.Now
};

bool ret = db.Products.Validate(entity);

Console.WriteLine("*** Validation Sample ***");

// Display Result
if (ret)
{
    Console.WriteLine($"Product Validated");
}
else
{
    Console.WriteLine($"Product NOT Validated");
    // Display Validation Messages
    foreach (var item in db.Products.ValidationMessages)
    {
        Console.WriteLine("   " + item);
    }
}
Console.WriteLine();
Add Custom Validations
Microsoft has a limited number of data annotations that you can apply to your properties. You have two choices: You can create your own attributes to perform data checking, or you can write custom validations in the Validate() method of your repository classes. In this article, I'm going to show you how to write custom validations.
Add Validate() Method
Open the ProductRepository.cs file and modify the Validate() method (Listing 13) to call the generic Validate() method in the base class, and then perform your custom validations. Check the value in the StandardCost property to see if it's greater than the value in the ListPrice property. If it is, add the appropriate ValidationMessage object to the ValidationMessages collection. Next, check whether the value in the SellStartDate property is greater than the value in the SellEndDate property. If this condition is true, add a new ValidationMessage object to the ValidationMessages collection. You can continue this process with any other validation you wish to perform.
Listing 13: Use the Validate() method in the ProductRepository to add custom validations
public virtual bool Validate (Product entity)
{
    base.Validate<Product>( entity);

    // Perform any other validation here
    if (entity.StandardCost > entity.ListPrice)
    {
        ValidationMessages.Add(new()
        {
            PropertyName = "StandardCost",
            Message = "Cost must be Less Than the List Price"
        });
    }
    if (entity.SellStartDate > entity.SellEndDate)
    {
        ValidationMessages.Add(new()
        {
            PropertyName = "SellStartDate",
            Message = "Selling Start Date must be Less Than the Selling End Date"
        });
    }

    return ValidationMessages.Count == 0;
}
Try It Out
Open the Program.cs file and change the StandardCost property to 10 and the ListPrice property to 5, which violates the custom code you wrote in the Validate() method.
StandardCost = 10,
ListPrice = 5,
Also, set the SellEndDate property and set it to 5 days in the past, which will also violate the custom code you wrote.
SellEndDate = DateTime.Now.AddDays(-5);
Run the application and you should see the additional two custom validation messages appear in the console window.
Exception Handling
When interacting with a database server, there are a multitude of things that can go wrong. The network may be down, the server may be down, you may have a syntax error in the SQL statement you're submitting, someone might have changed a field name in the table you're trying to access, etc. Although the error messages you get from .NET are sometimes very cryptic, the errors you get from a SQL Server are generally very descriptive.
It's very important when working with ADO.NET that you catch the errors as close to where they are generated as possible. If you rely on .NET to throw the exception up your call stack, you're missing a lot of important information. If you catch the error where you're submitting the command object, you have a lot of information that you can gather for logging purposes. For example, you have the SQL statement, the connection string, the command parameters, all the values you set in those command parameters, and you have the complete call stack of how you got to the call that failed. Having all this information can help you figure out what the error is much quicker.
If you rely on .NET to throw the exception up your call stack, you're missing a lot of important information.
Add a DatabaseException Class
Just like you did with the DatabaseContext and the SqlServerDatabaseContext classes, you're going to build a generic DatabaseException class and a SqlServerDatabaseException class. Most of the code goes into the generic DatabaseException class, but there are few methods you are going to override in the SqlServerDatabaseException class to handle SQL Server-specific exceptions. Right mouse-click on the Common folder and create a new class named DatabaseException, as shown in Listing 14.
Listing 14: The DatabaseException class gathers data from various sources to give us a lot of information about the exception
#nullable disable

using System.Data;
using System.Text;

namespace AdoNetWrapper.Exceptions.Common;

public partial class DatabaseException : Exception
{
    public DatabaseException() : base() { }
    public DatabaseException(string message): base (message) { }
    public DatabaseException(string message, Exception innerException) : base(message, innerException) { }

    public DatabaseException(string message, Exception innerException, IDbCommand cmd) : base(message, innerException)
    {
        CommandObject = cmd;
    }

    public IDbCommand CommandObject { get; set; }
    public string ExceptionType { get; set; }
    public string InnerExceptions { get; set; }
    public string SQL { get; set; }
    public string ConnectionString { get; set; }
    public string ParameterValues { get; set; }
    public bool IsInTransaction { get; set; }

    public virtual void SetAllExceptionInfo()
    {
        return sb.ToString();
    }

    public virtual string GetCommandParameters()
    {
        StringBuilder sb = new(1024);
        return sb.ToString();
    }

    protected virtual string HideLoginInfo(string connectString)
    {
        return "****";
    }

    protected virtual string GetDatabaseSpecificError(Exception ex)
    {
        return string.Empty;
    }

    protected virtual string GetInnerExceptionInfo()
    {
        StringBuilder sb = new(1024);
        return sb.ToString();
    }

    public override string ToString()
    {
        StringBuilder sb = new(2048);
        return sb.ToString();
    }
}
When you inherit from an Exception class, you must provide the appropriate constructors to override the base class and call the matching constructor base class. I've added one additional constructor that accepts a command object. The database-specific error information is gathered from the command object, so it's important to pass this in when a database exception is thrown. The public properties are going to be filled in by calling the various methods that are stubbed out in this listing and by retrieving information from the command object.
Add HandleException() Method to DatabaseContext Class
Before you build the rest of the methods in the DatabaseException class, let's first add a method that can be called to throw a DatabaseException object. Open the DatabaseContext.cs file and add an abstract HandleException() method.
public abstract void HandleException(Exception ex);
Add HandleException() Method to SqlServerDatabaseContext Class
Open the SqlServerDatabaseContext and override the HandleException() method with one to throw an instance of a SqlServerDatabaseException class. To the constructor of this object, pass in the exception message and the exception object itself. And, most importantly, pass in the CommandObject, as that's where you can retrieve the connection string, the SQL, and any parameters that might have caused the error.
public override void HandleException(Exception ex)
{
    throw new SqlServerDatabaseException(ex.Message, ex, (SqlCommand)CommandObject);
}
Call HandleException() Method
You now need to modify just a few key areas within the SqlServerDatabaseContext class. Locate the CreateDataReader() method and wrap a try...catch block around the code that opens the connection and executes the reader. Within the catch block, call the HandleException() method.
public override SqlDataReader CreateDataReader(IDbCommand cmd, CommandBehavior cmdBehavior = CommandBehavior.CloseConnection)
{
    try
    {
        // Open Connection
        cmd.Connection.Open();

        // Create DataReader
        DataReaderObject = cmd.ExecuteReader(cmdBehavior);
    }
    catch (Exception ex)
    {
        HandleException(ex);
    }
    return (SqlDataReader)DataReaderObject;
}
Next, locate the GetLastAutoIncrement() method and wrap a try...catch around the call to the ExecuteScalar() method, as shown in the following code snippet. Within the catch block, call the HandleException() method.
public override void GetLastAutoIncrement<TEntity>(IDbCommand cmd, TEntity entity, PropertyInfo prop)
{
    cmd.CommandText = "SELECT CONVERT(INT, @@IDENTITY);";
    cmd.CommandType = CommandType.Text;
    try
    {
        int? value = (int?)cmd.ExecuteScalar();
        if (value.HasValue)
        {
            prop.SetValue(entity, value, null);
        }
    }
    catch (Exception ex)
    {
        HandleException(ex);
    }
}
There are couple of more methods to modify handle exceptions. Open the RepositoryBase.cs file and locate the ExecuteScalar() method and wrap a try...catch block around the code that opens the connection and calls the ExecuteScalar() method. Call the DbContext.HandleException() method within the catch block.
public virtual object ExecuteScalar(IDbCommand cmd)
{
    object ret = null;
    try
    {
        // Open the Connection
        DbContext.CommandObject.Connection.Open();

        // Call the ExecuteScalar() method
        ret = DbContext.CommandObject.ExecuteScalar();
    }
    catch (Exception ex)
    {
        DbContext.HandleException(ex);
    }
    return ret;
}
Also wrap a try...catch around the code in the ExecuteNonQuery() method as shown in the code snippet below. Again, make sure you call the HandleException() method within the catch block so it can gather the command object from this call.
public virtual int ExecuteNonQuery(IDbCommand cmd)
{
    int ret = 0;
    try
    {
        // Open the Connection
        DbContext.CommandObject.Connection.Open();

        // Call the ExecuteNonQuery() method
        ret = DbContext.CommandObject.ExecuteNonQuery();
    }
    catch (Exception ex)
    {
        DbContext.HandleException(ex);
    }
    return ret;
}
Catching the DatabaseException Object
From within your application, you should always wrap up code that makes database calls in a try...catch block.
try
{
    // ERROR CAUSING CODE
    List<Product> list = db.Database.Search<Product>(cmd);
}
catch (DatabaseException ex)
{
    string msg = ex.ToString();
    Console.WriteLine(msg);
}
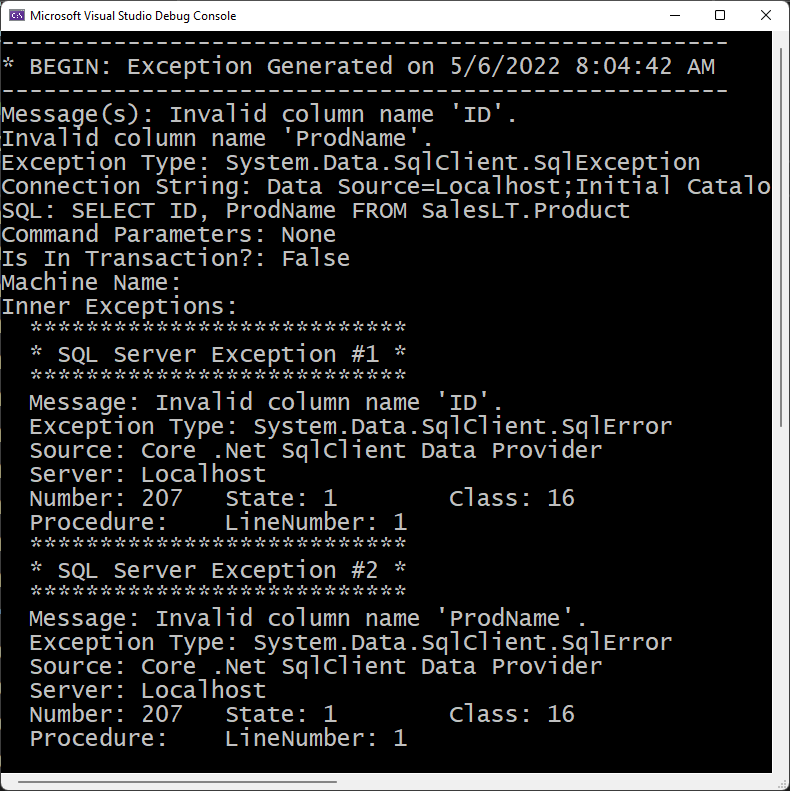
In the catch block, receive a DatabaseException object and call the ToString() method on that object to get back all of the exception information. In the previous code snippet, the ToString() method is called on the DatabaseException object and all the data will come back to you, as shown in Figure 1.
Override the ToString() Method
To build the data shown in Figure 1, you need to build a string of all the exception information you can gather. Open up the DatabaseException.cs file and modify the ToString() method to look like the code in Listing 15. The first thing this method does is call the SetAllExceptionInfo() method. This method calls all the other methods in the exception classes to set all the public properties in this class. These properties are then built into a large string to be returned from this method. Once you have this exception string, log it in a data store so you can look at it later.
Listing 15: Override the ToString() method to return all exception information as a single string
public override string ToString()
{
    StringBuilder sb = new(2048);
    string exDate = DateTime.Now.ToString();
    string dashes = new('-', 52);
    string equals = new('=', 25);

    // Set all exception information properties
    SetAllExceptionInfo();

    sb.AppendLine(dashes);
    sb.AppendLine($"* BEGIN: Exception Generated on {exDate}");
    sb.AppendLine(dashes);
    sb.AppendLine($"Message(s): {Message}");
    sb.AppendLine($"Exception Type: {ExceptionType}");
    sb.AppendLine($"Connection String: {ConnectionString}");
    sb.AppendLine($"SQL: {SQL}");
    sb.AppendLine($"Command Parameters: {ParameterValues}");
    sb.AppendLine($"Is In Transaction?: {IsInTransaction}");
    sb.AppendLine($"Machine Name: {Environment.MachineName}");
    sb.AppendLine($"Inner Exceptions: {InnerExceptions}");
    if (!string.IsNullOrEmpty(StackTrace))
    {
        sb.AppendLine($"{equals}");
        sb.AppendLine($"* BEGIN: Stack Trace Info");
        sb.AppendLine($"{equals}");
        sb.AppendLine(StackTrace);
    }
    sb.AppendLine(dashes);
    sb.AppendLine($"* END: Exception Generated on {exDate}");
    sb.AppendLine(dashes);

    return sb.ToString();
}
Set All Exception Information Method
The method named SetAllExceptionInfo(), Listing 16, is responsible for setting the various public properties in the DatabaseException class. This method first initializes all public properties to an empty string. It then starts filling in each property with information from the command, connection, and transaction objects. It also calls the HideLoginInfo() method to hide any user ID and/or passwords in the connection string. You do not want that information to be logged anywhere. It calls the GetCommandParameters() method to create a string with a list of any parameter names and the values submitted with the SQL. Finally, it calls the GetInnerExceptionInfo() method to look at the current exception and see if there is more information in the InnerException property that should be gathered.
Listing 16: Call SetExceptionInfo() method to gather all the exception information
public virtual void SetAllExceptionInfo()
{
    ExceptionType = string.Empty;
    ConnectionString = string.Empty;
    InnerExceptions = string.Empty;
    SQL = string.Empty;
    ParameterValues = string.Empty;

    ExceptionType = InnerException.GetType().FullName;
    if (CommandObject != null)
    {
        IsInTransaction = CommandObject.Transaction != null;
        if (CommandObject.Connection != null)
        {
            ConnectionString = HideLoginInfo(CommandObject.Connection.ConnectionString);
        }
        SQL = CommandObject.CommandText ?? "";
        ParameterValues = GetCommandParameters();
    }
    InnerExceptions = GetInnerExceptionInfo();
}
Get Inner Exception Information Method
The GetInnerExceptionInfo() method (Listing 17) calls the GetDatabaseSpecificError() method to retrieve database provider specific error information if any exists. If no database-specific error information exists, it returns the inner exception information from the exception object. The GetDatabaseSpecificError() method is overridden in the SqlServerDatabaseException class, or any other database specific exception class.
Listing 17: Return database-specific error information or just the inner exception information
protected virtual string GetInnerExceptionInfo  ()
{
    StringBuilder sb = new(1024);
    Exception ex;
    int index = 1;

    ex = InnerException;
    while (ex != null)
    {
        sb.AppendLine();

        // Is exception a database-specific error?
        string dbSpecific = GetDatabaseSpecificError(ex);

        // If no database-specific error, get normal exception info
        if (string.IsNullOrEmpty(dbSpecific))
        {
            sb.AppendLine($"  {new('*', 23)}");
            sb.AppendLine($"  * Inner Exception #{index} *");
            sb.AppendLine($"  {new('*', 23)}");
            sb.AppendLine($"  Message: {ex.Message}");
            sb.AppendLine($"  Type: {ex.GetType().FullName}");
            sb.AppendLine($"  Source: {ex.Source}");
            index++;
        }
        else
        {
            sb.Append(dbSpecific);
        }

        // Get next inner exception
        ex = ex.InnerException;
    }

    return sb.ToString();
}
Get All Command Parameter Values Method
If there are parameters in the command object when an exception is thrown, the information in the parameter objects can be very useful. The GetCommandParameters() method, Listing 18, loops through all command parameters and retrieves the ParameterName property and the Value property to build a string that looks something like the following.
@Name = C
@ListPrice = 50
Listing 18: Get the parameter name and value from the parameters in the command object
protected virtual string GetCommandParameters()
{
    StringBuilder sb = new(1024);

    if (CommandObject != null && CommandObject.Parameters != null)
    {
        foreach (IDbDataParameter param in CommandObject.Parameters)
        {
            sb.Append($"  {param.ParameterName}");
            if (param.Value == null || param.Value == DBNull.Value)
                sb.AppendLine(" = null");
            else
                sb.AppendLine($" = {param.Value}");
        }
    }

    if (string.IsNullOrEmpty(sb.ToString()))
    {
        return "None";
    }
    else
    {
        return sb.ToString();
    }
}
If the Value property is a null or a DBNull.Value for the current parameter, the string "= null" is returned. If no parameters are found in the command object, then the string "None" is returned from this method.
Hide Login Information Method
You don't want to display or log any security information contained within the connection string. If a user ID or a password exists in a connection string, it needs to be removed. Within the DatabaseContext class, you're never going to show the connection string at all; you only return asterisks. This method is meant to be overridden in your database-specific exception class so you can filter out the user ID and password there.
Get Database-Specific Error Method
Each database provider has specific exception classes that are used to report errors. The method in the DatabaseException class always returns an empty string. This method is meant to be overloaded within your database-specific exception class.
Add a SQL Server Database Exception Class
If you're using SQL Server as your database, you need a SqlServerDatabaseContext and a SqlServerRepositoryBase class. You also need one more SQL Server-specific class named SqlServerDatabaseException. If you need to access an Oracle database, you're going to have to create three Oracle-specific classes and override the same methods as you have done so far for SQL Server. Right mouse-click on the Common folder and add a new class named SqlServerDatabaseException. Into this new file, add the code shown in Listing 19. You need the same constructors as for the DatabaseException class you created earlier. Each of these constructors should call the ones in the DatabaseException base class. There are two methods to override in this class, HideLoginInfo() and GetDatabaseSpecificError(). For now, just stub them out as shown in Listing 19.
Listing 19: The SqlServerDatabaseException class gathers SQL Server specific information about the exception
#nullable disable

using System.Text;
using System.Data.SqlClient;

namespace AdoNetWrapper.Common;

public class SqlServerDatabaseException: DatabaseException
{
    public SqlServerDatabaseException(): base() { }
    public SqlServerDatabaseException(string message) : base(message) { }
    public SqlServerDatabaseException(string message, Exception innerException) : base(message, innerException) { }
    public SqlServerDatabaseException(string message, Exception innerException, SqlCommand cmd) : base(message, innerException, cmd) { }

    public override string HideLoginInfo(string connectString)
    {
        SqlConnectionStringBuilder sb = new(connectString);
        return sb.ConnectionString;
    }

    protected override string GetDatabaseSpecificError(Exception ex)
    {
        StringBuilder sb = new(2048);
        return sb.ToString();
    }
}
Override the HideLoginInfo() Method
You could do some string parsing in the HideLoginInfo() method contained in the DatabaseContext class, but there are many different kinds of connection strings and the code would get very messy. If you override this method in your database-specific exception classes, you can use the appropriate ConnectionStringBuilder class that each database provider supplies. Locate the HideLoginInfo() method in the SqlServerDatabaseException class and use the SqlConnectionStringBuilder class to replace the user ID and password properties with asterisks. When you then return the ConnectionString property from this method, your user ID and password won't be displayed or logged anywhere.
protected override string HideLoginInfo(string connectString)
{
    SqlConnectionStringBuilder sb = new(connectString);
    if (!string.IsNullOrEmpty(sb.UserID))
    {
        sb.UserID = "****";
    }
    if (!string.IsNullOrEmpty(sb.Password))
    {
        sb.Password = "****";
    }
    return sb.ConnectionString;
}
Override the GetDatabaseSpecificError() Method
The database-specific ADO.NET providers supply a specific exception from which they gather information from a database, such as SQL Server or Oracle. When using SQL Server, a SqlException object is generated with lots of great information such as the SQL Server-specific error number, the server name, the procedure name (if applicable), and the line number within the procedure that was in error. Locate the GetDatabaseSpecificError() method and replace the code you stubbed before with the code shown in Listing 20. If you're using Oracle, Progress, or SQLLite, the properties available on those specific exceptions might vary, thus, you will probably write slightly different code in this method.
Listing 20: Override the GetDatabaseSpecificError() method to retrieve SQL Server specific error information
protected override string GetDatabaseSpecificError(Exception ex)
{
    StringBuilder sb = new(2048);

    if (ex is SqlException exp)
    {
        for (int index = 0; index <= exp.Errors.Count - 1; index++)
        {
            var current = exp.Errors[index];
            sb.AppendLine($"  {new('*', 27)}");
            sb.AppendLine($"  * SQL Server Exception #{index + 1} *");
            sb.AppendLine($"  {new('*', 27)}");
            sb.AppendLine($"  Message: {current.Message}");
            sb.AppendLine($"  Exception Type: {current.GetType().FullName}");
            sb.AppendLine($"  Source: {current.Source}");
            sb.AppendLine($"  Server: {current.Server}");
            sb.Append($"  Number: {current.Number.ToString()}");
            sb.Append($"\tState: {current.State.ToString()}");
            sb.AppendLine($"\tClass: {current.Class.ToString()}");
            sb.Append($"  Procedure: {current.Procedure}");
            sb.AppendLine($"\tLineNumber: {current.LineNumber.ToString()}");
        }
    }

    return sb.ToString();
}
Try It Out
Now that you have all the code written to gather exception information, write some code to generate an error so you can test your exception handling. Open the Program.cs file and add a couple of Using statements at the top of the file.
using AdoNetWrapper.Common;
using System.Data;
Write the code shown in Listing 21 to try out the exception handling. In this code, create a SELECT statement that has two invalid column names. Place this SQL statement into a command object and submit that command using the Search() method. Wrap the call to the Search() method into a try...catch block. Catch a DatabaseException object in the catch block and call the ToString() method on the exception to gather the exception information into a string that you can display on the Console window. Run the application to generate the exception information and you should see output like that shown in Figure 1.
Listing 21: Create a bad SQL statement and submit to the database to generate an exception
using AdvWorksDbContext db = new(ConnectString);

IDbCommand cmd= db.CreateCommand("SELECT ID, ProdName FROM SalesLT.Product");

try
{
    List<Product> list = db.Database.Search<Product>(cmd);

    Console.WriteLine("*** Exception Sample ***");
    // Display Data
    foreach (var item in list)
    {
        Console.WriteLine(item.ToString());
    }
    Console.WriteLine();
    Console.WriteLine($"Total Items: {list.Count}");
    Console.WriteLine();
    Console.WriteLine($"SQL Submitted: {db.Products.SQL}");
    Console.WriteLine();
}
catch (DatabaseException ex)
{
    string msg = ex.ToString();
    Console.WriteLine(msg);
    System.Diagnostics.Debug.WriteLine(msg);
}
catch (Exception ex)
{
    Console.WriteLine(ex.ToString());
}
Summary
In this article series, you created a set of wrappers around ADO.NET that you can use to significantly reduce the amount of code you have to write to perform CRUD operations. All these classes can be put into a class library and reused on many different projects. For each table in a database that you need to interact with, you only need to create small Repository, Entity, and Search classes to be able to search, insert, update, and delete data. These classes are not a full ORM, but the amount of code you need to write is very similar to that of an ORM.
