


In my previous article (https://www.codemag.com/Article/2201021/The-Basics-of-Git">https://www.codemag.com/Article/2201021/The-Basics-of-Git), I embarked on a journey to describe Git to the completely uninitiated. When I write such articles, it amazes me to no end how much knowledge and background we take for granted. Git is such a fundamental skill that almost every developer needs to know it. Yet it is also one of the top items that developers complain about. It made sense to pick this topic up, and in my first article, I looked at the absolute basics of Git. I started with introducing it, installing it, configuring it, and getting basic help from command line. Then you learned how to initialize a Git repo, commit, and modify code to it. You understood the basics of branches and merges, and how you can use the .gitignore file. And finally, I wrapped everything up with some basics around how diff works with Git.
In this article, let’s further your knowledge with some practical working tricks and tips that involve both Git and GitHub.
Stashing Changes
Context switching for developers is hard. You’re deep in code, balancing the delicate cards of logic on quicksand in your dimensions of mind, and BOO! Cats and yarn everywhere. All it takes is an IM or doorbell. We’ve all been there. Seriously, I deal with this daily. When we’re all working from home, I can’t exit Teams or Outlook. So how do I focus and not miss calendar appointments or IMs?
That’s the problem Git stash intends to solve. It lets you easily save your current state of work, do whatever else, and come back to where you were.
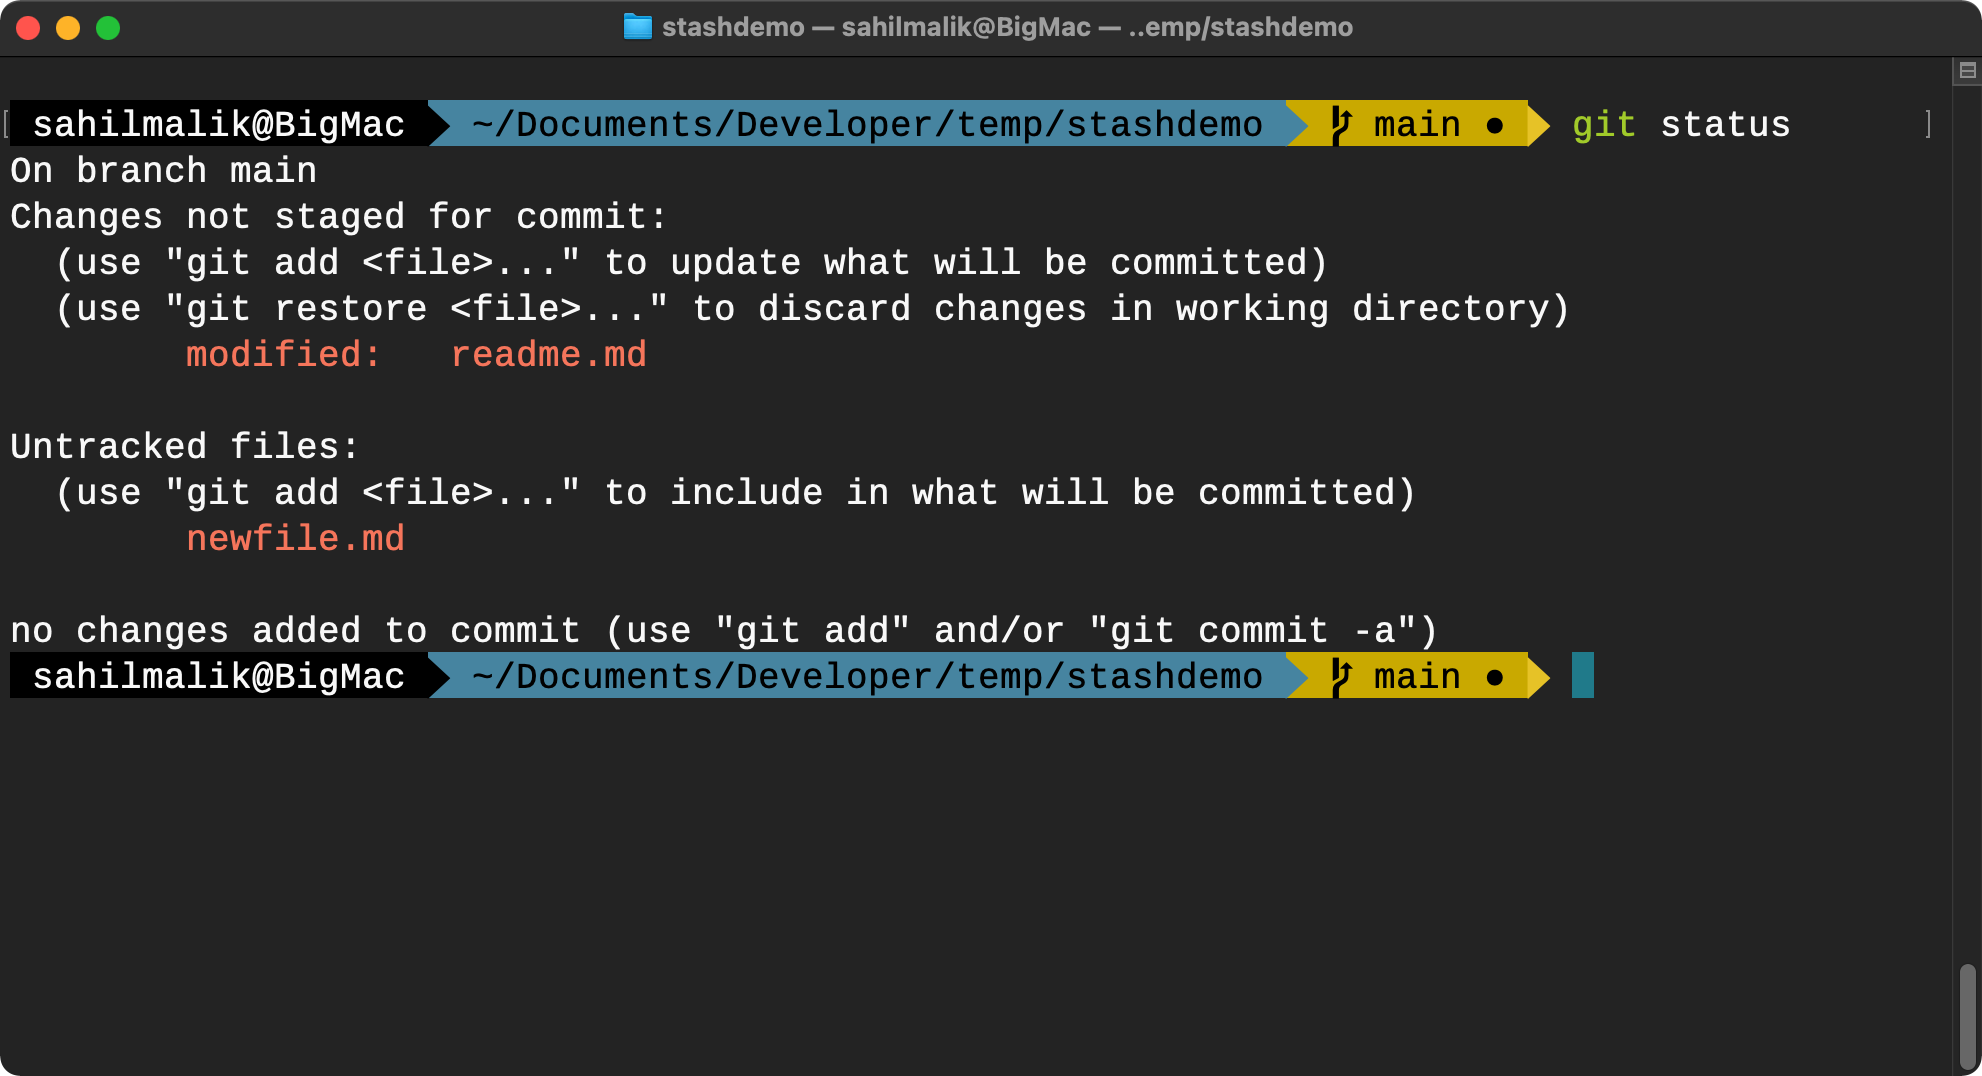
Let’s see how it works. I have a Git repo with one file "readme.md" and everything is clean and committed. Now, I add a new file, let’s say newfile.md, as follows:
echo "this is a new file" > newfile.md
I’ll also append some content to the readme.md as follows:
echo "more content" >> readme.md
You can see the current status of my Git repo in Figure 1.
Now let’s say you were deep in this code and you suddenly need to context switch. You simply issue the following command:
git stash
You have now "stashed away" your staged and unstaged changes. Now you can change branches, create new commits, or do anything else. Now, if I type git status, it should tell me that newfile.md is an untracked file, and that’s all.
Sometimes you may wish to stash only some files. To do so, you need to pass the -p or --patch option to the Git stash command. By doing so, Git will ask you if you wish to stash or not for each file.
Stashing Untracked Files
Remember that untracked files are files dropped into the folder—not being tracked by Git. So the stash operation, or for that matter, many other Git commands, treats them as not part of Git—they are untracked. You should keep this in mind and not inadvertently miss any work.
If you wish to have new files be part of the stash, you’ll need to stage them first. Yes, that’s not ideal. So Git stash gives you an option to include untracked files in the stash as follows
git stash -u
When you’re ready to come back, you pick up your stash and start working with it. You can either choose to "pop" a stash or "apply" a stash. To pop a stash, you’d issue a command git stash pop. Popping a stash removes it from the stash and reapplies it to the working copy. If you wish to apply but keep them in the stash, you’d choose git stash apply. Apply is useful if you wish to pick changes from one branch and apply them to another, while not losing the work in the original branch.
Multiple Stashes
What if you want to play around with multiple stashes?
You can choose to do so by issuing multiple git stash commands. To make things a bit more meaningful, you can choose to add a message with your stash as follows:
git stash save "this is valuable work"
Then you can look at all the stashes using the following command:
git stash list
And you can choose to apply a specific stash as follows:
git stash pop stash@{1}
At any point, you can choose to remove a specific stash using the git stash drop command:
git stash drop stash@{1}
Or you can simply clear all stashes using the clear command:
git stash clear
Creating a Branch from a Stash
Has it ever happened that you did a bunch of changes in the main/master branch only to wish you had done those in a branch instead? Or perhaps you’re trying out various concepts, but at some point you decide, hmm, I wish to separate this work out in a branch.
This is where creating a branch out of a stash is helpful. Let’s say you’ve been playing around with code and have a few stashes ready to go. You can view these stashes using git stash list. You decide that the stash@{1} is worth separating into its own branch. Here is how you’d do it:
git stash branch newbranch stash@{1}
By running this command, a new branch gets created and the specified stash gets popped to the new branch.
Collaboration
So far, everything I’ve talked about has been for a single user scenario. That’s not how most of your projects will be. By its very definition, source code, especially open source, is intended to be collaborative. In this article, I’ll talk about how multiple users can work together in Git. You’ll use GitHub and understand the fundamentals of authentication, and set up a new user from scratch. Then you’ll use this new user, along with an existing user account, and see how this new user and old user can work together collaboratively. Let’s switch gears now and understand how multiple users can work collaboratively using Git.
Remote
When you work with a Git repository, you’re typically working with a local repository on your disk. Git is designed to give you the full power of Git, while being completely disconnected. This means that you can version control, stashing, branching, log history, all that good stuff, without ever involving a server. But if you wish to collaborate, you’ll need a "remote" location that points to a Git repo somewhere in the cloud on a server that understands the Git protocol.
When you wish to get stuff from that remote repo, or send stuff to that remote repo, it’s a conscious decision that you need to make as a developer. Typically, you’d commit stuff locally, and say, push to send stuff up. Or you would do a fetch or pull to get stuff from the cloud to your local computer.
This remote repo is exactly what we mean by "remote" in Git. And Git gives you a convenient command called "remote" to work with your remotes.
In any Git repo, run the following command to see where your remotes lie:
git remote -v
There is a special remote called the origin that refers to the location you have cloned your repo from.
Typically, if you wish to clone a repo, you’d use the git clone command. For instance, let’s say I have a coworker called maliksahiltest. He happens to have a Git repo at https://github.com/maliksahiltest/test. This is a public repo, so although I don’t have access to write to it, I can clone it as maliksahil on a different computer. In order to clone it, I’ll visit the GitHub repo and use the SSH URL, which you can see in Figure 2.
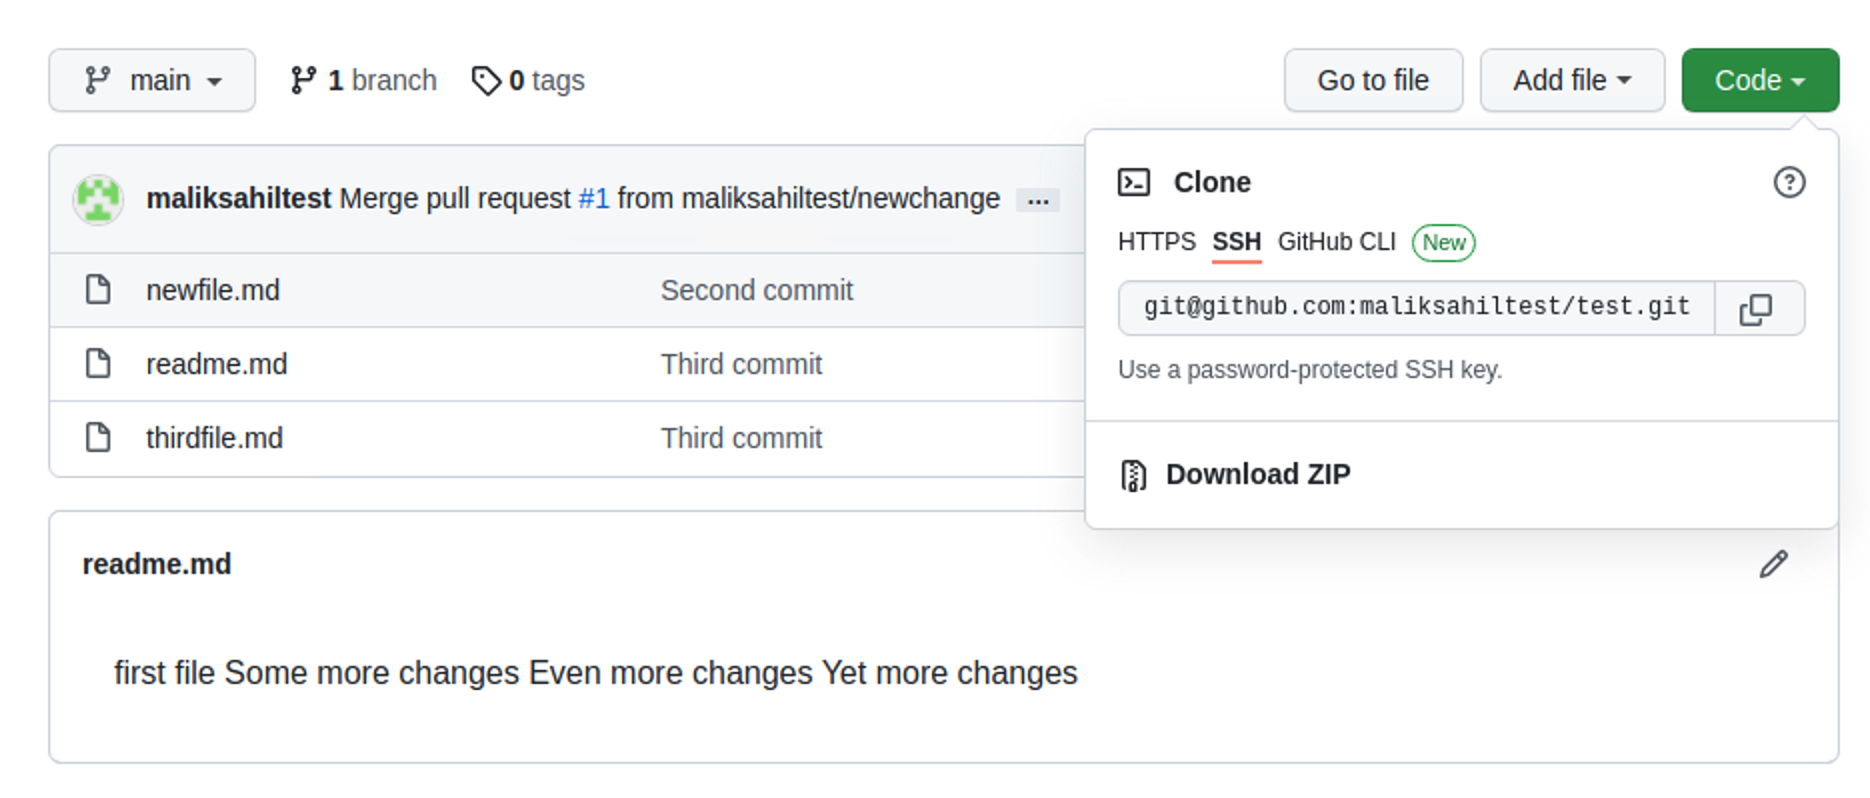
To clone, I simply use the following command:
git clone git@github.com:maliksahiltest/test.git
Remember, I ran this command as maliksahil, but since the repo is public, I was able to clone it.
Now in this repo, I check remotes and it shows me the output, as shown in Figure 3.

Note that there are two remote URLs here. One for fetch, another for push. They’re both for the remote origin. In most scenarios, the fetch and push URLs are the same. But sometimes you have a triangular workflow. I’ll touch upon this in a moment when I talk about forking, but perhaps maliksahil wishes to make edits, but maliksahiltest is someone far away and maliksahil and maliksahiltest have never really talked with each other. maliksahil wishes to propose a change. In order to do so, maliksahil can fork the repo in their own GitHub account, make changes there, and submit a pull request for maliksahiltest to merge. In this case, maliksahil would want to pull changes from maliksahiltest’s repo, but push changes to maliksahil’s repo. Confused yet? I’ll explain this more clearly when I talk about forking. But for now, just know that sometimes, the fetch and push URLs can be different.
Fetching vs. Pulling
Now, logged in as maliksahiltest, make a change.
On the main branch, modify a file.
echo "some change" >> readme.md
Ensure that you Git add and commit and push.
git commit -am "some change" && git push
Hang on, did you notice something interesting? I used a special way to commit using the -am input flag. This shorthand lets me add and commit in one go. We are learning new cool stuff all the time.
Now, log in as maliksahil. You may be thinking, how am I switching users so easily? Well, I have two docker containers. But you can use two virtual machines as well.
As maliksahil, first execute git fetch, followed by git pull. Observe the output closely, as seen in Figure 4.
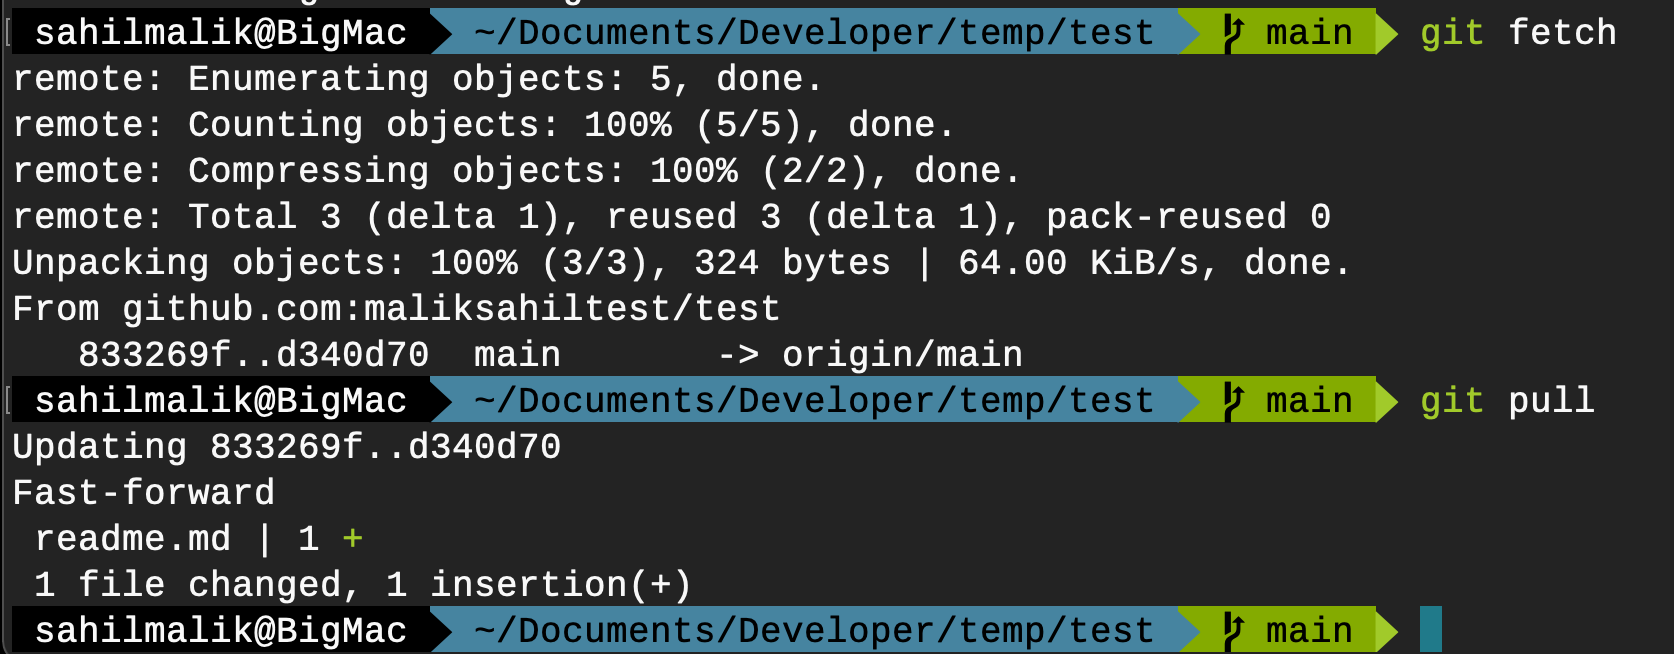
Notice a difference between fetch and pull? Fetch merely told my local Git to retrieve the latest information but doesn’t update any files. Pull, on the other hand, is fetch plus get the new changes.
Invite Users to Collaborate
Now, while logged in as maliksahil, make some code change to readme.md, and attempt to push. This operation can be seen in Figure 5.
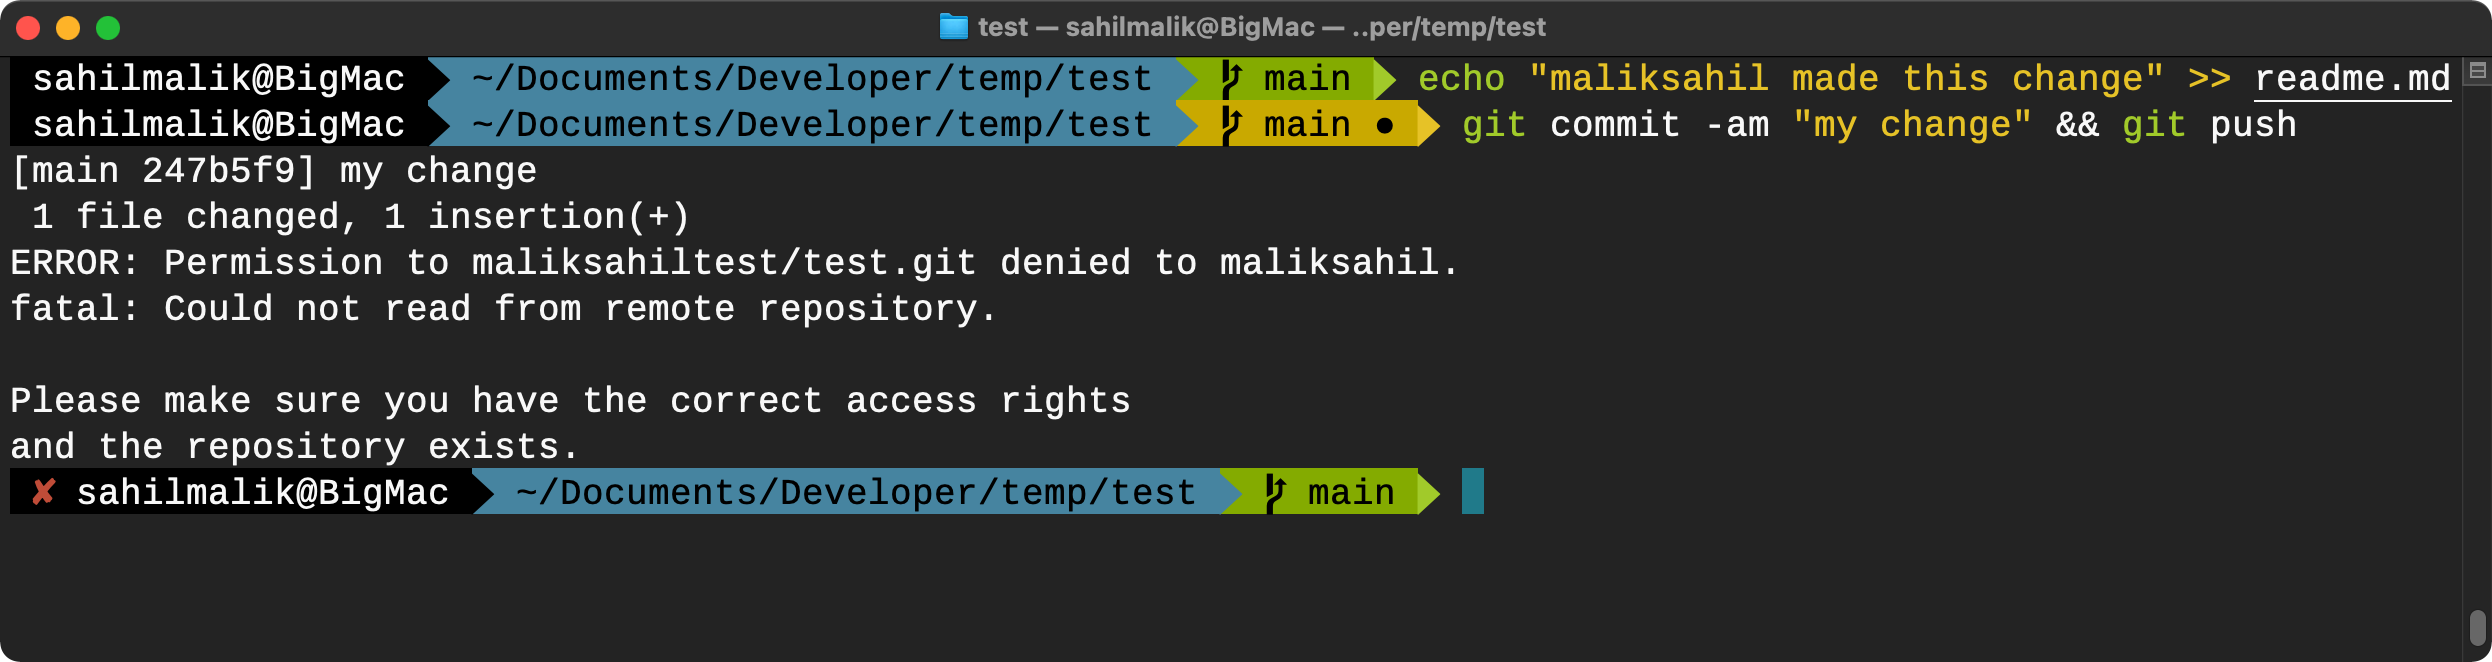
As you can see from Figure 5, maliksahil was unable to push changes to maliksahiltest’s repo. Okay, this makes sense. At no point did maliksahiltest grant maliksahil permissions to edit the repo. How would you feel if anyone in the world could just make changes to your code? Github.com and most other source providers come with a rich set of permissions and collaboration features.
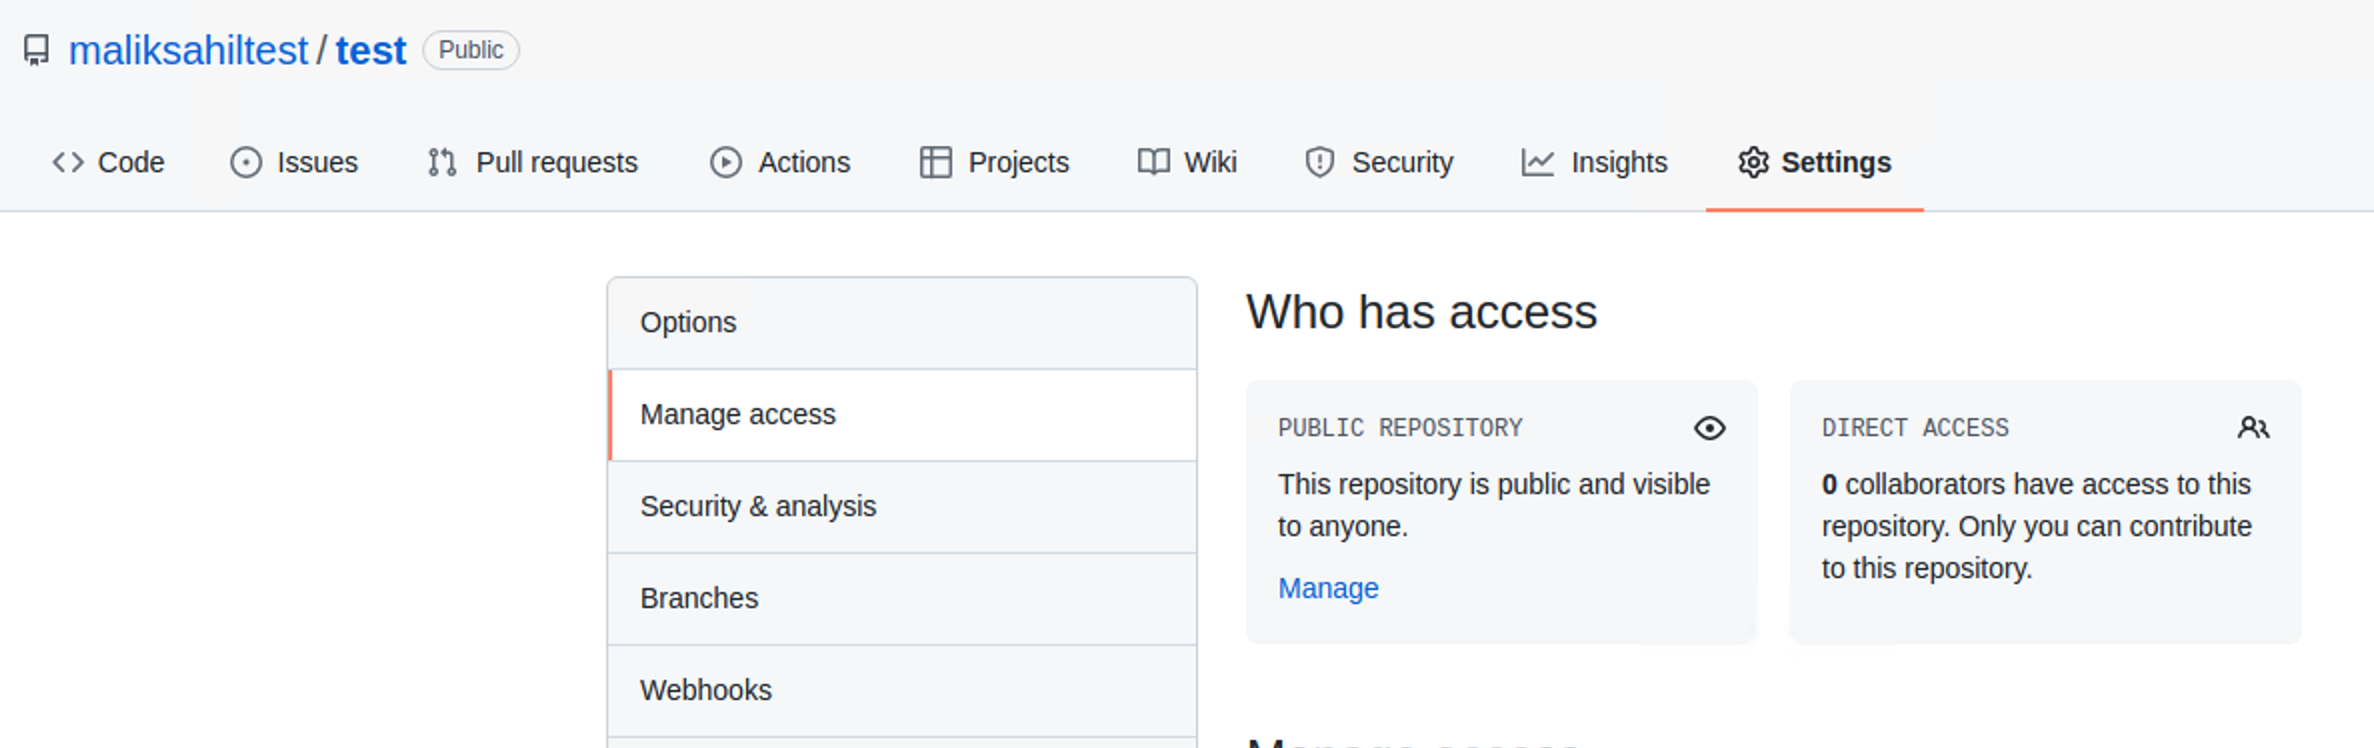
In order to grant access, logged in as maliksahiltest, visit, https://github.com/maliksahiltest/test/settings/access. Note that you’ll have to modify the URl accordingly. You can also get here by clicking on Settings in your Git repo, and go to Manage access, as can be seen in Figure 6.
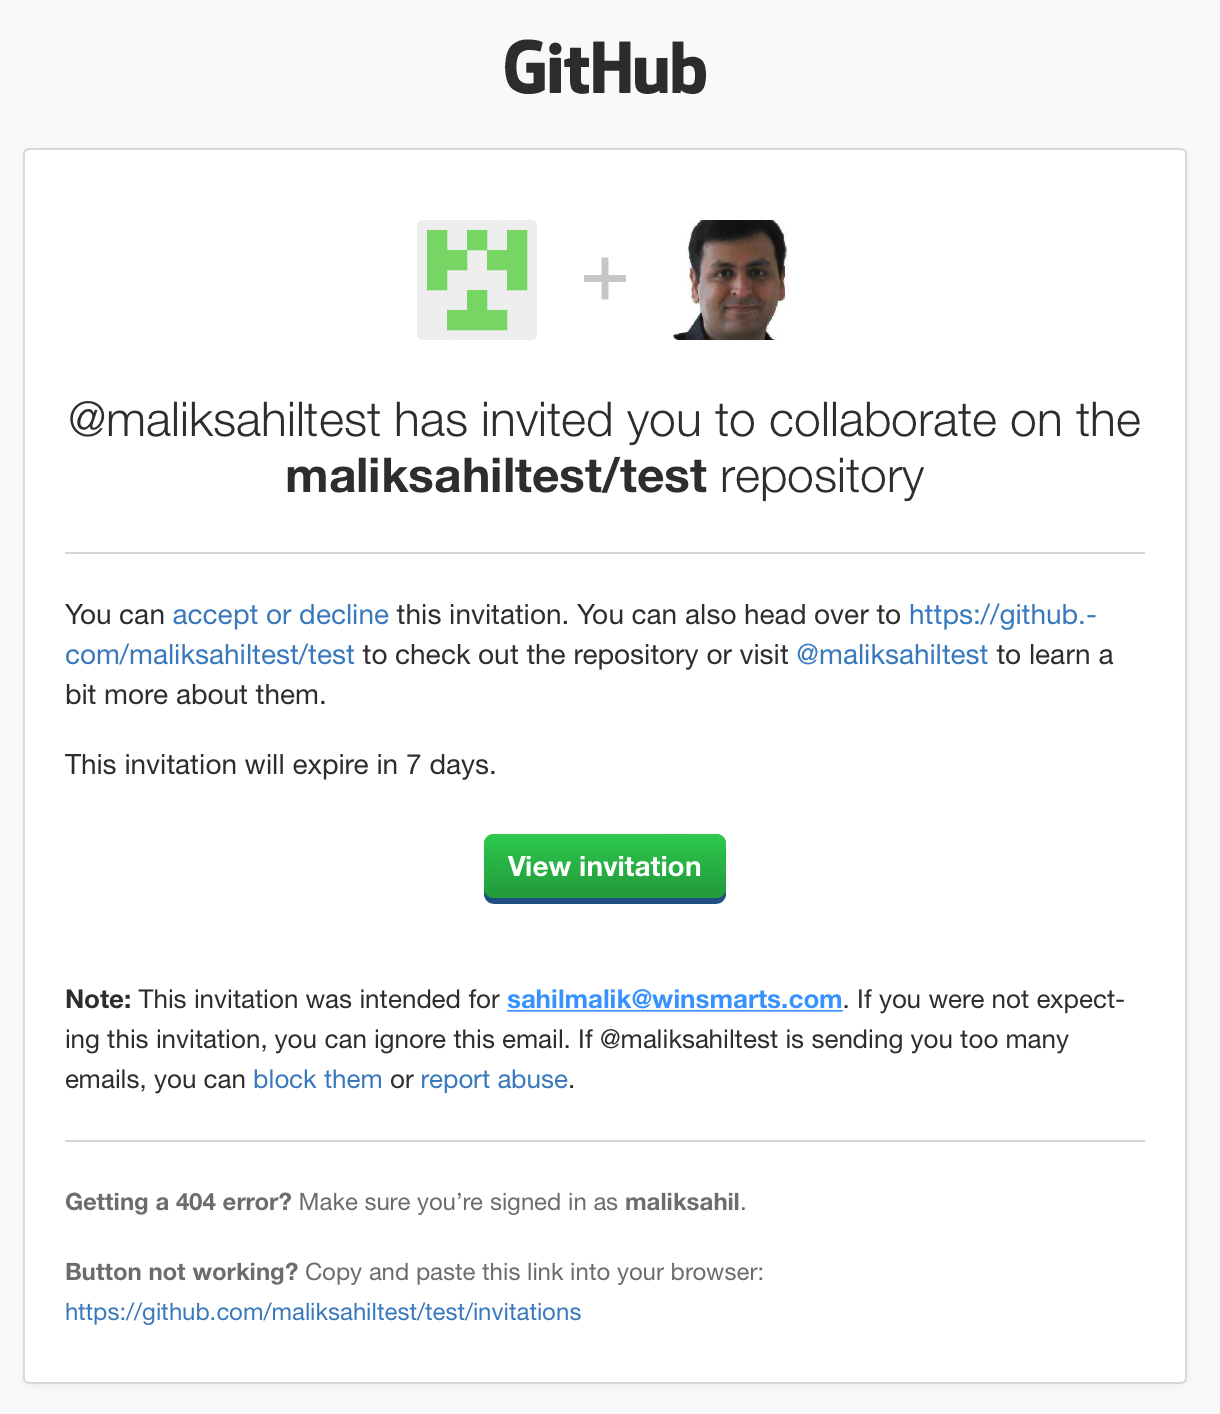
Here, choose to add the GitHub user account you wish to collaborate with, in my case maliksahil. At this point, maliksahil will get an email prompting him to accept the invite. This can be seen in Figure 7.
Choose to view and accept the invite. Once you have accepted the invite, re-attempt to push your changes using git push. This time your changes should succeed.
This is quite amazing. Just sit back and think about how cool this is. Two developers, at random locations around the world, can now work in a disconnected fashion, and this was free. Of course, you can pay for additional features, but it’s pretty amazing that we can get this far for absolutely free.
Forking and Merging
Now, let’s see an alternate way of two developers working together. In this scenario, maliksahiltest and maliksahil don’t know each other, and maliksahiltest hasn’t taken the step of adding a collaborator. The first thing you need to do is go to https://github.com/maliksahiltest/test/settings/access, and remove maliksahil’s access.
Now imagine a scenario where maliksahiltest/test is an amazing open source project. But maliksahil has discovered a bug in it. maliksahil wishes to make a code change and propose a fix.
If maliksahil had the rights to push changes directly into maliksahiltest’s Git repos, you’d be all set. But that’s not the case here. So the first thing maliksahil has to do now is to fork the repo.
In order to do so, logged in as maliksahil, visit https://github.com/maliksahiltest/test. Here on the top right-hand side, look for the Fork button, as seen in Figure 8. Go ahead and click on it.

When you click on it, you may be asked where you wish to fork this repo to. Go ahead and choose to fork it into your account, in this case maliksahil. In a moment, the repo will be forked from https://github.com/maliksahiltest/test to https://github.com/maliksahil/test. Think of it this way, a copy has been made of this repo in your area, with a pointer to the original repo. Now, you can bring changes in from the original repo while pushing changes to your "copy" or forked repo. And when you wish to submit changes back to the original source, you simply issue a pull request.
Let’s see this in action.
Logged in as maliksahil, go ahead and clone https://github.com/maliksahil/test. In the real world, even within maliksahil/test, I should create a branch and do my work via pull requests and merges, but I’ll take a shortcut for brevity’s sake and stick with the main branch. So as maliksahil, make a small edit to your repo, and push the changes back to maliksahil/test in the cloud.
echo "change done by maliksahil" >> readme.md
git commit -am "new change" && git push
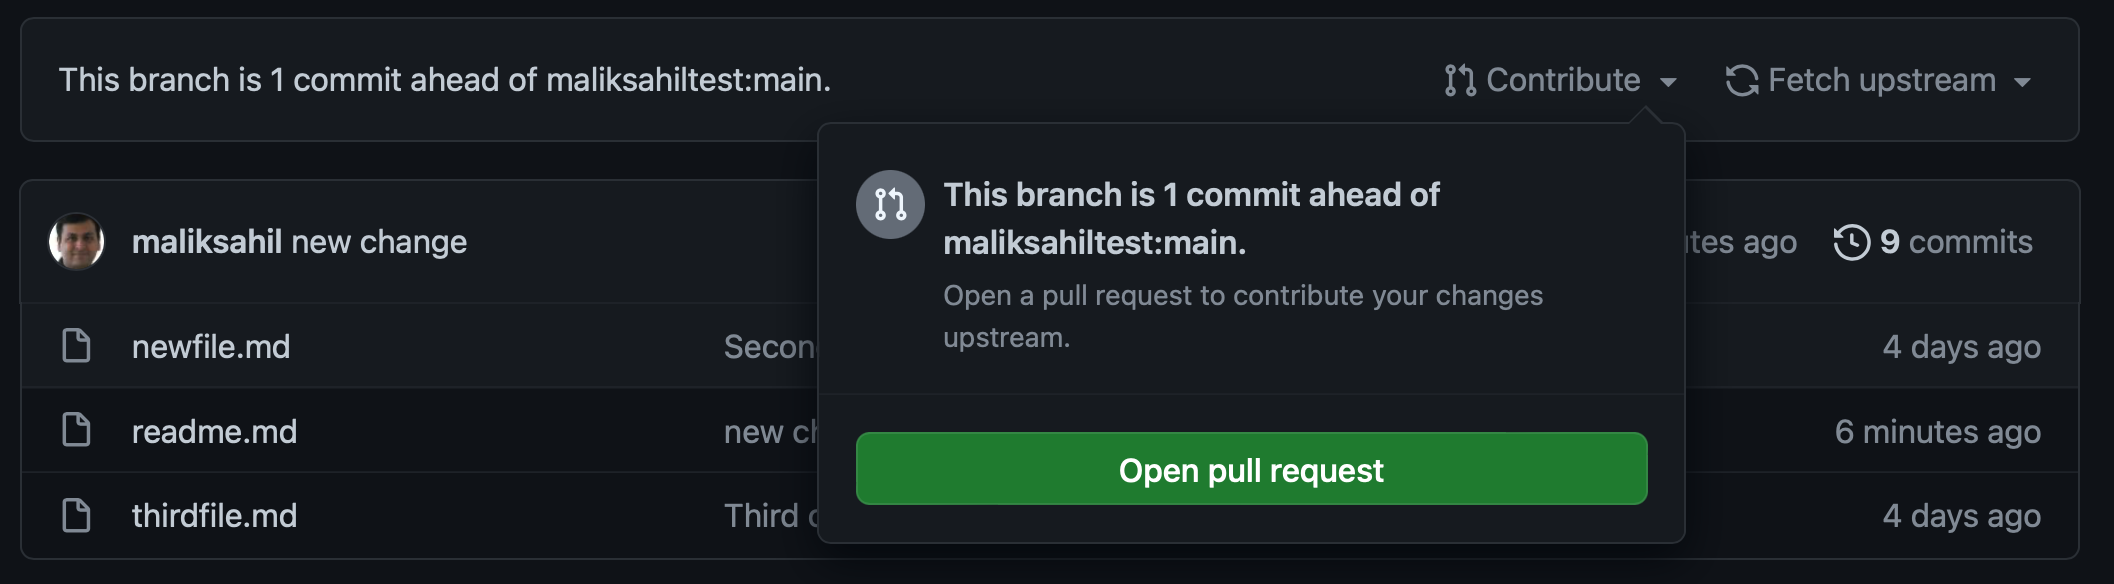
Now, logged in as maliksahil, visit https://github.com/maliksahil/test in the browser. You should see a new bar appear on top of the repo. This can be seen in Figure 9.
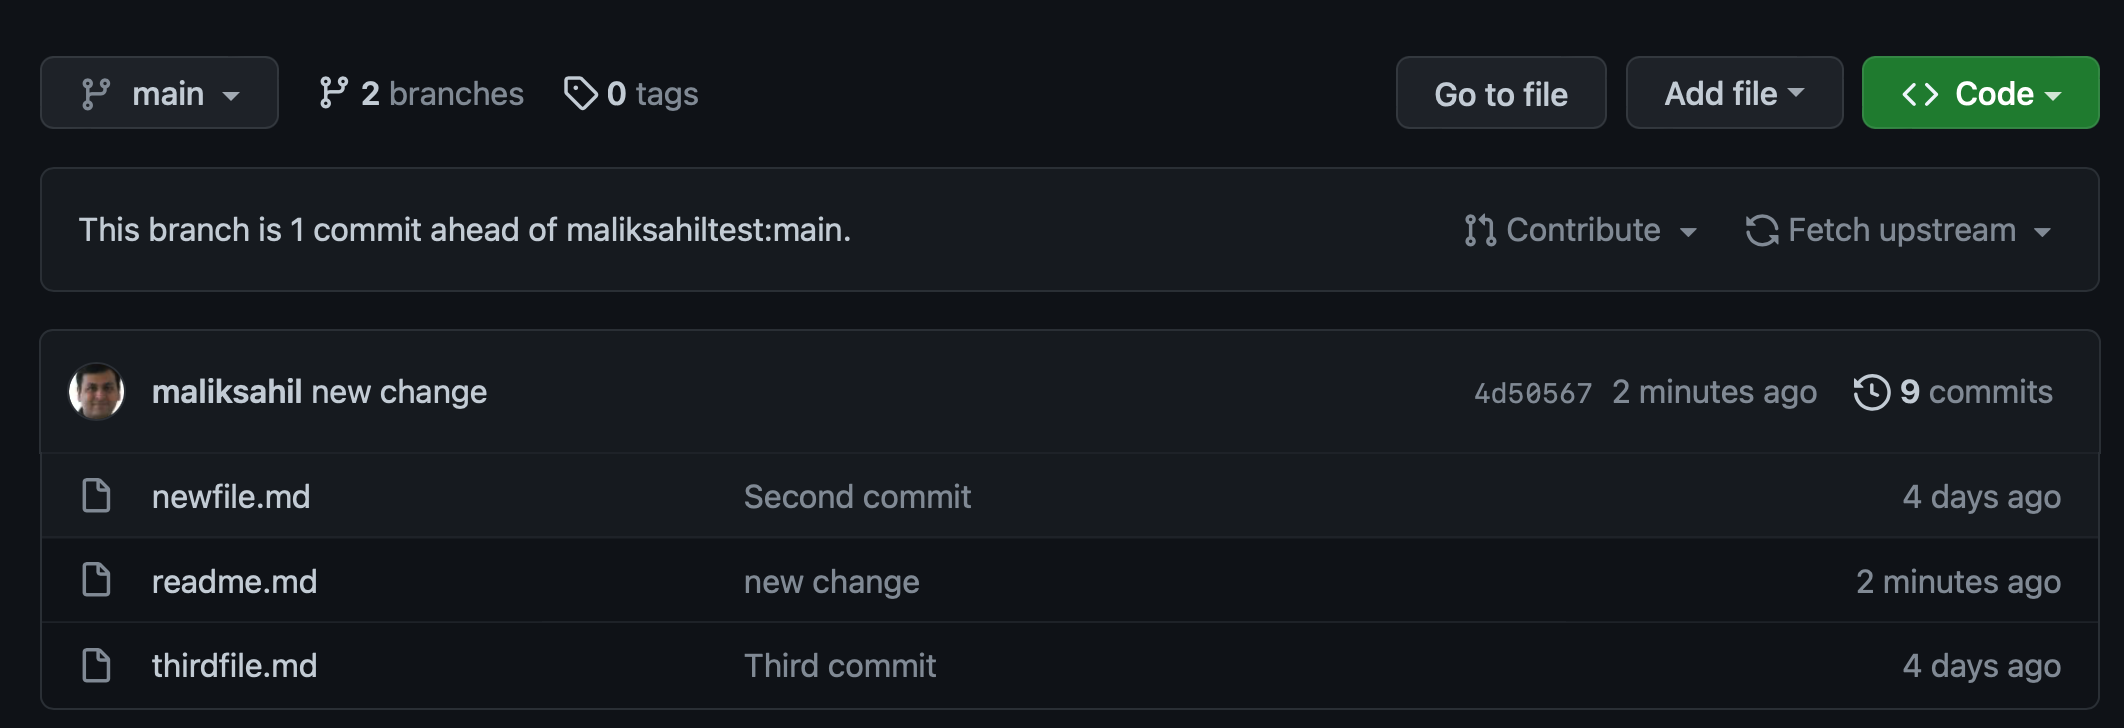
There are two buttons at the top. One asks you to contribute back to the original repo. The idea is that you forked the repo, you made a change, so do you feel this change should go to the original repo you forked from? If so, go ahead and create a pull request.
The second button that says "Fetch upstream" is Git’s way of you telling you that other developers have made changes to the source repo you forked from. Do you wish to bring changes from the original repo into your fork? This makes sense, because if you’re writing code, you want to make sure your submission reflects the latest picture.
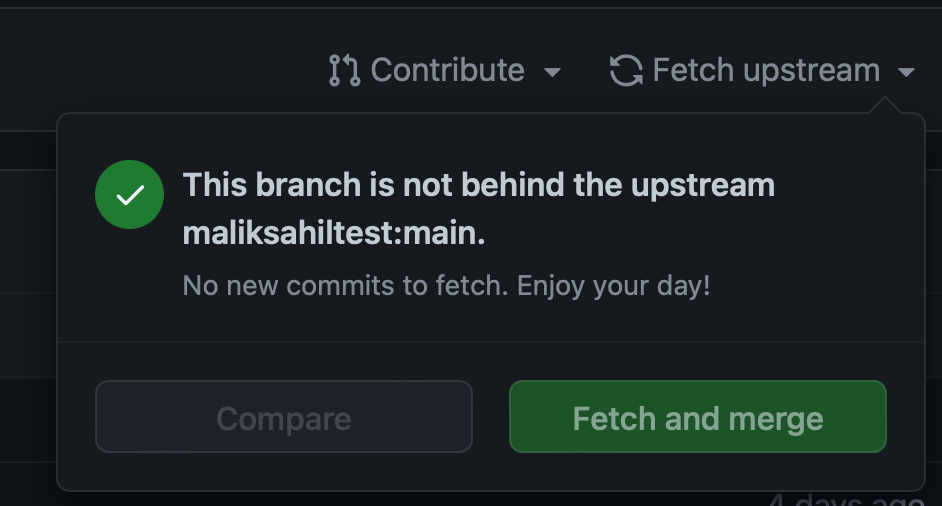
As of now, you know that maliksahiltest hasn’t made any changes to the source repo. So the "Fetch upstream" button looks like Figure 10.
You can certainly contribute back to the source via a PR (pull request). Logged in as maliksahil, click on the "Contribute" button and choose to create a pull request. This can be seen in Figure 11. This is maliksahil saying, "I’m done with my changes, and because I don’t have the rights to directly make changes to the source, I’m requesting that someone with rights (maliksahiltest) can merge my PR." The user interface for creating a PR is quite similar to what you have already seen in my previous article on Git.
Once the PR is created, log in as maliksahiltest and visit https://github.com/maliksahiltest/test/pulls. Here you should see the user interface to complete and merge the PR. By doing so, maliksahil’s changes are now part of the original repo. When the PR is merged by maliksahiltest, maliksahil is informed that the PR is now closed and merged. Alternatively, the developers (maliksahil and maliksahiltest) can comment on the files changed and submit further changes to the same PR.
Triangular Workflow and Conflicts
What you just saw in merging and forking was the happy path. In the real world, especially on large repos, you’ll see many thousands of developers contributing to the code base. The problem this creates is that when you submit a PR, frequently your code is out of date. You need a convenient way of keeping up to date with what’s going on in the source. This is the spirit behind triangular workflows when working with open-source repos.
Triangular workflow means:
- You fetch from upstream to keep your local repository up to date., In this case, that would be maliksahiltest/test.
- When you want to contribute back, you push them to your fork (maliksahil/test), and you open a pull request.
- And if the maintainer of the upstream agrees with your changes, they can merge the changes.
This can be seen in Figure 12.
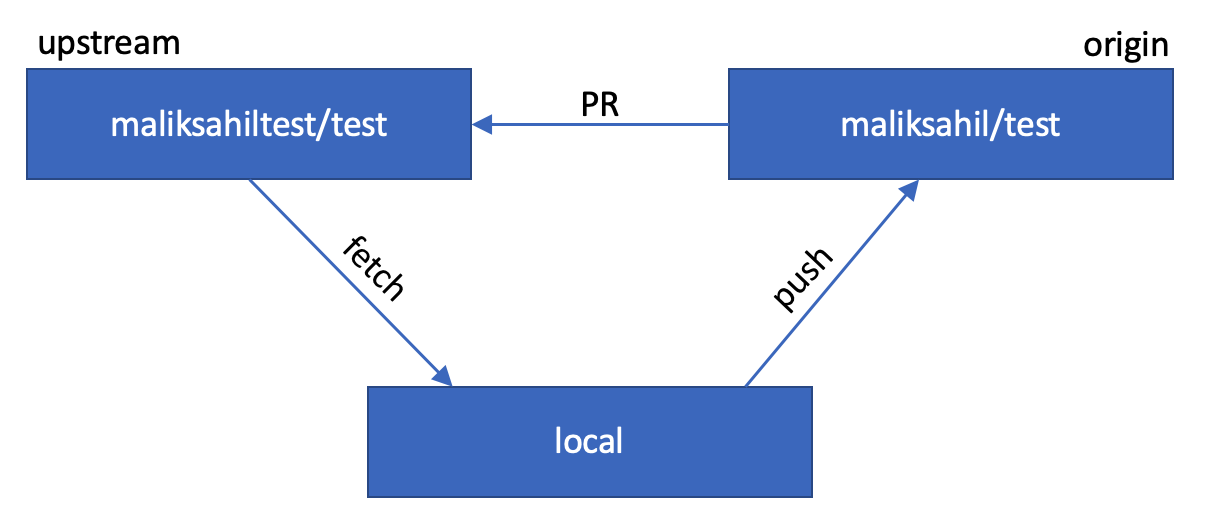
If you pay close attention to Figure 12, I introduced a new keyword here: "upstream." This is very cool. Let’s see this in action.
First, logged in as maliksahil, remember that you had cloned the repo on your local computer from maliksahil/test? In that directory, execute the following commands.
git config remote.pushdefault origin
git config push.default current
By running these commands, you have informed Git that the remote called origin refers to the fork—in this case maliksahil/test. And the default push will push current to origin. All this means is that when you do "git push" you are pushing to maliksahil/test.
Now, you can create a second remote.
git remote add upstream
 https://github.com/maliksahiltest/test
Now check the remotes using git remote -v and you should see output as shown in Figure 13.
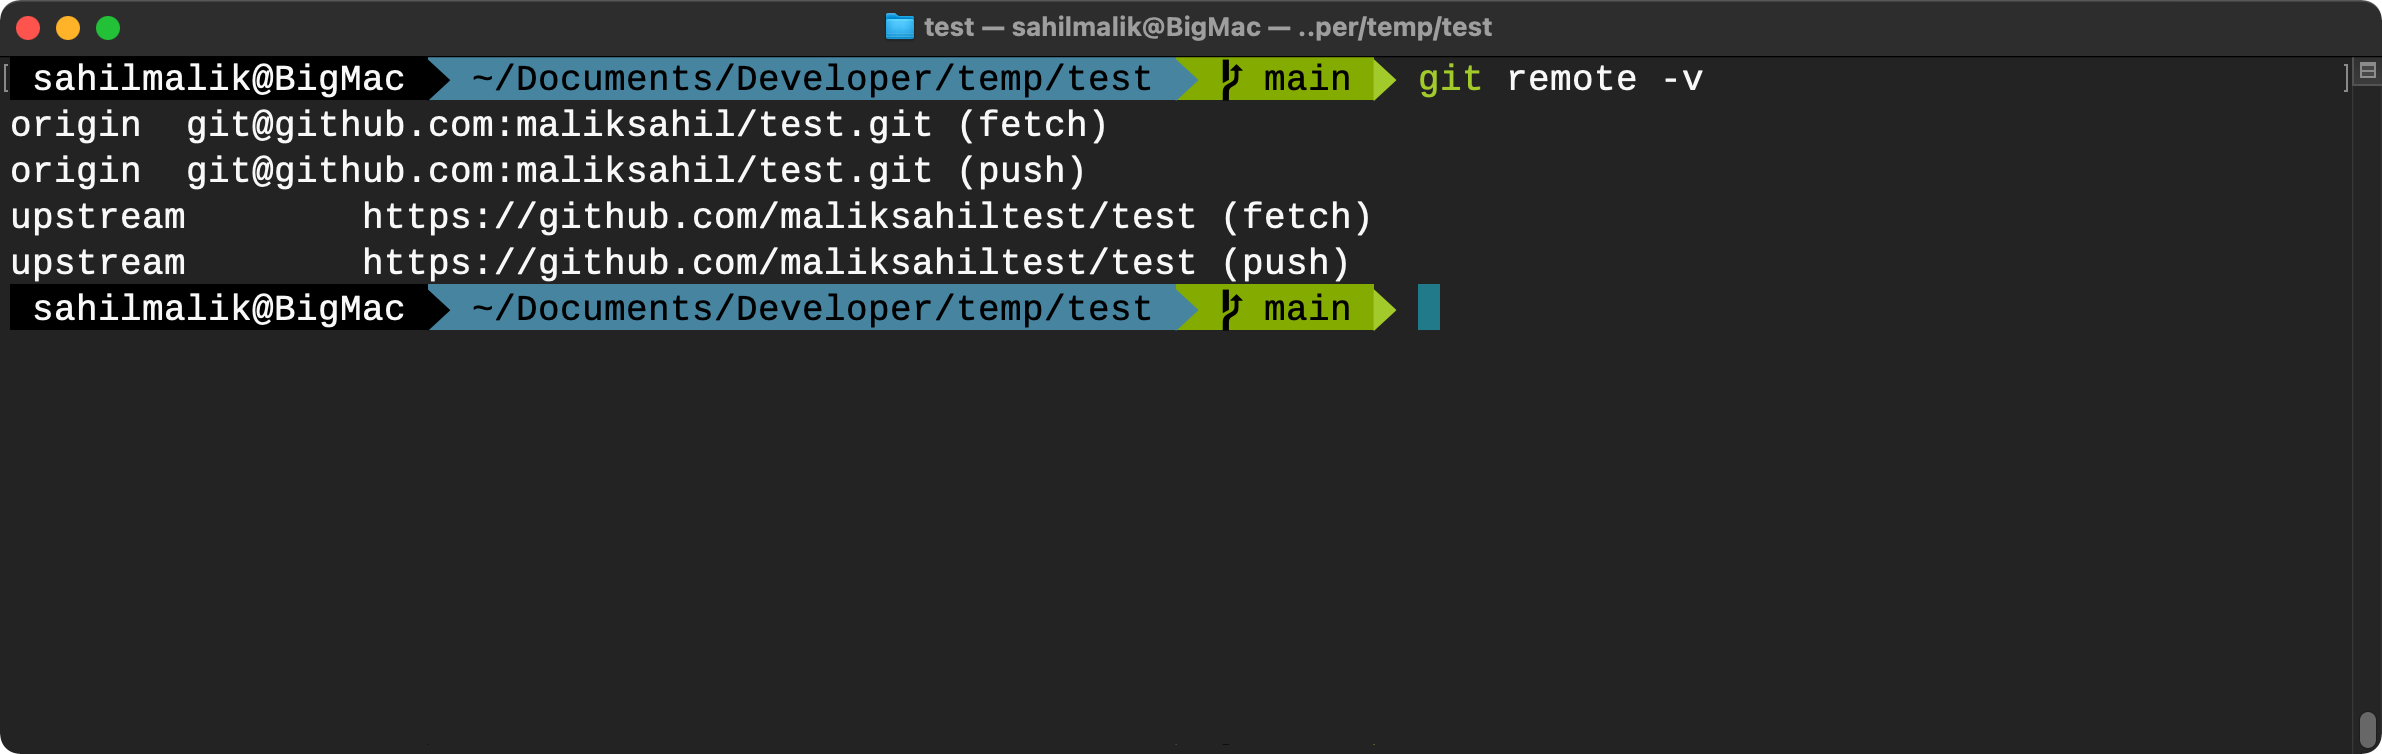
Now, when you wish to get changes from the repo that you originally forked from (maliksahiltest/test), you simply say
git fetch upstream
This makes it incredibly convenient for you to stay up to date with what’s going on in the original repo.
Putting It All Together
Now, you’ll perform a more real-world example, where maliksahil will propose a change, but while maliksahil was working on the changes, maliksahiltest has done some further changes. And to make things even more interesting, you’ll do this properly using branches.
Logged in as maliksahil, go to the cloned repo and first ensure you have everything reflecting the latest picture from the fork. First pull the main branch from upstream.
git pull upstream main
To ensure the forked version in the cloud is up to date, run Git push.
Now, logged in as maliksahil, check out a new branch.
git checkout -b coolstuff upstream/main
This command creates a new branch called coolstuff, and checks out that branch. It also tracks that branch to track upstream/main. But it pushes changes to origin/coolstuff. Remember, upstream here was maliksahiltest/test—where you forked FROM. And origin is maliksahil/test—where you forked TO.
Now while in this coolstuff branch, make a code change.
echo "coolstuff by maliksahil" >> readme.md
Simultaneously, logged in as maliksahiltest—the other user—make a change to the main branch directly in the same file and push that change. You can see this in Figure 14.

Now back as maliksahil, commit and push your change.
git commit -am "coolstuff" && git push
Your changes should be pushed successfully. Why did you not get a problem with the conflict? Because the conflict hasn’t yet made it to the upstream. Also, in the output of the Git push, you’ll see a message saying, "Create a pull request for 'coolstuff' on GitHub by visiting: https://github.com/maliksahil/test/pull/new/coolstuff."
Now, logged in as maliksahil, visit maliksahil/test in your browser. You should see a prompt, as shown in Figure 15.
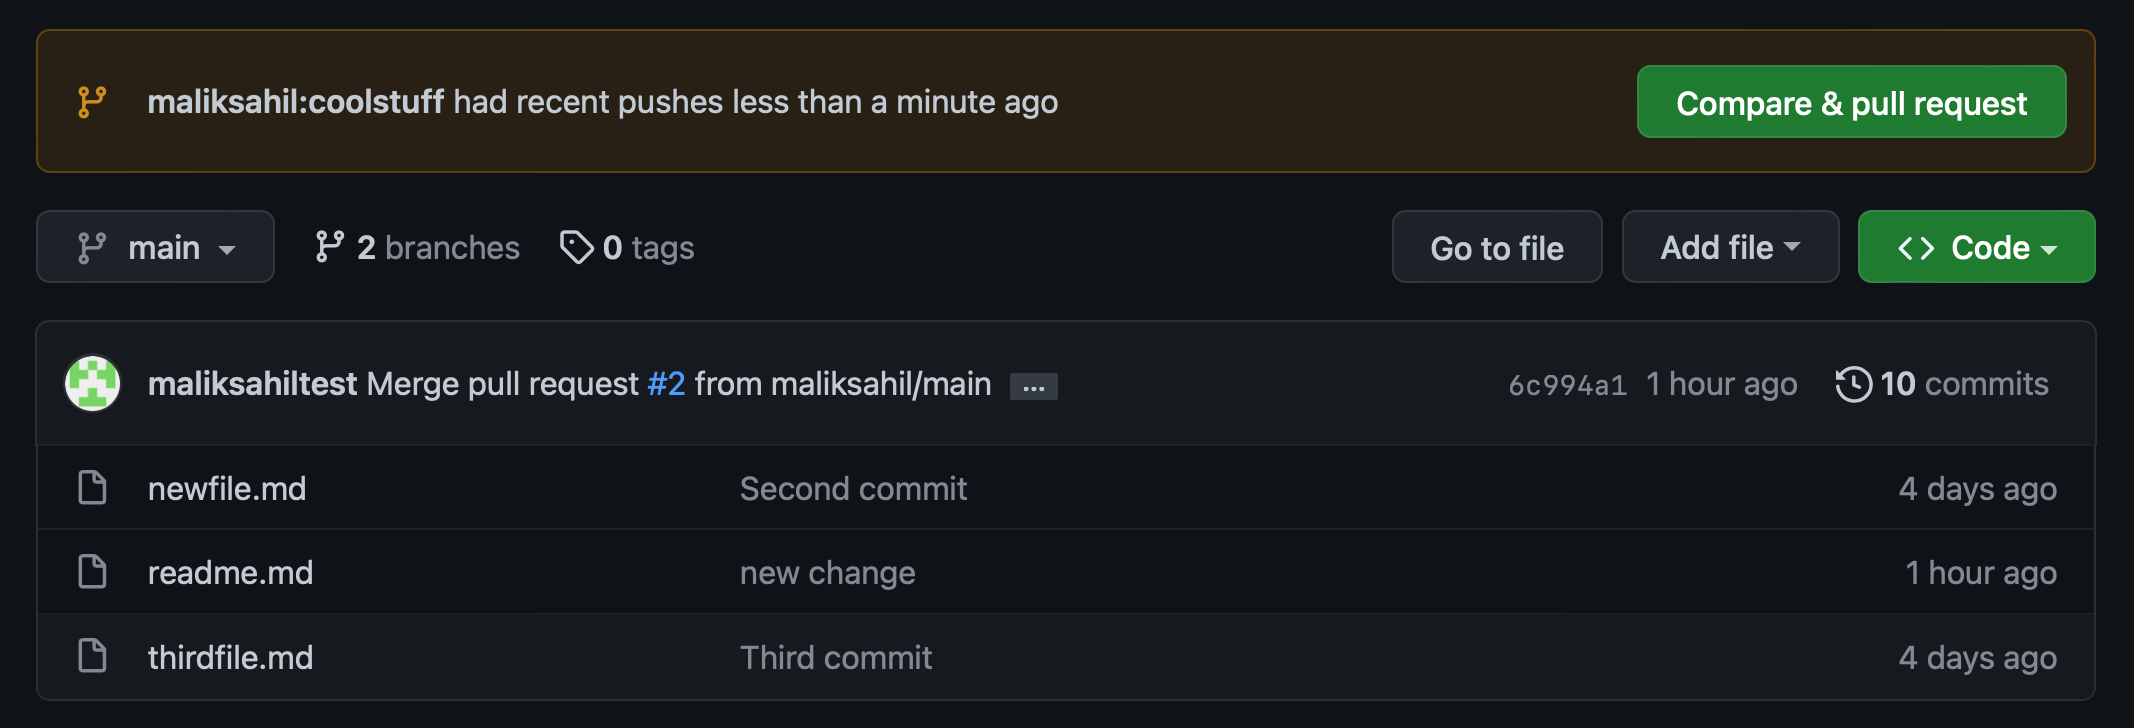
Click on the "Compare & pull request" button, and this time you are shown a prominent message, as shown in Figure 16

This is GitHub checking for you and ensuring that there are merge conflicts needing manual resolution. This work will have to be done manually by maliksahiltest, the maintainer of the upstream.
Now ask yourself, if you were to submit a PR to a busy popular open-source repo, such as maliksahiltest, and it had a lot of merge conflicts, and required a tonne of work from the repo maintainer, does it improve or hurt your chances to get the PR merged?
As maliksahil, the PR submitter, make the first attempt to eliminate conflicts. Don’t submit the PR just yet. Come back to terminal and issue the following command.
git merge upstream/main
The output of this command can be seen in Figure 17.

As you can see from Figure 17, you’re being informed of a conflict. Not only that, but your prompt looks a bit weird, too. How do you resolve this conflict? If you recall, the conflict is in a single file, readme.md, which has been modified by both the upstream and the origin.
There are many ways to resolve conflicts, but my favorite is to use VSCode. Open the repo in VSCode. VSCode in its file structure tree view clearly informs you which file has a conflict. When you open the file, it shows you the conflict in a very easy to understand user interface, as can be seen in Figure 18.
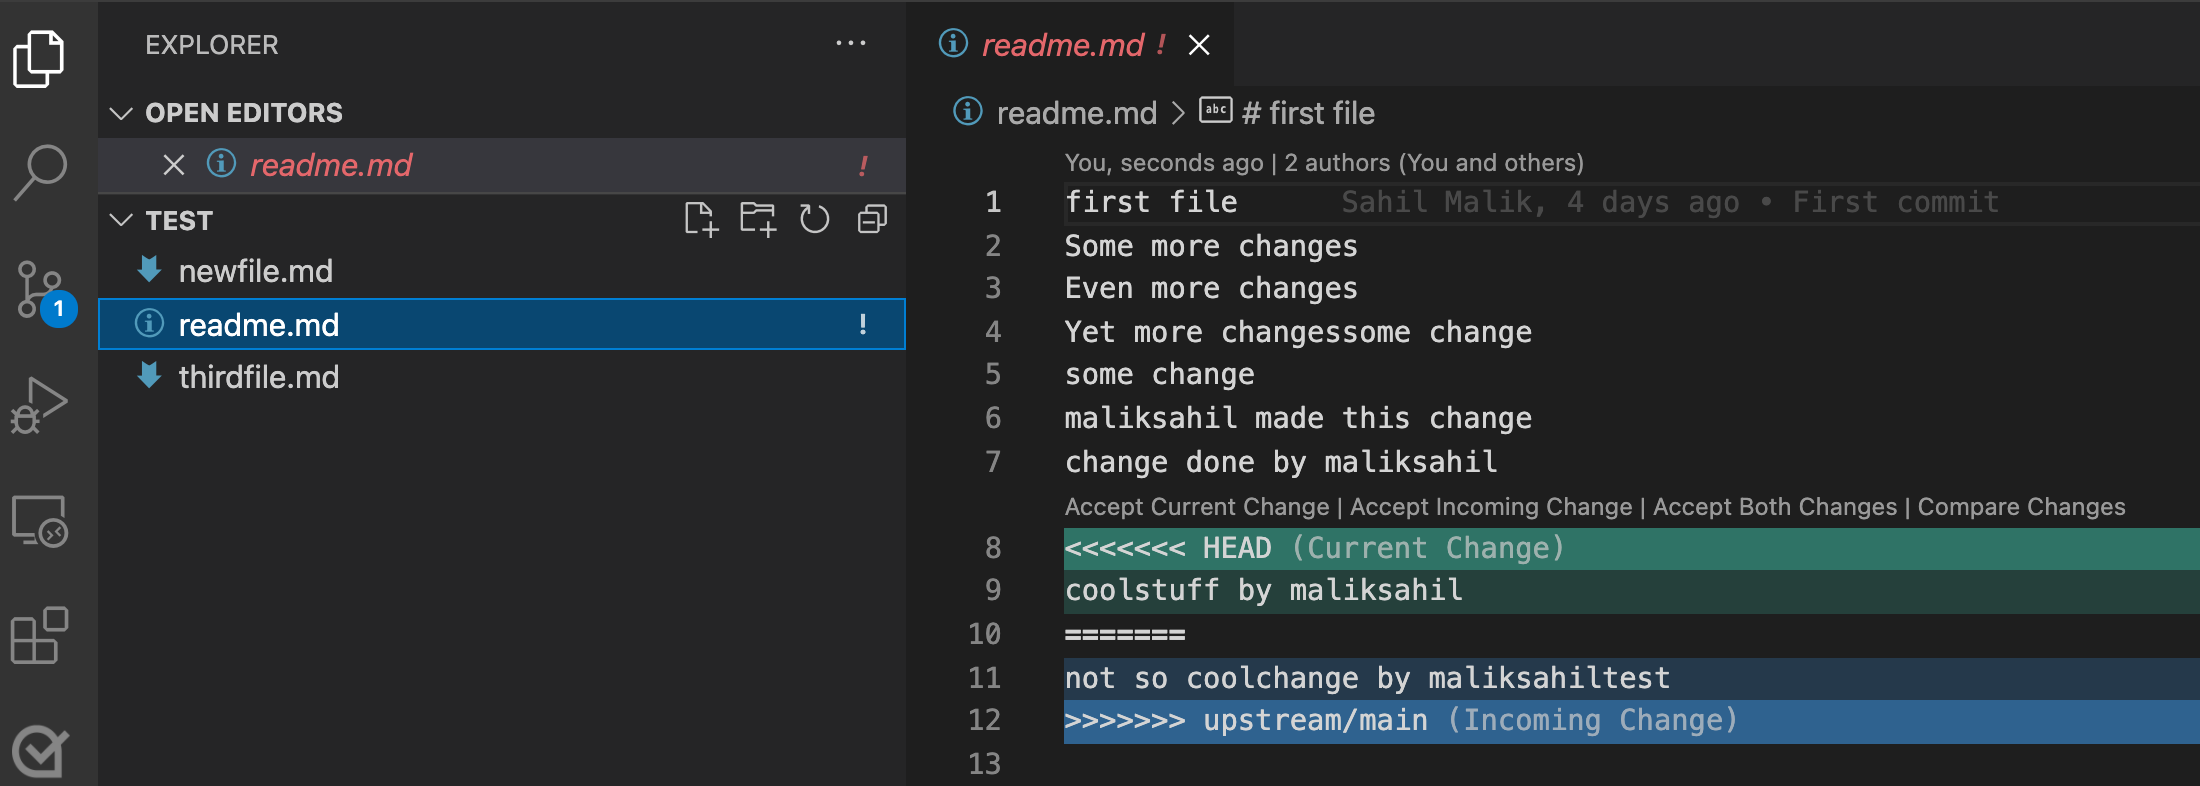
It informs you of the current change--the change you made, versus the changes others made (incoming change). And it gives you a convenient toolbar to accept either change or both changes, or compare the changes so you can manually fix things. In this case, choose to accept both changes.
To finish your merge, git add the readme.md file, and commit it as follows:
git add .
git commit -m "resolved conflict"
Now push this to origin using "git push" and submit a PR to maliksahiltest/test. Now maliksahiltest can complete the merge without any issues.
Summary
Git isn’t something you can run from, and the commands can get confusing. If you sat and read this article on the toilet, you probably didn’t gain much out of it. Git is like swimming: You need to dive in and practice—there’s no other way. To truly understand the concepts, follow an article like this by creating two accounts, drawing on a piece of paper, and deliberately following through the steps, like I did.
Almost every project you deal with will use Git. You’ll be glad you put in the time to follow this article hands-on. Once you do, in no time, you’ll be working with these scenarios with ease and impressing your coworkers and managers alike.
It’s worth it. Spend the time and put in the effort.
Until next time.
git commit -m "There is more to learn"
git push
