


In Part 1 of this article series, you created a web server using Node.js, Express, and JavaScript. You built a series of API routes used to retrieve an array of product objects, search for a single object or a set of objects, and add, edit, and delete objects. In this article, you'll move some of the hard-coded values from the code into a configuration file and read those settings into your application. You're going to add middleware functions to handle exceptions. You're going to write different types of errors to different locations, such as to the console and to a file. Thus far, the set of product data coming from the API calls has been from a JSON file. In this article, you'll learn to retrieve the same data, but from a SQL Server table.
Read Settings from a Configuration File
There are a few hard-coded strings in your Web API project from the last article that should be placed into a configuration file. There is an npm package called config that helps you read configuration data from a JSON file. If you were following along with the first article, open the AdvWorksAPI project you created in your favorite editor. If you weren't following along, download the project at https://github.com/PaulDSheriff/Articles-CodeMagazine and bring up that project in your favorite editor. Bring up a terminal window and install the
config package into the AdvWorksAPI project using the following command.
npm install config
By default, the config package is expecting your project to have a config folder into which you place a JSON file. Create a config folder in your project and add a new file named development.json. You can use file names such as default, development, or production for your configuration file. For complete information on the config package, see the documentation at https://www.npmjs.com/package/config. Add the following JSON object into the development.json file.
{
  "host": "http://localhost",
  "port": 3000,
  "prefix": "/api"
}
Open the index.js file, locate the piece of code where you declare the port constant, and set it to 3000, as shown in the following code snippet.
// Specify the port to use for this server
const port = 3000;
Replace those two lines of code with the code shown in the following code snippet. This code loads the config module and retrieves the host, prefix, and port values from the configuration file using the config.get() method.
// Load the config module
const config = require('config');
// Get host server address
const host = config.get('host');
// Get prefix for all API calls
const prefix = config.get('prefix');
// Specify the port to use for this server
const port = config.get('port');
Now that you've eliminated the hard-coded port value, let's replace the other hard-coded string /api. Scroll down in the index.js file to locate that call and replace the string /api with the constant prefix, as shown in the following code snippet.
// Configure router so all routes
// are prefixed with /api
app.use(prefix, router);
The last value placed into the development.json file is the host name. This host name is only used in the message displayed within the app.listen() function. Replace the hard-coded value http://locahost within the console.log() with ${host}, as shown in the following code snippet.
let server = app.listen(port, function () {
  console.log(`AdvWorksAPI server is running on ${host}:${port}.`);
});
Try It Out
Save all the changes you have made to the project files. Start the AdvWorksAPI project using the command npm start in the terminal window. You should see the values from the configuration file appear in your terminal window. Open Postman or a browser and submit the GET query http://localhost:3000/api/product to ensure that the array of product data is returned from the route.
Change the Name of the Configuration File
If you want to change which configuration file is read in, locate this line of code const config = require('config'), and before this line, add the following line of code that modifies the NODE_ENV variable to the value production. This tells the config package to look for a file named production.json within the config folder.
// Set 'production' modev
process.env["NODE_ENV"] = "production";
Make a copy of the development.json file and change the name of the copied file to production.json. Modify all three values in the production.json file to some different values.
Try It Out
Save all the changes you've made to the project files. Start the application and you should see the new values from the configuration file appear in your terminal window. After you've seen the new values, comment out the line of code you just added that changed the NODE_ENV value to production.
Default Exception Handling
So far, you haven't handled any exceptions in your Web API calls. If you've been following along with the previous article, you most likely have encountered an exception or two when sending requests to your Web API. By default, Express returns an HTML error back to you. In case you haven't seen an exception yet, let's create one. Open the repositories\product-file.js file and modify the constant, as shown below, to use a .json file name that doesn't exist.
const DATA_FILE = './db/product-bad.json';
Save the changes made to all the files in your project and ensure that the project is still running. In Postman, submit the GET request http://localhost:3000/api/product. The response you receive from Express is an HTML body that looks like the following:
<!DOCTYPE html>
<html lang="en">
<head>
<meta charset="utf-8">
<title>Error</title>
</head>
<body>
<pre>Error: ENOENT: no such file or
directory, open 'D:\Samples\
AdvWorksAPI\db\product-bad.json'
</pre>
</body>
</html>
Add Exception Middleware
Express doesn't know if you're building a Web API application or a website application, so it defaults to returning HTML from unhandled exceptions. In every route you've created so far, you've seen the code next(err) in the error handling section. The function, next(), takes the error object and passes it to the middleware defined in Express that handles errors. This middleware takes that err object, extracts the error message, and wraps it within the HTML you saw above. Let's override this built-in Express exception middleware and eliminate the HTML being returned. Open the index.js file and add the following code just before the app.listen() function.
// Configure the last exception
// handler in the middleware chain
app.use(function (err, req, res, next) {
    res.status(500).send(err);
});
Express executes middleware in the order they're added in your index.js. Exception handling functions should always be the last middleware added to the chain prior to calling app.listen(). How do you know that the function shown above is an exception handling piece of middleware? All exception handling functions have four parameters. All other middleware functions have only three parameters. In an exception handling function, the err parameter is defined first, followed by the other three standard parameters. The last exception handler listed before the app.listen() shouldn't have a call to next(err). If you don't put a call to next(err) in your last exception handling function, the default Express exception handler never gets called.
The above final exception handler is very simple. If you are going to use your own handler, there are additional things you need to be aware of. Check out the Express documentation at https://expressjs.com/en/guide/error-handling.html for more information on best practices around exception handling.
Try It Out
Save all the changes you made to the files in your project. Open Postman and submit the same request as last time. Remember, you still have the bad file name defined in your repository module. You should see that the raw err object (shown below) has been returned from your exception handling function. It's now expressed as a JSON object instead of HTML because the default exception handler in Express didn't get called.
{
  "errno": -4058,
  "code": "ENOENT",
  "syscall": "open",
  "path": "D:\\Samples\\AdvWorksAPI\\db\\product-bad.json"
}
Build Your Own Error Object
If you were to set a breakpoint on the res.status(500).send(err) line, then debug the running Node application. You'll see that the err object contains a stack property that didn't show up in the error that was sent to Postman. This stack property might be useful in helping you debug that application. Sometimes the message and the stack properties are the same value, but you should grab both anyway. The stack property doesn't show up when running the application in production mode, nor would you want it to, as that could give away too much information about your server.
Let's add a new function to build an error object that contains the original error information and wraps it up into a JSON object. In addition to the error itself, add a few additional properties to this error object. Open the index.js file and add the function shown in the code below immediately after the *app.listen()* call.
// Create error object for logging
function buildError(err, req) {
    return {
        "status": 500,
        "statusText": 'Internal Server Error',
        "message": err.message,
        "stack" : err.stack ?? 'n/a',
        "originalError" : err,
        "requestInfo" : {
              "hostname": req.hostname ?? 'Unknown',
              "path": req.path ?? 'Unknown'
        }
    };
}
Now, scroll back up in the index.js file and add the following code before the error handler you added previously.
// Configure a console exception logger
app.use(function(err, req, res, next) {
    // Build a better error object
    let errObject = buildError(err, req);
    // Log error information to the console
    console.log(errObject);
    // Call next error handler in the chain
    next(errObject);
});
This function calls the buildError() function to build the additional error information object. It then logs that error object to the console. You still call the next(errObject), passing in this better error object. This JSON object gets passed to the final error handler you wrote previously.
Try It Out
Save all the changes made to the files in your project. Open Postman and submit to the same request so you can generate the same error. You should now see the error message (Listing 1) appear in your VS Code terminal window and within the response body in Postman.
Listing 1: The error returned shows a lot of information about the server.
{
    "status": 500,
    "statusText": "Internal Server Error",
    "message": "ENOENT: no such file or directory,
        open 'D:\\Samples\\AdvWorksAPI\\db\\product-bad.json'",
    "stack": "Error: ENOENT: no such file or directory,
        open 'D:\\Samples\\AdvWorksAPI\\db\\product-bad.json'",
    "originalError": {
        "errno": -4058,
        "code": "ENOENT",
        "syscall": "open",
        "path": "D:\\Samples\\AdvWorksAPI\\db\\product-bad.json"
    },
    "requestInfo": {
        "hostname": "localhost",
        "path": "/api/product"
    }
}
Don't Expose Too Much Error Information
From a security standpoint, it's not a good thing to expose any information about your server to anyone. Thus, the errObject built in the buildError() method shouldn't be sent back to the caller. Instead, you should always send a generic message back to the caller that doesn't expose server information. You can log the errObject information to the console or into a file so you can look at it later. In the index.js file, modify the last exception handler in the chain to look like the following.
// Configure the last exception
// handler in the middleware chain
app.use(function (err, req, res, next) {
    res.status(500).send({
        "status": 500,
        "statusText": 'Internal Server Error',
        "message": `An error occured; please contact the system administrator.`
  });
});
Try It Out
Save all the changes made to the files in your project. Open Postman and submit the same request to see the generic message appear. This is much better because now the caller doesn't see any path or file names on your server.
Error Helper Module
As you would expect, it's a good idea to move these error handlers out of the index.js file and put them into their own module. Add a new folder named helpers to your project. Add a new file named error.js to the helpers folder and put the code from Listing 2 into this new file. In the errorHelper object, you create three functions: buildError(), errorToConsole(), and errorFinal(). The first function, buildError(), is the one you created previously at the bottom of the index.js file. The second function, errorToConsole() is like the other error handler you built that logs the error object to the console. The last function, errorFinal() is the last exception handler in the middleware chain because it doesn't call the next() function.
Listing 2: Create an error handler module.
// Error Helper
let errorHelper = {};

// Build error object for internal logging
errorHelper.buildError = function (err, req) {
  return {
    "status": 500,
    "statusText": 'Internal Server Error',
    "message": err.message,
    "stack": err.stack ?? 'n/a',
    "originalError": err,
    "requestInfo": {
      "hostname": req.hostname ?? 'Unknown',
      "path": req.path ?? 'Unknown'
    }
  };
}

// Log error information to console
errorHelper.errorToConsole =
  function (err, req, res, next) {
      // Build error object for logging
      let errObject = errorHelper.buildError(err, req);
      // Log error information to the console
      console.error(`Log Entry:${JSON.stringify(errObject)}`);
      console.error("*".repeat(80));
      // Pass error along to 'next' middleware
      next(err);
  }

// Last function in error middleware chain.
// Sends out the error object appropriate for
// consumers of Web API calls.
errorHelper.errorFinal = function (err, req, res, next) {
    res.status(500).send({
        "status": 500,
        "statusText": 'Internal Server Error',
        "message": `An error occured; please contact the system administrator.`
    });
}

module.exports = errorHelper;
Use the New Error Module
Open the index.js file and add the code to load the new error module you created. Just after the line of code where you declare the port constant, add the following code.
// Load error helper module
const errorHelper = require('./helpers/error');
Scroll down in index.js, locate the previous two error handlers you added, and replace them with the following lines of code.
// Configure exception logger to console
app.use(errorHelper.errorToConsole);
// Configure final exception middleware
app.use(errorHelper.errorFinal);
Finally, delete the buildError() function you added at the end of the index.js file. Your index.js file is once again very clean and has less code in it, but still performs the same error handling.
Try It Out
Save all the changes made to the files in your project. Open Postman and submit the same query again. You should see the same error message as last time in the response body within Postman. Switch back to your editor and look at the terminal window and you should see the large error object created with the buildError() function.
Log Exceptions to a File
Now that you can log your errors to the console, let's add a new middleware function to log the error object to a file. Create a new folder named \logs in your project. Create a new file in the helpers folder named logToFile.js and add the code shown in Listing 3.
Listing 3: Create a log helper module to log errors to a file.
// Bring in node file system module
let fs = require('fs');

// Setup path/file name to store log info
const ERROR_FILE = './logs/error-log.txt';

// Log information to a file
let logToFileHelper = {};

// Write error information to log file
logToFileHelper.error = function (data, resolve, reject) {
    let toWrite = `
        ${"*".repeat(80)}
        Date/Time: ${new Date().toJSON()}
        Exception Info: ${JSON.stringify(data)}
        ${"*".repeat(80)} `;

  // Write error to log file
  fs.appendFile(ERROR_FILE, toWrite,
      function (err) {
          if (err) {
              // ERROR: Invoke reject() callback
              reject(err);
          }
          else {
              // SUCCESS: Invoke resolve() callback
              resolve(true);
          }
      });
}

module.exports = logToFileHelper;
The logToFileHelper object contains a single function named error() to which you pass some data to log. A string is created with a series of asterisks, the current date/time, and the error object passed into this function. This string is written to a file named error-log.txt in the logs folder.
Use Log Helper in Error Helper Module
Open the helpers\error.js file and add the following code at the very top of the file.
// Load the log to file module
let logToFileHelper = require('../helpers/logTofile');
Add an additional function to the errorHelper object named errorToFile() as shown in Listing 4. The err object is passed to this middleware function and the large error object function is created by calling the buildError() function. This large error object is passed to the error() function of the logToFileHelper object and written to the log file. After a while, this file could get quite large, so it might be a better idea to use a logger package that truncates the file after so many days. There are several utilities you can use out there that will perform this functionality.
Listing 4: Add an additional middleware function to store error information to a file.
// Log error information to a file
errorHelper.errorToFile = function (err, req, res, next) {
    // Build error object for logging
    let errorObject = errorHelper.buildError(err, req);
    // Write error information to a file
    logToFileHelper.error(errorObject, function (data) {
        // SUCCESS: Information was written
        console.log(data);
    }, function (err) {
        // ERROR: Write error to console
        console.error(err);
    });
    // ERROR: pass error along to the 'next' middleware
    next(err);
}
Open the index.js file and add the following lines of code in between the calls that configure the errorToConsole and errorFinal exception middleware:
// Configure exception logger to file
app.use(errorHelper.errorToFile);
Try It Out
Save all the changes made to the files in your project. Open Postman and submit the same query again. You should see the same error message as last time in the response body within Postman. Switch back to your editor and look at the terminal window. You should see the large error object created in the buildError() function. Look in the logs folder and you should find the error-log.txt file. Open this file to see the error information. When you're done with testing your error handling, open the product.js file and change the file back to the correct file name, as shown in the following code snippet.
const DATA_FILE = './db/product.json';
Create a SQL Server Database
Working with a flat file is fine for small sets of data that don't change, but for a production website, you should use a database. Let's learn how to connect your Web APIs to make a call to a SQL Server database. If you want to use Oracle, or a MySQL database, there are packages you can download for those database servers as well. The code I'm showing you for SQL Server should be similar even if using one of these other database servers. The first step is to install the mssql package into your Web API project by running the following command in your terminal window.
npm install mssql
You're going to write code in the rest of this article to search, insert, update, and delete data in a SQL Server database. So I'm not going to be covering every feature of the mssql package. If you want more information, check out the documentation for this package at https://www.npmjs.com/package/mssql.
Create a Database
To follow along with this article, create a database using SQL Server or SQL Server Express. Create a database named AdvWorksProducts using the appropriate tool for your database. Once the database is created, create a Product table within this database using the following T-SQL command:
CREATE TABLE [dbo].[Product](
  [ProductID] [int] IDENTITY(1,1) NOT NULL,
  [Name] [nvarchar](50) NOT NULL,
  [ProductNumber] [nvarchar](25) NOT NULL,
  [Color] [nvarchar](15) NULL,
  [StandardCost] [money] NOT NULL,
  [ListPrice] [money] NOT NULL,
  [ModifiedDate] [datetime] NOT NULL
) ON [PRIMARY];
If you download the samples for this article, you'll find a folder within the zip file called Database. In this folder, there are two SQL files. The AdvWorksProducts-schema.sql contains scripts to build the Product table and a stored procedure. The AdvWorksProducts-Data.sql file contains insert statements to load sample data into the Product table. The AdvWorksProducts.zip file also contains the detached AdvWorksProducts.mdf and AdvWorksProducts.ldf files that you can attach to a SQL Server version 2019 or later. The AdvWorksProducts-SqlExpress.zip file contains the detached AdvWorksProducts.mdf and AdvWorksProducts.ldf files that you can attach to an instance of SQL Server Express. The last file is called product.csv and contains the product data as comma-separated values if you want to import the data into the Product table.
Create a SQL Server Repository Module
In the repositories folder, you have a product-file.js file that allows you to interact with the db\product.json file. Create a new file named product-sqlServer.js in the repositories folder in which you are going to write the code to interact with the Product table in SQL Server. Into the new product-sqlServer.js file, place the code shown in Listing 5. In the code in Listing 5, you're first going to learn how to work with SQL Server. You'll then learn to make this code more reusable.
Listing 5: Create a repository object to read from SQL Server
// Load SQL Server module
let sqlServer = require('mssql');

// Product repository using SQL Server
let repo = {};

// Retrieve set of products from SQL Server
repo.get = async function (resolve, reject) {
    // Create a connection string
    let cnn = `Server=localhost,1433;
               Database=AdvWorksProducts;
               user id=sa;
               password=P@ssw0rd;
               encrypt=false;
               TrustServerCertificate=True;
               Application Name=AdvWorksAPI;`;

    // The SQL statement to submit
    let sql = `SELECT productID, name,
              productNumber, color, standardCost,
              listPrice, modifiedDate FROM dbo.Product
              ORDER BY name, listPrice`;

    try {
        // Connect to SQL Server
        await sqlServer.connect(cnn);
        // Submit the SQL query
        const result = await sqlServer.query(sql);
        // SUCCESS: Invoke resolve() callback
        // Return first recordset
        resolve(result.recordset);
    } catch (err) {
        // ERROR: Invoke reject() callback
        reject(err);
    }
}

module.exports = repo;
This code first loads the mssql module so you can use the features of the mssql package to submit queries to your SQL Server database. You create a repo object in which there's a function called get(). This function first creates a connection string. The connection string might have some things that you're not used to seeing if you've used SQL Server from a .NET application.
I added a comma after the server name and added the port number on which SQL Server typically listens for a connection: Server=localhost,1433. The encrypt=false key/value pair is typically needed if your web server and SQL Server are both on your local computer. This key/value pair instructs the connection to either encrypt traffic or not between the web server and the SQL Server. The TrustedServerCertificate=True key/value pair ensures that the connection accepts any certificate for making encrypted calls. These key/value pairs may not be needed, but I wanted to include them here so you can troubleshoot things by changing the values of these additional key/value pairs.
Notice that the SQL statement uses camel casing for the field names. Even though the fields are upper case in SQL Server, I'm deliberately changing the first letter of each column to a lower-case because that's how most JSON objects are written. If you're using Oracle, or any case-sensitive database engine, you may need to alias your columns to return them with the first letter lower-case.
Within a try...catch block is where you attempt to make a connection to the SQL Server using the await sqlServer.connect(cnn) call. Once the connection is made, submit the SELECT statement using the await sqServer.query(sql) call. When the data is returned, the object looks like the following:
{
  "recordset": [{product object}, {...}]
  "recordsets": [
      [{product object}, {...}]
      [,other recordset], ...
    ]
  "rowsAffected": [15 [, n], ...]
}
The recordset property is set to the results of the first SQL statement in the query. If there are multiple SQL statements, the recordsets property contains each resulting recordset. The rowsAffected property contains an array of the number of rows affected by each SQL statement.
The last thing to do is to change all the routes in the routes\product.js file to use the new product-sqlServer module instead of the product-file module. Open the routes\product.js and change the line of code that loads the product-file.js to the product-sqlServer.js file.
// Load product repository module
let repo = require('../repositories/product-sqlServer');
Try It Out
Save all changes you made to the files in your project. Open Postman and submit the same get all query http://localhost:3000/api/product. If you put all the code in correctly, you should see the rows from the Product table appear in the response body.
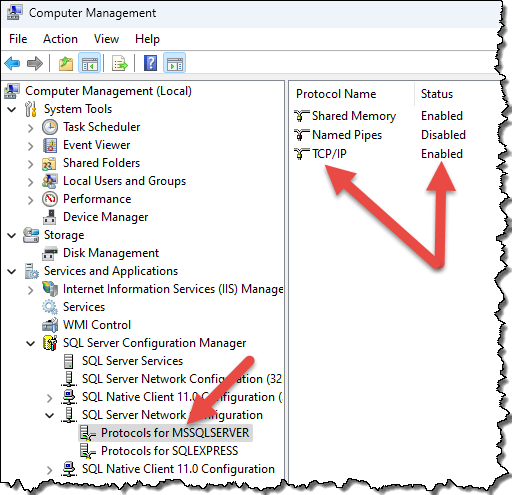
Did You Get an Error?
If you get an error message about not being able to make a connection, make sure TCP/IP is enabled for SQL Server on your computer. By default, it's usually turned off. Open the Computer Management app (Figure 1) on Windows and expand the SQL Server Configuration Manager node, then expand the Protocols for MSSQLSERVER (or Protocols for SQLExpress if using SQLEXPRESS). Double-click on the TCP/IP protocol and in the dialog box, change the status to Enabled.
Create a Reusable SQL Server Module
The code you just wrote in Listing 5 is a simple example of how to make a call to SQL Server but it's not ideal. As you can imagine, you shouldn't duplicate this code for retrieving data from all your other tables. There are two major problems with this code: the connection string is hard-coded and the code within the try...catch block is repeated for each table.
Let's write a function that's more generic and can be used to retrieve data from any table such as customer, employee, or student tables. Create a SQL Server helper module with a generic function to submit any SQL Server query. In the helpers folder, create a new file named sqlserver.js. Add the code shown in Listing 6 to this new file.
Listing 6: Create a helper module to submit queries to SQL Server.
// Load SQL Server Module
let sqlServer = require('mssql');

// Load the config module
const config = require('config');

// Get connection string from config file
let connectString = config.get('connectString');

// SQL Server Helper
let db = {};

/*
 * Submit SQL query with/without parameters
 * SELECT * FROM Product
 *  [WHERE ProductID = @ProductID]
 * OPTIONAL: Pass array of parameter objects
 * { "name": 'ProductID',
 *   "type": sqlServer.Int,
 *   "value": 706 }
 */
db.submit = async function (sql, params,
    resolve, reject) {
        try {
            // Connect to SQL Server
            await sqlServer.connect(connectString);
            // Create Request object
            let request = new sqlServer.Request();
            // Are there parameters to submit?
            if (params) {
                // Create parameters
                params.forEach(param => {
                    request.input(param.name,
                    param.type, param.value);
                });
            }

            // Submit SQL query
            const result = await request.query(sql);
            // SUCCESS: Invoke resolve() callback
            // Return recordset(s)
            resolve(result);
        } catch (err) {
            // ERROR: Invoke reject() callback
            reject(err);
        }
    }

    module.exports = db;
This code is similar to what you hard-coded in Listing 5, but retrieves the connection string from a configuration file and the SQL to submit is passed into the submit() function. There is also an optional parameter array that can be passed in. Parameters are built using the request object from the mssql module. A parameter object in the array has three properties: name, type, and value. The name is set to the name of the parameter included in the SQL statement. The type is the data type in SQL Server, and the value property is set to the value to pass to the server.
Store the Connection String
To eliminate hard-coding the connection string, open the development.json file and add a connectionString property. Set the connection string to the one you used in your code earlier. Please note that you must put the connection string all on one line; I had to break the connection string across multiple lines for formatting purposes in this article.
{
  "host": "http://localhost",
  "port": 3000,
  "prefix": "/api",
  "connectString": "Server=localhost;
      Database=AdvWorksProducts;
      user id=sa;password=P@ssw0rd;
      encrypt=false;
      TrustServerCertificate=True;
      Application Name=AdvWorksAPI;"
}
Make the Product SQL Server Module Generic
Now that you have created a generic SQL Server module, you can significantly cut down the amount of code you wrote previously in the product-sqlServer.js file. Open the product-sqlServer.js file and replace the entire contents of this file with the code shown in Listing 7.
Listing 7: Update product repository module to use the SQL Server module.
// Load SQL Server module
let sqlServer = require('mssql');

// Load SQL Server module
let db = require('../helpers/sqlserver');

// Product repository using SQL Server
let repo = {
    // Get all products from SQL Server
    get: function (resolve, reject) {
        // Create SQL statement to submit
        let sql = `SELECT productID, name,
                   productNumber, color, standardCost,
                   listPrice, modifiedDate
        FROM dbo.Product
        ORDER BY name, listPrice`;

        // Submit SELECT query
        db.submit(sql, null, function (data) {
            // SUCCESS: Invoke resolve() callback
            // Return data from first
            // recordset in the result set
            resolve(data.recordset);
        }, function (err) {
            // ERROR: Invoke reject() callback
            reject(err);
        });
    }
};

module.exports = repo;
You still need to load the mssql package in this file because you're going to use it to build parameter data types when you write additional functions in this repository module. Load the sqlserver.js module you created so you can submit your SQL queries. The rest of the code should be self-explanatory.
Try It Out
Save all the changes you have made to the files in your project. Open Postman and submit the same query you've been using to ensure you're still retrieving all the product data from the SQL Server.
Get a Single Product
Let's now add a function to the product repository module to retrieve a single row from the Product table. Open the product-sqlServer.js file and add a new function named getById(), as shown in Listing 8. In this function, create the SQL statement using a parameter @ProductID. This means that you need to create a parameter object in an array to pass to the submit() function. Set the name property to ProductID without the at (@) sign. The type property must match the type of the field in your SQL Server table. Finally, set the value property to the id passed in. Pass the SQL statement and the array of the single parameter object to the submit() function.
Listing 8: Add a function to retrieve a single product object from SQL Server.
// Retrieve a single product
repo.getById = function (id, resolve, reject) {
    // Create SQL statement to submit
    let sql = `SELECT productID, name,
               productNumber, color, standardCost,
               listPrice, modifiedDate
    FROM dbo.Product
    WHERE ProductID = @ProductID`;

    // Create parameter array
    let params = [{
       "name": "ProductID",
       "type": sqlServer.Int,
       "value": id
    }];

    // Submit SELECT query
    db.submit(sql, params, function (data) {
        // SUCCESS: Invoke resolve() callback
        if (data.recordset.length) {
            // Return product object from first
            // recordset in the result set
            resolve(data.recordset);
        }
        else {
          // Record not found
          resolve(undefined);
        }
    }, function (err) {
        // ERROR: Invoke reject() callback
        reject(err);
    });
}
Try It Out
Save all change to the files you made in your project. Open Postman and submit a query to retrieve a single row of data, such as http://localhost:3000/api/product/345. Replace the number at the end of the query with a valid product ID from your table. You should see a single product object appear in the response body window. Try submitting an invalid product ID (http://localhost:3000/api/product/1) to ensure that you get a 404 response.
Search for Products
Just like you searched for products in the JSON file, you should also create a search function to retrieve a set of products based on the criteria you pass in. Instead of putting a lot of SQL code within your JavaScript, I recommend creating a stored procedure in your database named Product_Search, as shown in the following code snippet.
CREATE PROCEDURE dbo.Product_Search
    @Name nvarchar(50) null,
    @ListPrice money null
AS
BEGIN
    SELECT productID, name, productNumber,
        color, standardCost, listPrice,
        modifiedDate FROM dbo.Product
    WHERE (@Name IS NULL OR [Name]
        LIKE @Name + '%')
    AND (@ListPrice IS NULL OR ListPrice >= @ListPrice)
    ORDER BY [name], listPrice
END
This stored procedure allows you to pass a name (or partial name) and a list price. Both parameters can accept a null value. Each parameter is checked in the WHERE clause to see if it was passed in or not. If it was passed in, the value is used to filter on the data in the Product table. The Name parameter, if passed in, is used with a LIKE to allow you to pass in a value, such as H, and it finds all product names that start with the letter H. The ListPrice parameter, if passed in, is used to find all products where the list price is greater than or equal to the value passed in.
Create the Search Function
Let's add a search() function to the product repository module. Open the product-sqlServer.js file and add the code shown in Listing 9. In this function, set the SQL statement to submit to the name of the stored procedure followed by the two parameters you're passing. Create an array of two parameter objects setting the values passed in via the search parameter into each of the parameter objects. Call the submit() function to submit the call to the stored procedure in your SQL Server.
Listing 9: Add a function to search for one or many products in SQL Server.
// Search for one or many products
repo.search = function (search, resolve, reject) {
    if (search) {
        // Create SQL statement to submit
        let sql = `exec dbo.Product_Search @Name, @ListPrice`;

        // Create parameter array
        let params = [{
            "name": "Name",
            "type": sqlServer.NVarChar,
            "value": search.name
        },
        {
            "name": "ListPrice",
            "type": sqlServer.Decimal,
            "value": search.listPrice
        }];

        // Submit SELECT query
        db.submit(sql, params, function (data) {
            // SUCCESS: Invoke resolve() callback
            // Return product data from first
            // recordset in the result set
            resolve(data.recordset);
        }, function (err) {
            // ERROR: Invoke reject() callback
            reject(err);
        });
    }
}
Try It Out
Save all the changes made to the files in your project and submit the following request via your browser or Postman.
http://localhost:3000/api/product/search?name=H
The above request should return a few records where the product name starts with the letter H. Submit the following request to look for both criteria.
http://localhost:3000/api/product/search?name=H
  &listPrice=1499
From this request, you should have a single product object returned. Next, submit the following request to check your error handling.
http://localhost:3000/api/product/search?name=z
From this request, you should get no records and thus a 404 status code and error object is returned from the query.
Insert a Product
It's now time to start building the data modification methods in your product repository module. If you're submitting either an INSERT or UPDATE statement, you're going to have to create a set of parameter objects with each column in your Product table. If you're submitting an UPDATE statement, you also need to include the ProductID parameter for the WHERE clause. You don't need an ID for performing an insert because the Product table's primary key is set up as an IDENTITY and the ProductID will be generated by SQL Server. Open the repositories\product-sqlServer.js file and add the new function shown in Listing 10 that's used to build the parameter array.
Listing 10: Add a function to create an array of parameter objects.
// Create parameters for INSERT and UPDATE
repo.createParams = function (product, id) {
    // Create parameter array
    let params = [{
        "name": "Name",
        "type": sqlServer.NVarChar,
        "value": product.name
    }, {
        "name": "ProductNumber",
        "type": sqlServer.NVarChar,
        "value": product.productNumber
    }, {
        "name": "Color",
        "type": sqlServer.NVarChar,
        "value": product.color
    }, {
        "name": "StandardCost",
        "type": sqlServer.Decimal,
        "value": product.standardCost
    }, {
        "name": "ListPrice",
        "type": sqlServer.Decimal,
        "value": product.listPrice
    }, {
        "name": "ModifiedDate",
        "type": sqlServer.DateTime,
        "value": new Date().toISOString()
    }
    ];

    if(id) {
        params.push({
          "name": "ProductID",
          "type": sqlServer.Int,
          "value": id
        });
    }

    return params;
}
Next, add an insert() function (Listing 11) to create the INSERT statement with the list of columns and parameters. Call the createParams() function and pass in the product object passed to this insert() function. Pass a null value for the ID as you don't need an ID when performing an insert. Once you have the array of parameter objects, call the submit() function passing in the SQL statement and the parameter array. Typically, after submitting an INSERT, you want to get the row back that was inserted in SQL Server because you want to get back any generated field values, such as the ProductID, which is an INDENTITY property. Notice that in the sql variable you submit, there are two SQL statements: the first one is the INSERT statement and the second retrieves the newly inserted row by selecting immediately from the Product table using the SCOPE_IDENTITY() function to get the generated ProductID value.
Listing 11: Add a function to insert a product into SQL Server.
// Insert a product into SQL Server
repo.insert = function (newData, resolve, reject) {
    // Create SQL statement to submit
    let sql = `INSERT INTO dbo.Product
        (Name,ProductNumber,Color, StandardCost,ListPrice,ModifiedDate)
    VALUES
      (@Name,@ProductNumber,@Color, @StandardCost,@ListPrice,@ModifiedDate);
    SELECT productID, name, productNumber, color, standardCost, listPrice,
       modifiedDate FROM dbo.Product
       WHERE ProductID = SCOPE_IDENTITY();`;

    // Create parameter array
    let params = repo.createParams(newData, null);

    // Submit SELECT query
    db.submit(sql, params, function (data) {
        // SUCCESS: Invoke resolve() callback
        if (data.rowsAffected[0] == 1) {
            // Return product object from first
            // recordset in the result set
            resolve(data.recordset);
        }
        else {
            // Record not found
            resolve(undefined);
        }
    }, function (err) {
        // ERROR: Invoke reject() callback
        reject(err);
    });
}
Try It Out
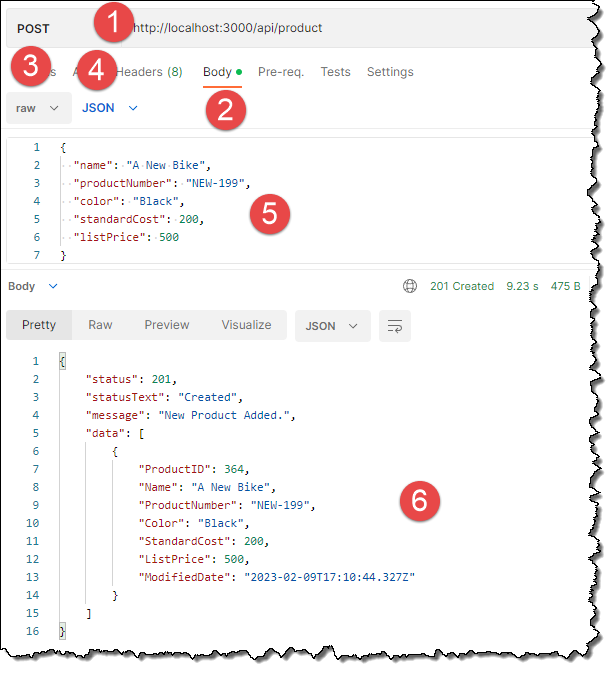
Save all the changes made to the files in your project. You now need to use Postman, or another tool, to be able to submit a POST with a JSON object within the body of the post back. Referring to Figure 2, follow the steps below to submit a new product object to be inserted into the Product table in SQL Server.
{
    "name": "A New Bike",
    "productNumber": "NEW-199",
    "color": "Black",
    "standardCost": 200,
    "listPrice": 500
}
Open your SQL Server query tool and retrieve all rows in your Product table to see the new record you just inserted. Keep track of the new ProductID of your new product as you're going to need this for updating and deleting. Also take note of the modifiedDate property, as you're going to see that value change when you update this product in the next section of this article.
Update a Product
The update() function is just like the insert() function in that you submit two SQL statements, the UDPATE and a SELECT, to retrieve the newly updated row. You call the createParams() function to build the array of parameter objects, but you pass in the id of the product to update, so the extra parameter object is added to the array. The update() function does assume that you're submitting all of the columns in your table to update. Open the repositories\product-sqlServer.js file and add the update() function, as shown in Listing 12.
Listing 12: Add a function to update a product into SQL Server.
// Update a product in SQL Server
repo.update = function (changedData, id, resolve, reject  ) {
    // Create SQL statement to submit
    let sql = `UPDATE dbo.Product
        SET Name = @Name
            ,ProductNumber = @ProductNumber
            ,Color = @Color
            ,StandardCost = @StandardCost
            ,ListPrice = @ListPrice
            ,ModifiedDate = @ModifiedDate
      WHERE ProductID = @ProductID;
      SELECT productID, name, productNumber,
            color, standardCost, listPrice,
            modifiedDate FROM dbo.Product
            WHERE ProductID = @ProductID;`;

    // Create parameter array
    let params = repo.createParams(changedData, id);

    // Submit SELECT query
    db.submit(sql, params, function (data) {
        // SUCCESS: Invoke resolve() callback
        if (data.rowsAffected[0] == 1) {
            // Return product object from first
            // recordset in the result set
            resolve(data.recordset);
        }
        else {
            // Record not found
            resolve(undefined);
        }
    }, function (err) {
        // ERROR: Invoke reject() callback
        reject(err);
    });
}
Try It Out
Save all the changes made to the files in your project. Open Postman and submit a PUT with a JSON object within the body of the post back. All columns for your table should be included with this object. You'll want to replace the productID property with the value you recorded when you submitted the INSERT statement.
{
    "productID": YOUR_VALUE_HERE,
    "name": "A CHANGED Bike",
    "productNumber": "NEW-199",
    "color": "Red",
    "standardCost": 300,
    "listPrice": 600
}
Modify the URL to add the product ID you wish to update at the end of the request, such as http://localhost:3000/api/product/YOUR_VALUE_HERE. Place the product ID returned from your insert at the end of the request. Click the Send button to submit the PUT request. You should see the updated product object returned in the response body of Postman. You should notice that the modifiedDate property has a different date/time stamp than the one from the POST you submitted. If you want, open your SQL Server query tool and select all rows from your Product table to verify that the changes were made.
Delete a Product
The last data modification functionality to add is to delete a product. Open the repositories\product-sqlServer.js file and add a delete() function, as shown in Listing 13. Pass in the primary key of the product to delete in the Product table and create the DELETE statement. The SQL should have a WHERE clause with a replaceable parameter for the ProductID field. Create a single parameter object in the params array that you pass to the submit() function. If the number of rows affected comes back as a one (1), then you know the product was deleted successfully.
Listing 13: Add a function to delete a product from SQL Server.
// Delete a product in SQL Server
repo.delete = function (id, resolve, reject) {
    // Create SQL statement to submit
    let sql = `DELETE FROM dbo.Product
    WHERE ProductID = @ProductID;`;

    // Create parameter array
    let params = [{
        "name": "ProductID",
        "type": sqlServer.Int,
        "value": id
    }];

    // Submit SELECT query
    db.submit(sql, params, function (data) {
        // SUCCESS: Invoke resolve() callback
        if (data.rowsAffected[0] == 1) {
            // Return a numeric value
            resolve(1);
        }
        else {
            // Record not found
            resolve(undefined);
        }
    }, function (err) {
        // ERROR: Invoke reject() callback
        reject(err);
    });
}
Try It Out
Save all the changes made to the files in your project. Open Postman and submit the DELETE request http://localhost:3000/api/product/YOUR_VALUE_HERE passing the product ID from your insert at the end of the URL line. Click the Send button and you should receive a 204 No Content status code back from the request. There will be no content in the response body area, you should just see the 204 status code. If you want, open your SQL Server query tool, and select all rows from your Product table to see that the row has been deleted.
Summary
In this article, you built upon the code from Part 1 of this article series. You added the ability to store hard-coded data into a configuration file and read that data from the file for use in your application. You took advantage of the middleware features of Node.js and Express to add exception handling that can log to both the console and to a file. Finally, you used the mssql package to connect to a SQL Server database. You then created functions to read, search, add, edit, and delete product data from a Product table. In the next article, you'll create an Express web server to build dynamic web pages. You're going to use these pages to make calls to the Web APIs you've created in these two articles to create a complete set of CRUD web pages.
