


Lately, everywhere you look, everyone is talking about low code / no code and how much you can build without traditional code. You might begin to think, “Is there a place for a code developer to still add value?” Code developers are essential to the overall Microsoft Power Platform ecosystem. You can use your current skills to extend the Power Platform by writing code that works with low code to increase productivity and build advanced solutions. Let's explore the Power Platform developer tooling, opportunities for using code, and how developers can participate in Power Platform fusion teams.
Power Platform Is Built On Azure
The first thing to understand as a developer is that Power Platform core components are built using 25+ Azure cloud services. These components offer an abstraction and simplification layer targeted for building line of business applications. For example, Microsoft Dataverse provides hybrid cloud storage that is both relational and unstructured, all in the same data engine. Dataverse uses Azure SQL Server, Azure Cosmos DB, and Azure Blob storage under the hood for data storage. This architecture allows Power Platform to benefit from the scale and robustness of Azure services without reimplementing their core capabilities. Dataverse also offers a cell-based service infrastructure built on Azure that Power Apps and the rest of the Power Platform run on. Other examples are Power Automate, which builds on top of Azure Logic Apps, and Power Pages built on Azure App Services. Azure also has many places to connect Azure services to the Power Platform, allowing developers to extend it with their Azure-built resources.
No Cliffs
A common problem in the past with low-code / no-code platforms is that someone would get 80-90% of the solution built but then hit the limits of the platform's capabilities. Without extension points built into the platform, the person building the solution would encounter a cliff. Nobody wants to hit a cliff because 1) you don't want to fall off the cliff, and 2) you don't want to go back and find a more traditional way of building the whole solution. To be better than others, the Power Platform teams have pushed a “no cliffs” mantra of building extensibility into each platform component. You can use these extensibility points to allow traditional code to extend the platform and fill gaps. For example, you could build a Power Apps Component Framework control to extend the user experience of a Power App, or a connector could be built to allow a Power Automate flow to communicate to an internal microservice.
Where Do I Start?
There is no single correct place to begin. I generally recommend learning some basics about the Power Platform and the Power Platform products that you might be working with or extending. While it is possible to create code for the Power Platform without knowing much about it, you won't be as productive. You might recreate something the platform already does since you didn't know it already did it! You are also more likely to build something that works against how the platform was intended to work. Power Platform products, to keep their simplicity and abstraction, do implement some opinionated ways of doing things. Knowing some of these opinionated things can help you build better extensions.
Power Platform products, to keep their simplicity and abstraction, do implement some opinionated ways of doing things. Knowing some of these opinionated things can help you build better extensions.
When asked what is a good first step, I suggest building a couple of tables in Dataverse, a Power App that uses the data, and a Power Automate flow that automates something with the data. This approach will also expose you to Power Fx, Power Platform's low-code language, and connectors, which are both key aspects of the platform. By the time you complete building that, you will be ready to move along and understand the extension points available and start thinking about building some code.
Developer Tooling
Microsoft is investing in the Power Platform developer tools to allow developers to not have to jump back to the portals to complete common tasks. Essential to that goal is the Power Platform CLI (the pac command) and the Power Platform Extension for Visual Studio Code (Figure 1) that allows completing common developer tasks without leaving Visual Studio Code.
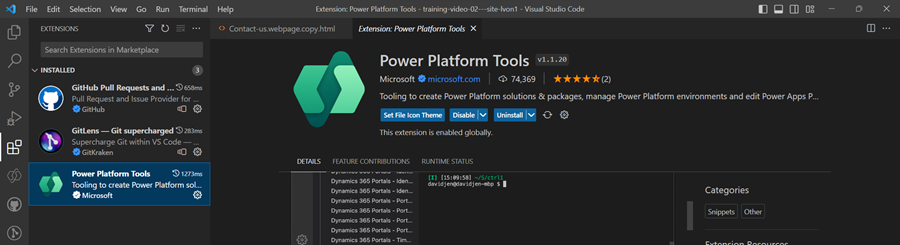
If you're curious about how the extension is built you can check out the repo on GitHub (https://github.com/microsoft/powerplatform-vscode/).
Using the extension makes it possible to manage Power Platform environments and allows developers to create, build, and deploy Power Platform solutions, packages and Power Pages websites. The extension also makes the Power Platform CLI (the pac command) (Figure 2) available for use from the Visual Studio Terminal.
Using the CLI, developers can work with many of the different Power Platform resources, from Power Apps components to Dataverse plugin code.
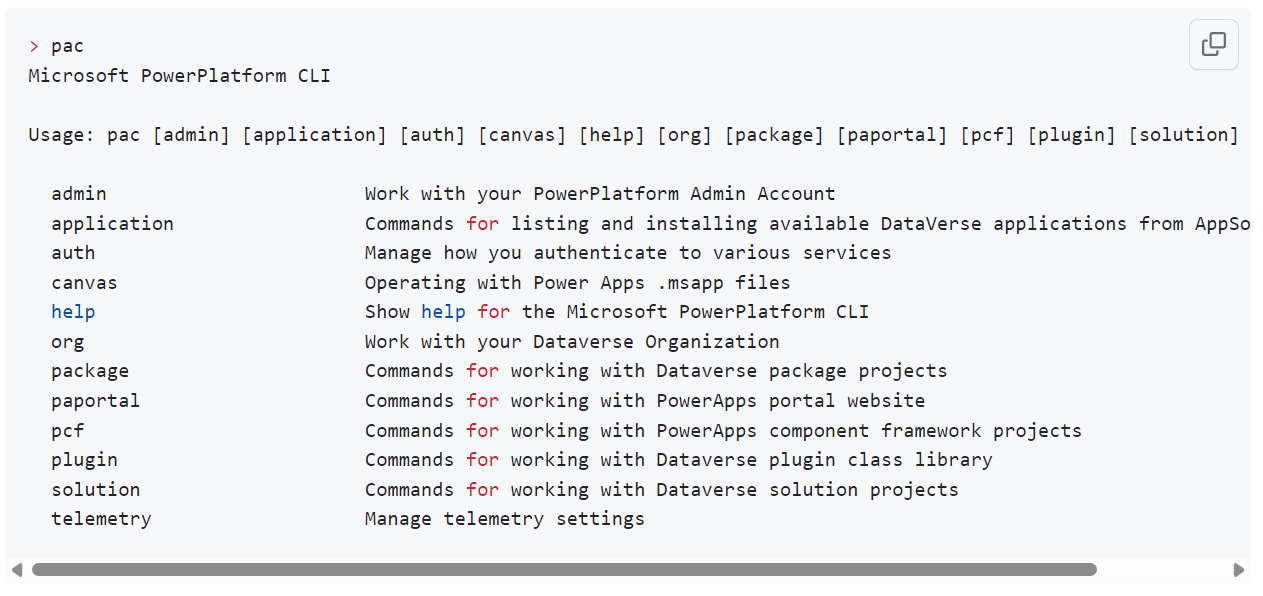
In many cases, the CLI will scaffold the initial files for the extension you are building, allowing you to focus on implementing your custom code logic.
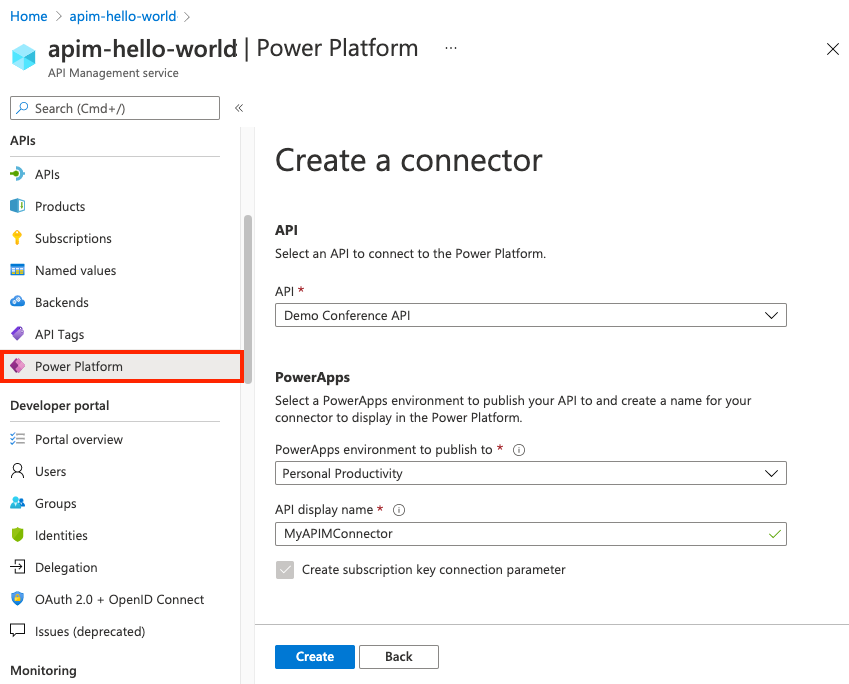
Developers will also find tooling built into Azure Services to make it easier to integrate the cloud services that you build with the Power Platform. This is relevant if, for example, you have an API managed by Azure API Management. In that case, you can use the export feature to create a Power Platform connector allowing Power Platform apps and flows to use your API. Figure 3 shows an example of exporting an API, bringing it into Power Platform as a custom connector.
API First
A cornerstone of the Power Platform is that it can easily work with existing data and services from low code without relocating them into the Power Platform. To accomplish this, it uses the concept of a connector. A connector is a wrapper describing a REST API to the platform to make it available in low code. Power Platform has over a thousand published connectors for popular services like Dropbox, SharePoint, DocuSign, and more. Connectors can be published for APIs by the service owners or by the community as independent publishers who want to help make more APIs available to the platform. You can publish custom connectors inside your company's environments to make your private APIs available to low code only inside your organization. Connectors are the easiest way to extend low-code solutions with custom logic from your APIs.
Creating a connector is a matter of defining the metadata that describes your API. While you can create it manually from the maker portals or edit it by hand using JSON, the easiest way is to import an Open API (https://swagger.io/) definition for your API (if it already has one).
For example, let's take the Swagger Petstore API (Figure 4) that defines a set of operations that are available.
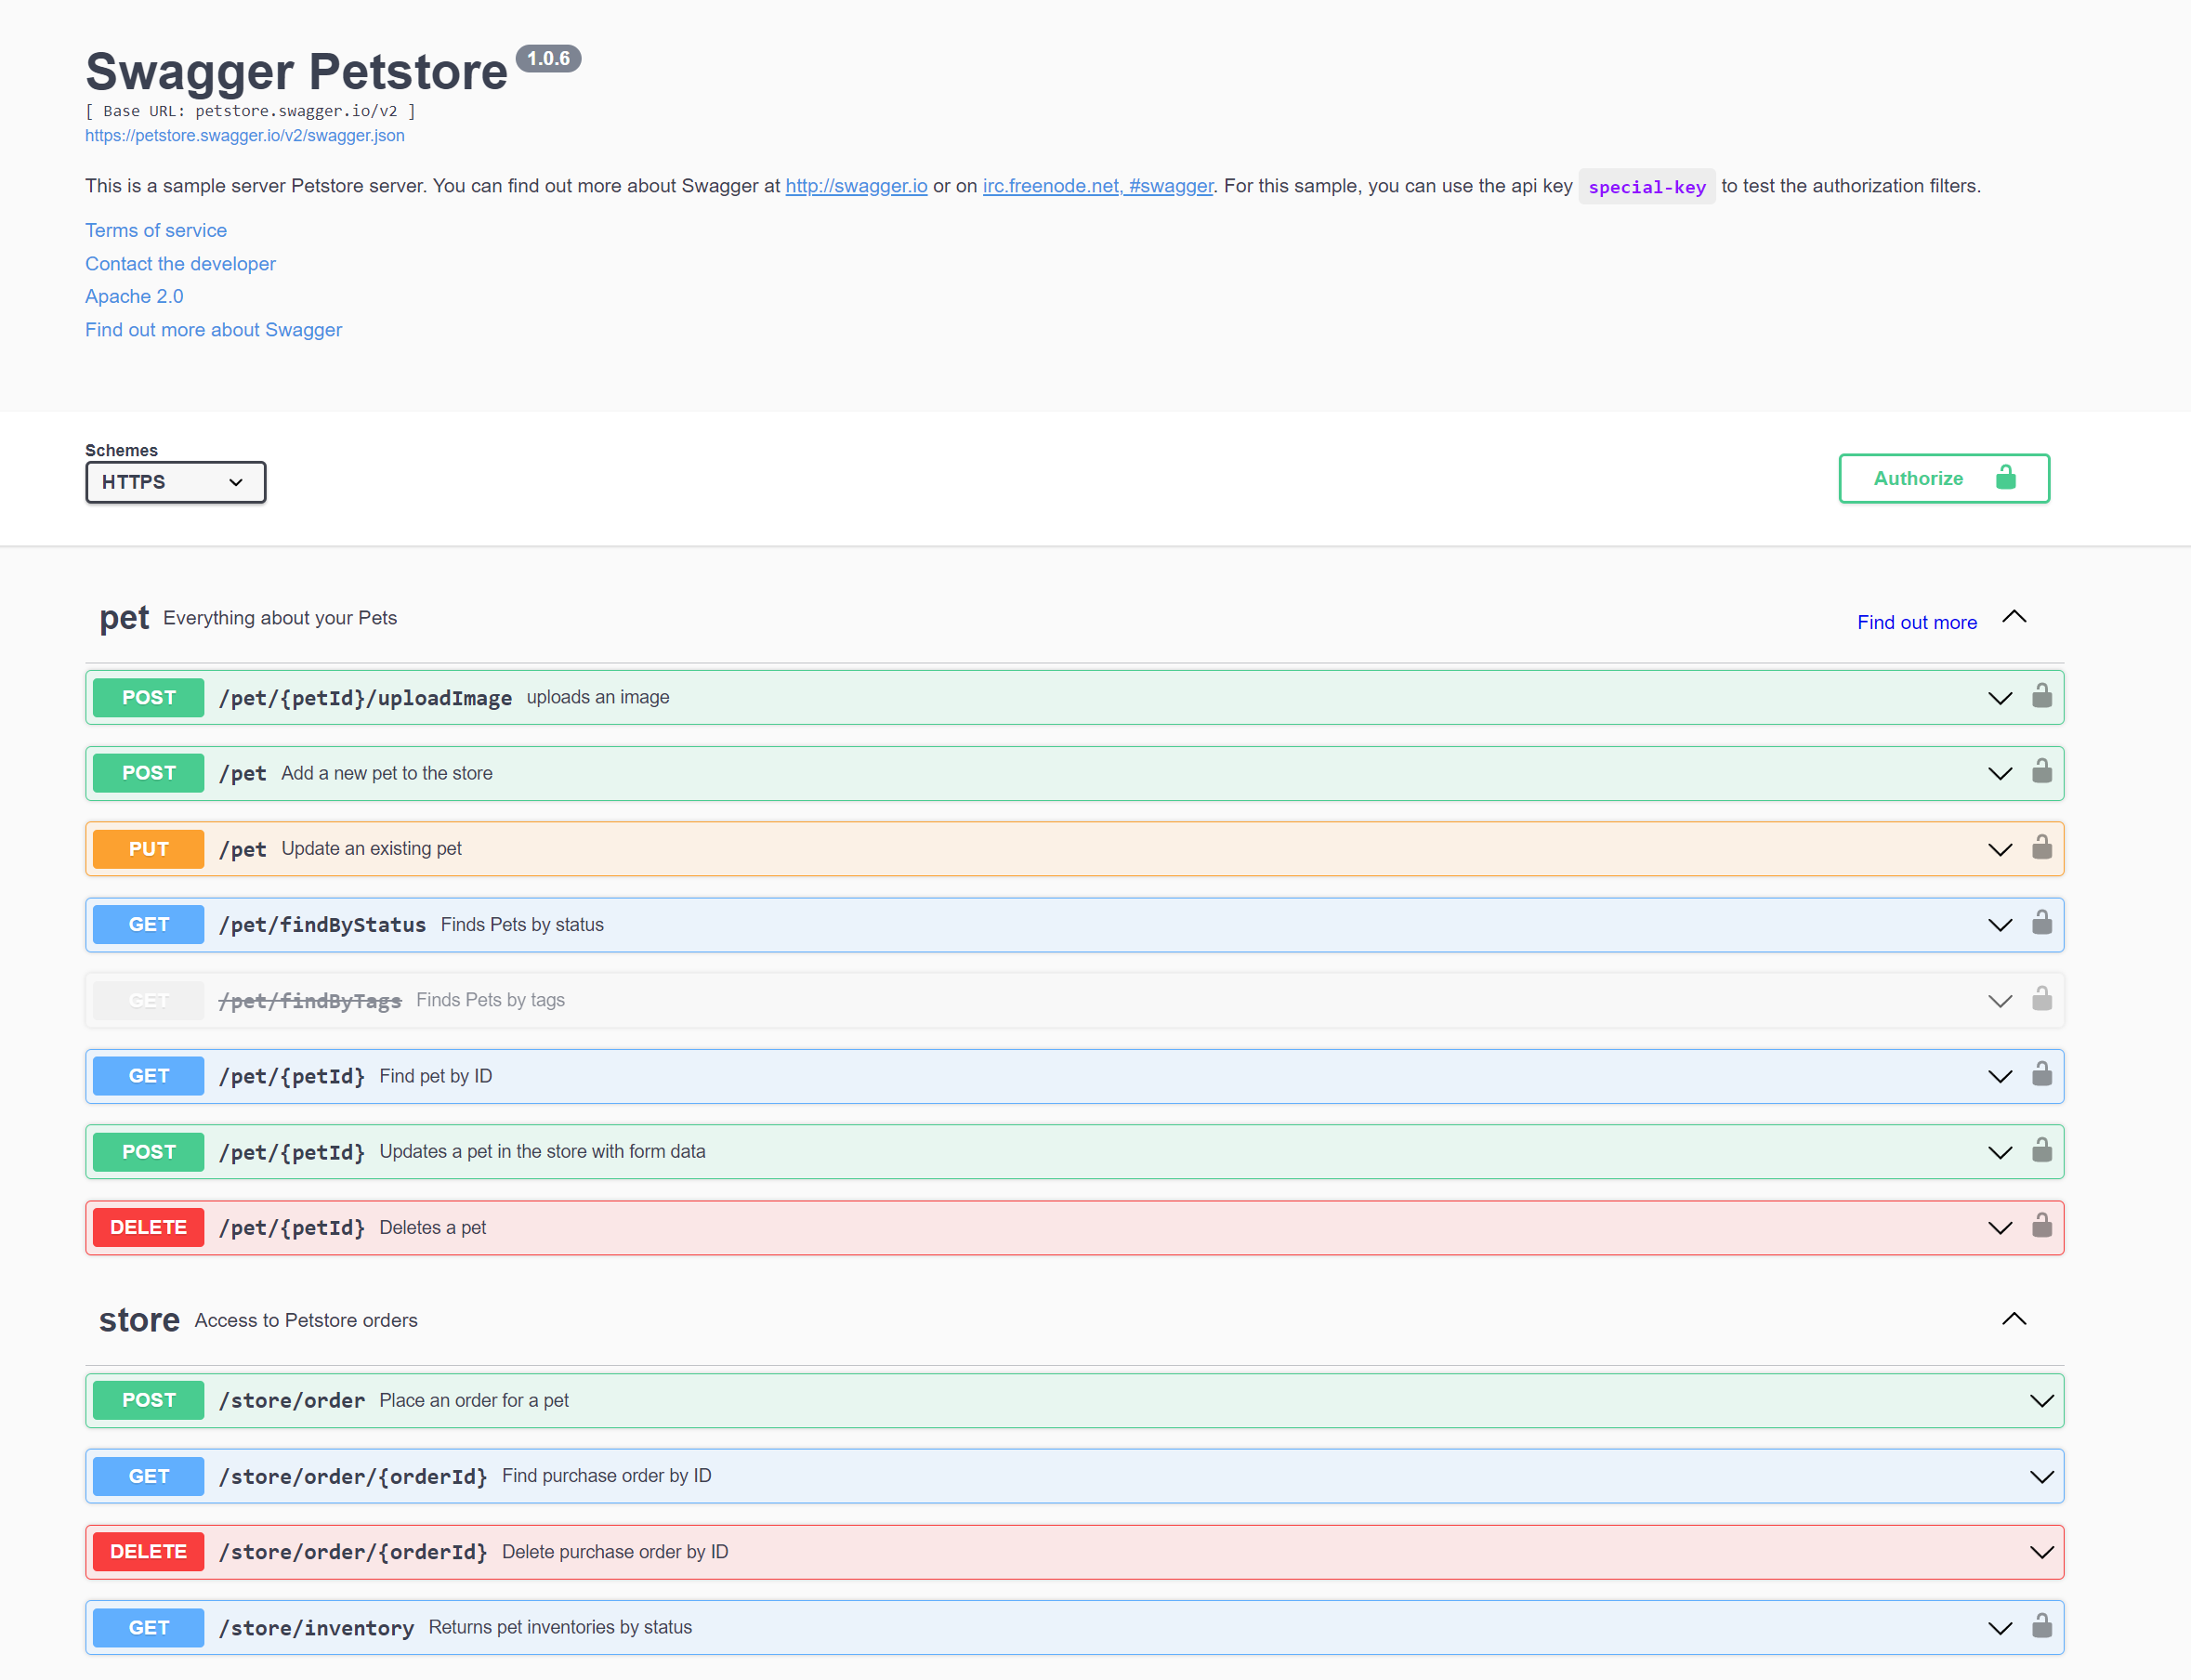
Once the Open API definition is imported, the Petstore connector is available to Power Apps and Power Automate flows. Figure 5 shows how a maker building a Power Automate flow can easily select from the API operations without knowing much about the API and use the operation as part of their automation.

API first is an excellent strategy for organizations and developers to make company custom logic available to makers building low-code solutions. You can define connectors for existing APIs or build custom APIs that support your organization's low-code effort. Using connectors to your own APIs, you can control the surface area and abstraction level you provide to makers who use your connector. You can use your favorite API hosting tools as long as it produces a REST API. You can secure your API using basic, OAuth, or key authentication. Many organizations use Azure API management to add a layer of governance on top of the APIs.
For more advanced connectors, developers can add custom C# code that either implements transformation on the API operations or can completely implement an operation in the connector. For example, the custom code could transform a complex object hierarchy the API returns into a simple object that is easy to consume by low code. To implement custom code in a connector, a developer would create a class named Script that inherits from ScriptBase, and then implement the ExecuteAsync method with your transformation logic.
public class Script : ScriptBase
{
  public override Task<HttpResponseMessage>
      ExecuteAsync()
  {
      // Your code here
  }
}
Power Platform connectors are one of the essential features developers need to know how to create. You can get a good idea of which connectors already exist by looking at the connector reference list. You can also dig deeper by exploring the Power Platform connector GitHub repo that contains the definition for all the published connectors.
Extending the User Experience
No matter how many visual controls ship with the platform, custom visual controls will always be needed. The Power Apps component framework (PCF) provides visual control extensibility for both Power Apps and Power Pages. PCF is a framework that allows developers to create custom visual code components that you can use on the low code screens in the application. The main purpose of PCF is to provide a defined interface for the low-code runtime to interact with the custom code. The framework accomplishes this by communicating with the custom code through the PCF interface throughout the lifecycle of the hosting screens. In addition to the standard interface a code component implements, code components have a manifest that defines individual input/output properties as well as the dependencies of the code component. The hosting runtime uses the manifest to determine the properties available to the low-code screen consuming the component.
You can create code components using TypeScript and HTML. You can use your favorite UI framework to help you build visuals. A popular choice is React, and the framework even has support for allowing you to leverage the platform provided React libraries, so you don't have to manually include React and Fluent UI libraries.
The best way to start building a PCF code component is to use the CLI to scaffold the component project. This snippet is an example of that command:
pac pcf init --namespace MyCo --name MyFirstPCF
 --template field --run-npm-install
Editor's note: A line break was inserted in the snippet due to the limitation of print margins.
This command creates a number of files to support the component and installs the required npm packages. If you were to open the folder in Visual Studio Code, it would look like Figure 6.
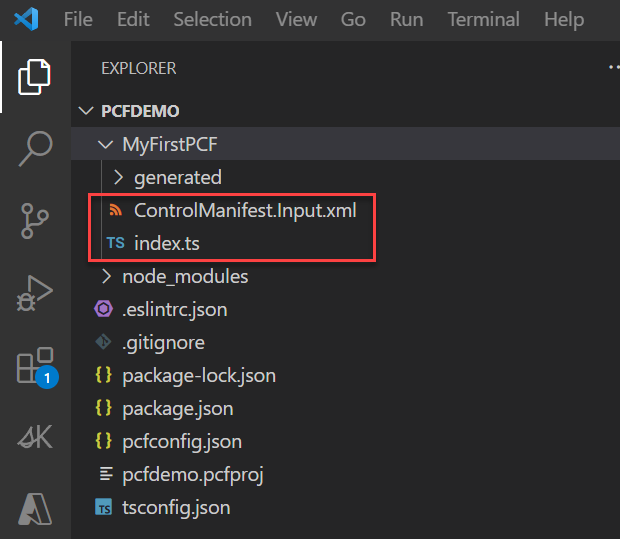
The most important is the Control Manifest that defines the control metadata and index.ts that contains the implementation of the code.
The manifest is where you define any properties available on the component. You can use these properties to share data and options between the code component logic and the hosting screen. The maker can add the component to the screen and configure these properties using the screen designer. The maker can also dynamically bind these properties to other data on the screen for a more dynamic experience. The following snippet shows how to define a property in the manifest:
<property name="sampleProperty"
  display-name-key="Property_Display_Key"
  description-key="Property_Desc_Key"
  of-type="SingleLine.Text"
  usage="bound"
  required="true" />
Editor's note: Line breaks were inserted in the snippet due to the limitation of print margins.
After you configure the manifest, you implement your code logic in index.ts. The StandardControl interface has four methods that you would add logic to depending on the component you were building.
- Init: Used to initialize the control instance. Controls can kick off remote server calls and other initialization actions here.
- updateView: Called when any value in the property bag has changed. This includes field values, data-sets, global values such as container height and width, offline status, control metadata values such as label, visible, etc.
- getOutputs: Called by the framework prior to a control receiving new data.
- destroy: Called when the control is to be removed from the DOM tree. Controls should use this call for cleanup.
Now the logic in each of these can range from simple to more complex where you use components from a UI framework. This code snippet shows a simple example of init that just creates a label in the DOM for use by the component:
public init(context:
  ComponentFramework.Context<IInputs>,
  notifyOutputChanged: () => void, state:
  ComponentFramework.Dictionary,
  container:HTMLDivElement)
{
    this._labelElement = document.createElement("label");
    this._labelElement.setAttribute("class", "MyLabels");
    container.appendChild(this._labelElement);
}
After configuring the manifest and implementing your code, you would use the CLI to package up your component and deploy it to one or more environments. From there, it would show up as an available component for makers in that environment, and they could add it to their screens in their apps and configure it for use.
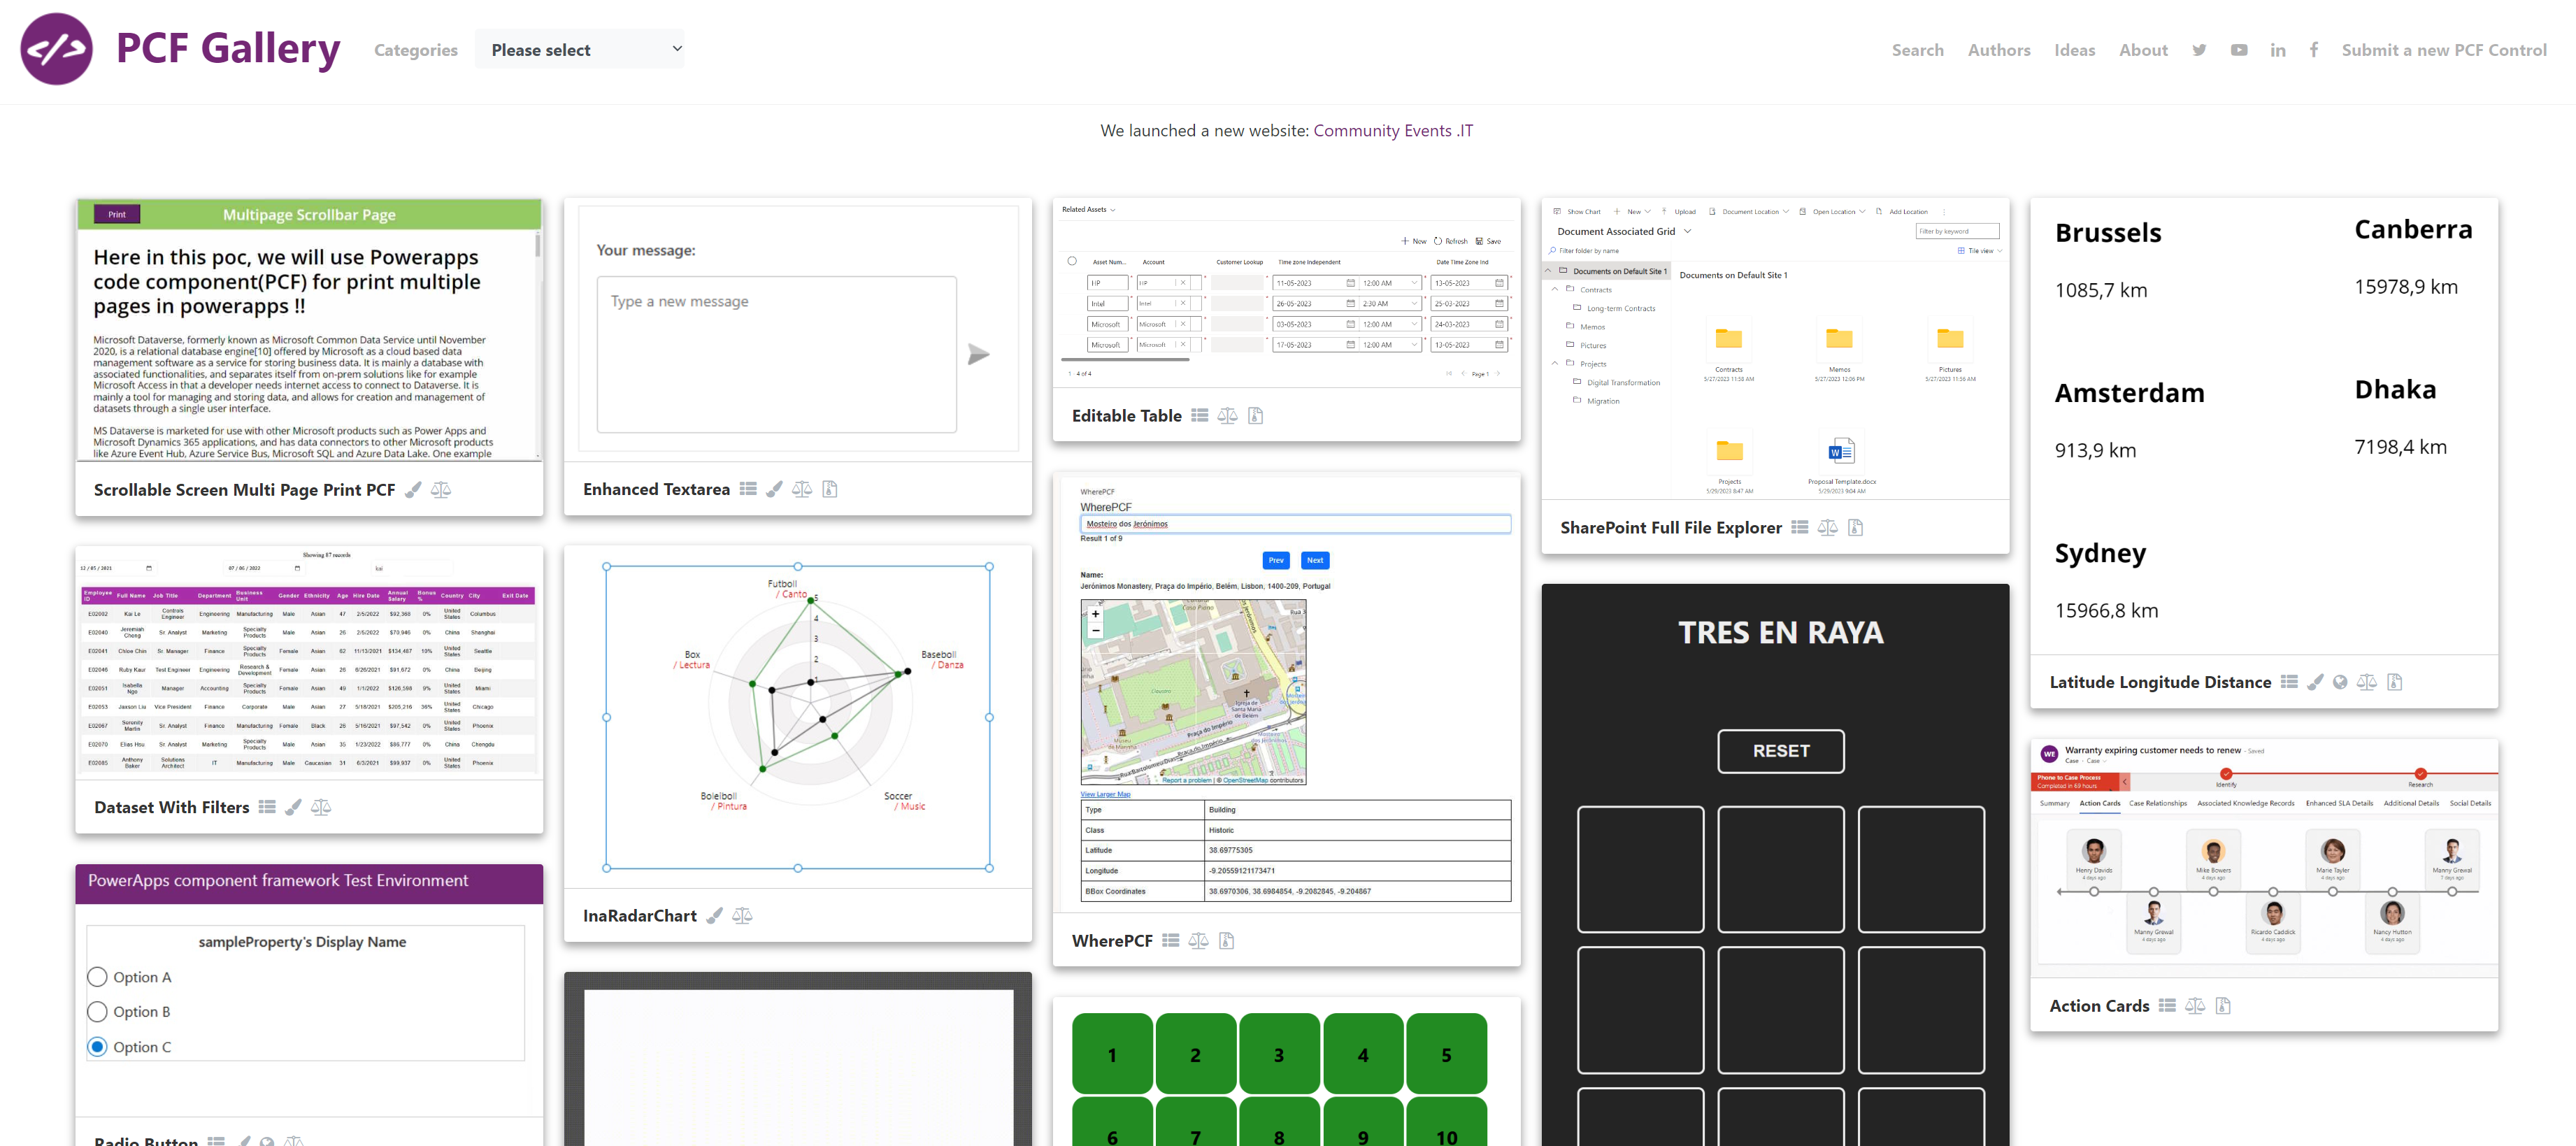
A great community resource for finding examples of PCF components is the site PCF Gallery (https://pcf.gallery/) shown in Figure 7.
Extending Dataverse with Plugins and Custom APIs
Dataverse is the Power Platform's database, providing hybrid storage options for data. Dataverse builds on top of 25+ services, including Azure SQL, Azure Cosmos DB, and Azure Storage, that provide secure, scalable storage of structured and unstructured data. The complexity of those underlying services is abstracted into what low-code developers configure and use. In addition to low-code usage, Dataverse also provides a REST API that implements the OData V4 protocol that code developers can use directly.
All operations against Dataverse from a user interface, a cloud flow, or directly via the API are processed by Dataverse's event framework. Each of these operations represents a message that is processed by the framework's event pipeline. The pipeline is at the heart of the extensibility that can be done via traditional code and low code. Dataverse has some built-in messages, and every time a table is defined, it also includes a standard set of messages in the context of that table, such as create, update, retrieve, and delete. You can extend the Dataverse API by defining your custom messages using the Dataverse custom API capability. For example, I could define a RiskAssessment message that I intend to implement support for performing a risk assessment across all the data table rows for a specific insurance policy data table. That Custom API message is then available for use in both the Dataverse REST API as well as from low code.
Defining a message doesn't cause any custom logic to execute; that is done by creating and registering a plugin with the event framework's pipeline for the message. The pipeline consists of the stages illustrated in Figure 8.

You can attach logic to any of these stages except for the Main Operation for built-in messages. You can also attach logic to execute custom messages for any of the stages, but the most common one is the Main Operation.
So how do you create custom logic? You create a Dataverse plugin. A plugin is a C# class that implements the IPlugin interface and is compiled into an assembly that is registered into your Dataverse environment. Then through Dataverse metadata, you register a step that identifies the event framework message and stage that your plug-in is to execute.
The IPlugin interface is a simple interface with a single method you must implement. That method is passed an IServiceProvider object that provides you the ability to get service objects like the plugin-context, tracing service, and organization service (Dataverse API for data operations) that are available for the current execution. The context for the custom message being processed allows your logic to access the input and output parameters for the current message. While it is simple to implement the logic, it becomes repetitive across multiple plugins for some of the basic things every plugin needs to do. One option that Microsoft provides is to use the CLI pac plugin init command to scaffold the files for the plugin. Figure 9 shows the files generated for my RiskAssessmentPlugin.
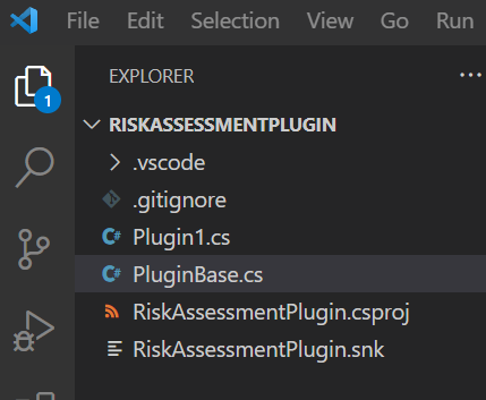
This takes care of some of the basic setup for the project and also includes a PluginBase.cs that does some of the work you would have to do in multiple plugins. Using this approach, you would implement your plugin in Plugin1 (you would rename it of course). Listing 1 shows an example of Plugin1.cs and since the base class has already done the work of using service provider to get the context, you now would implement your logic in the ExecuteDataversePlugin method.
Listing 1: RiskAssessmentPlugin
using Microsoft.Xrm.Sdk;
using System;

namespace RiskAssessmentPlugin
{
    public class RiskAssessmentPlugin : PluginBase
    {
        public RiskAssessmentPlugin(string unsecureConfiguration,
           string secureConfiguration): base(typeof(Plugin1))
        {
            // TODO: Implement your custom
            // configuration handling
        }

        // Entry point for custom business logic execution
        protected override void ExecuteDataversePlugin(
            ILocalPluginContext localPluginContext)
        {
            if (localPluginContext == null)
            {
                throw new ArgumentNullException(nameof(localPluginContext));
            }

            var context = localPluginContext.PluginExecutionContext;


            // Check for the entity on which the plugin
            // would be registered
            if (context.InputParameters.Contains("Target") &&
            context.InputParameters["Target"] is Entity)
            {
                var entity = (Entity)context.InputParameters["Target"];

                // Check for entity name on which this
                // plugin would be registered
                      if (entity.LogicalName == "dave_project")
                {
                  //Your logic goes here
                }
             }
        }
    }
}
Your logic goes here could be one or two lines of code or a bunch that implements some complex logic. The idea of plugins is to implement custom logic that is short running, you aren't expected or desired to implement logic in plugins that take a long time to execute. A key advantage is you can have your logic participate in the Dataverse database transaction.
The main difference between a plugin that responds to a built-in event and one that implements the logic for a custom API is that the custom API logic will access the input parameters that are custom for the message and populate the response. In most cases, the non-custom message plugin is all about the table operation. The custom API is also run on demand, where the other plugins are in response to a data operation.
The ability to implement basic plugins using Power Fx is currently in preview. These plugins don't have full access to the request and response but provide for a broader set of people that can create plugin logic. See Power Fx: Low Code for Everyone in this issue written by the team at Microsoft.)
Plugins represent one of the lowest level extensions of Dataverse and are a great way to implement logic where you want it to be as close to built-in to Dataverse as possible.
Fusion Teams
I fully endorse the concept of fusion teams, which is a term to describe collaborative cross-functional teams that come together to build business applications. This concept is particularly important with low-code efforts because it can bring together the low-code makers and the traditional code developers with deep business knowledge to accelerate deploying solutions. Fusion teams may be a more recent term, but the concept of these teams has been around for years and has proven successful in many deployments. For more, see The Rise of the Low-Code Ecosystem by Chris Huntingford in this issue of CODE Magazine.
Why do I bring up fusion teams here? Often as traditional code developers, we are quick to put down low code as not being real development. We are also quick to point out when low code or similar technologies don't live up to the standards and guidelines we have established for traditional code. By participating in fusion teams, you can get involved and influence that as part of the team. By building some supporting resources like custom connectors, you can help improve the overall architecture of the solutions being built. So, when you get asked to participate in a fusion team, take the opportunity to get involved.
Wrapping Up
That wraps up my quick tour of Power Platform for code developers. As you read through this CODE Focus issue, other articles will also highlight where traditional developers can add a lot of value to Power Platform. As I suggested earlier, try to create something using Power Platform. Learn how it does things. Review what the Power Platform created that you didn't have to write yourself. In addition, I have highlighted a few of the more common ways code developers can extend the platform. I have only scratched the surface of what is possible and hopefully sparked your interest to learn more.
