


WHAT’S IN THIS CHAPTER?
- Understanding Microsoft Push Notifications and how to use pop-up toasts
- Handling in-game notifications
- Using push notifications to update your game’s start tile
- Knowing whether your game is running on a device or in emulation
- Vibrating your phone with the VibrateController class
A key aspect of building a great Windows Phone 7 game experience is leveraging the platform’s features. Push notifications can be used to send updates and alerts in a variety of ways: in-game (also known as “raw”) updates, pop-up toasts, and tile updates.
These types of notifications have many uses, such as informing players when it is their turn, how many active games are waiting for them, or that a message has arrived from another player in a multiplayer game.
In addition to learning about push notifications in this chapter, you will learn how to vibrate the phone and detect your game environment.
Understanding Push Notifications
The Microsoft Push Notification Service provides a dedicated channel for sending information to a mobile application or game from a web service. This is a significant improvement over having to frequently poll a service to look for updates or notifications, since that would have a negative impact on battery life. Push notifications work the opposite way, allowing you to create cloud services that can push information to your phone, even when your game is not running.
One important thing you need to understand about push notifications as a game developer is that delivery is not guaranteed. This means that you should not be using them to transmit game data or anything essential to game play.
Instead, push notifications are intended for noncritical data, such as turn notifications, game status messages, incoming message alerts, and so on. A best practice for push notifications is to alert your player that something has occurred and provide a way to retrieve the same message manually in the player’s game.
Here are some sample scenarios:
- You have created a turn-based, two player game that allows for up to 32 concurrent games with other players. Each time you or your opponent takes a turn, a message is sent via a push notification to the other player that it is now his or her turn. The total count of games waiting for you to take your turn is displayed as a number on the game’s Start tile, via a tile update. Even if push notification fails, you will still be notified of your turn status the next time you launch the game, because the game would check a service to fetch the latest game state.
- You have created a game that allows players to pass short messages back and forth when they submit a turn. A pop-up toast could be used to alert the other player that a message has been received, rather than carrying (and possibly losing) the contents of the message. Even if this notification never makes it, and the pop-up toast never displays, the other player sees the new message the next time he or she starts the game.
- As you play your new Frontier Wars game, raw notifications provide information (“Bessie Mae done got a new cow!”) about the actions of other players playing the same game. These do not affect game play, and the player is not impacted if the message is missed. However, seeing the actions of others provides a feeling of interaction and makes the game more interesting.
As you can see, you have a variety of ways to use push notifications in your games. In the following sections, you will learn how to create and consume each of the three types: raw, toast, and tile updates.
Raw Notifications
In-game or “raw” notifications are received only when your game is running, and they can be processed or displayed in the context of the game. How you display them is up to you, of course, but the possibilities are end-less.
To demonstrate how raw notifications work, let’s create two projects instead of one. In addition to a Windows Phone Game project, let’s create a Windows Forms project to push the raw notifications to your phone game.
Note:
The complete code for these projects is available for download at the book’s companion web site (www.wrox.com).
If you don’t have an actual device, it’s okay. This demo works equally well in the Emulator without any changes.
PushItRawSample
First, create the Windows Phone Game project and name it PushItRawSample.
Add a SpriteFont to the PushItRawSampleContent project, and accept the default name. Set the size to 20.
Next, open the References section in Solution Explorer, and add a reference to Microsoft.Phone. This gives you access to the contents of the Microsoft.Phone.Notification namespace, which contains the HttpNotification class used in this sample.
Add the following using statements to the top of the Game1 class:
using Microsoft.Phone.Notification;
using System.Diagnostics;
You already know what the first statement is for. The reference to System.Diagnostics isn’t something you would use in a production ap-plication, but it’s a necessary part of this sample, as you will see shortly.
All applications or games that use push notifications need an entry for Publisher in the WMAppManifest. In Solution Explorer, expand the Properties section and open the WMAppManifest.xml file.
The App node has a series of attributes that define your game. Scroll all the way to the right, and edit the Publisher attribute. You can put any-thing you like between the quotes, so enter PushItRaw there.
NOTE:
You can put whatever you like in the Publisher attribute, as long as you put something there. Otherwise, it won’t work. When actually publishing to the Marketplace, you are encouraged to put your company name or website name as Publisher.
In your Game1 class, add the following class-level variables:
SpriteFont font;
string notificationMessage = “No message received”;
Scroll down to the LoadContent() method, and add this line to load your SpriteFont into memory:
font = Content.Load<SpriteFont>(“SpriteFont1”);
You will now use the HttpNotificationChannel class to create a notification channel between the Microsoft Push Notification Service and your game. This also creates a new subscription for your raw notifications.
Before adding any code, take a look at Listing 10-1 to see the members of the HttpNotificationChannel class.
Using this class, you can create and open a notification channel named RawNotificationSample and use that to receive push notifications in this sample project.
Start by adding a class-level variable to contain the notification chan-nel:
HttpNotificationChannel channel;
Next, create a new method called CreateNotificationChannel(), as shown in Listing 10-2.
This method contains a fair amount of activity. The Find() method is a static method that checks to see if the RawNotificationSample channel has already been created, and it returns the HttpNotificationChannel object if it has.
If you get back a null, your channel must not exist, so you create one by calling the constructor and passing in the name you want to use. Then you set up some delegates (which you will look at shortly) and open the newly created channel.
If you did not get back a null, you must have an active channel. You’ll set up those delegates as before, and then write a message containing the channel URI to the Output window in Visual Studio 2010.
You haven’t heard about creating services yet (that’s in Chapter 11). So, for now you will simulate the service by copying the URI from the Output window and pasting it into the Windows program you will create in the second part of this sample.
With your CreateNotificationChannel() method complete, add a call to your LoadContent() method.
Right now, Visual Studio should be complaining about the lack of a SetupDelegates() method, so add the one shown in Listing 10-3.
In this method, you set up two event handlers. The first is in response to a change in the URI for your notification channel.
Occasionally, your URI changes and the ChannelUriUpdated event fires. This typically doesn’t happen while your game is actively run-ning, but in rare cases it can. More likely, your game will be suspended as a result of the phone’s locking because of inactivity, and you will get a new URI when it resumes.
When this event occurs, the channel_ChannelUpdated() meth-od is called. You can see the method in Listing 10-4, so add it to your Game1 class now.
As you can see, it is very similar to the else clause of Listing 10-2, with one exception. This time, you are passing in the event argument as e and pulling the ChannelUri property from there.
The second event handler is triggered in response to receiving the ac-tual HTTP notification, which contains your raw information. When this oc-curs, the channel_HttpNotificationReceived() method is called. Take a look at Listing 10-5 and add it to your Game1 class.
When this method is called, you do a quick check to ensure that you have a valid notification. Then, you set up a StreamReader object to pull out the body of the notification and store it in the notificationMessage string you created earlier. This will be used in the Draw() method to display the raw notification.
At this point, you’re almost finished with the phone half of the sample. The only thing remaining is to add some code to your Draw() method to actually display the contents of the raw notification. Add the following block of code just before the call to the base.Draw() method:
spriteBatch.Begin();
spriteBatch.DrawString(font, notificationMessage, new Vector2(50,200),
     Color.White);
spriteBatch.End();
That’s it for the phone part of the sample. Before you move on to the next step, take a moment to build and run the PushItRawSample project. You can deploy to either the Emulator or the phone at this point; it doesn’t really matter.
On the phone’s screen, you see the text “No message received”; it will stay that way until the phone receives a raw notification.
Now, take a look at the Output window in Visual Studio 2010. At the very bottom, you should see a message containing the URI for sending raw notification data to your phone (or the Emulator).
NOTE:
Depending on whether you are running Visual Studio 2010 Express or a dif-ferent SKU, such as Professional or Ultimate, you may not see the Output window. If you are running Express, make sure you are set for Expert mode. If you still don’t see it, try pressing Ctrl+W and then O to open the Output window manually.
This URI will be different every time your game is run, or if it gets suspended and resumed. Normally, you would have a cloud service in place through which you could send that URI information. That way, if any notifi-cations need to be sent to the phone, the service would have the proper URI for each active player.
In this case, you are the service. You will take the URI from the Output window and paste it into the Windows form you are about to create, along with a message for the phone.
PushItRawWindows
Welcome to the second half of the raw notifications sample. You’ll create a Windows client program that accepts two inputs: the URI from your phone application, and a message to send. When you click the “Push it Raw” button, HttpWebRequest creates and sends a stream to the Push Notifica-tion Service via the URI specified.
WARNING:
You can’t do this next part in the Windows Phone edition of Visual Studio 2010 Express. You need either a full version of Visual Studio 2010 or the freely downloadable Visual C# 2010 Express to have access to the correct project types. The Express edition of C# is available for download at www.microsoft.com/express .
Start by creating a new Windows Forms application and naming it PushItRawWindows.
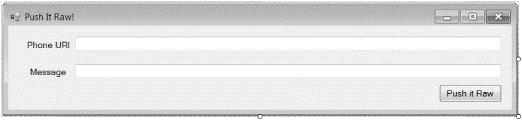
On your Form1 design surface, drag two labels, two textboxes, and a button. Configure them as shown in Table 10-1.
The end result doesn’t have to be a perfect match with Figure 10-1, but it should look reasonably close. Be sure to name your textbox and button controls correctly, or the code you are about to write won’t work properly.
Once you have the design surface finished, double-click the button control to create your Click event. In the handler for the Click event, add the following line of code:
SendRawNotification(txtPhoneUri.Text, txtMessage.Text);
If only it were that simple! Right about now, Visual Studio is telling you that you don’t have a SendRawNotification() method defined yet. Of course, that’s where the real action is.
At the top of the class file, add the following two using statements:
using System.Net;
using System.IO;
Add the code shown in Listing 10-6 to your Form1 class, right after the Click event handler.
Take a moment to go through this method. First you take the URI you pasted into the textbox and create your HttpWebRequest object.
Next, you set your request method to “POST” and add a notification class with a value of “3” to the Headers collection of the request.
Before you go any further, you should understand what’s going on here. The “X-NotificationClass” header is treated like a priority by the Push Notification Service, and a value of “3” means to send the message immediately.
WARNING:
Be sure you use “POST” for your request method, or you will get a 405 “Method Not Allowed” response code.
A quick trip to the MSDN documentation reveals three possible values:
- 3 - The Push Notification Service delivers the message immedi-ately.
- 13 - The message is delivered within 450 seconds (7.5 minutes).
- 23 - The message is delivered within 900 seconds (15 minutes).
Next, you set up a byte array called notificationMessage to hold the contents of the message textbox. The length of this array is then used to set the length of the HttpWebRequest.
After that, you create a stream and feed it to the HttpWebRequest, sending it to the specified URI.
Finally, using the same HttpWebRequest object, you fetch the re-sponse information and dump it into the variables at the end.
Even though you don’t actually display the contents of those variables on your form, they can provide useful diagnostic information that you can see by adding some Debug.WriteLine() statements, or by placing a breakpoint and examining each one individually.
Don’t just discard the response codes when building your game, be-cause they contain some important information. If, after sending your notifi-cation, you get a value of QueueFull in the X-NotificationStatus response, you may want to resend your notification later.
On the other hand, a value of Received doesn’t actually mean the phone received your notification - only that the Push Notification Service received it. A quick check of the X-DeviceConnectionStatus may re-veal a value of Connected or Temporarily Disconnected. The former means your notification was accepted and queued for delivery. The latter means the notification is in the queue, but the device is currently dis-connected.
At this point, you’re ready to test your raw notifications. The easiest way to do this is to have two copies of Visual Studio running at the same time. Have your XNA project in one and the Windows form you just created in the other.
Build and run your XNA project on either the Emulator or the phone. Keep an eye on the Output window in Visual Studio. After 2 to 3 seconds (sometimes longer), you see the URI. Copy the URI (not the whole message, just the URI).
On your phone’s screen (or the Emulator) you see the message “No message received,” indicating that the phone is ready to get a raw notification.
Now, in the other copy of Visual Studio, build and run your Windows Forms application. Paste the URI into the top box, type a message in the bot-tom box, and press the button.
After a couple seconds, the message on your phone changes to match the message you typed into the Windows form.
When you are running on an actual device, you should be aware of one more thing. The Emulator never “goes idle,” but if your phone goes back to the lock screen after an idle period, your game is suspended. When your game resumes, you get a new URI, and the ChannelUriUpdated event fires. If you have a phone, let it go idle while running this sample, and keep an eye on the Output window in Visual Studio as you resume.
Pop-Up Toasts
Toast notifications are system-wide notifications that do not disrupt active games or applications and that require no user intervention. They hang around the top of the screen for 10 seconds and then vanish.
If you want to get rid of a toast sooner, a Flick gesture will do the trick. If you tap the toast, the sending application or game is launched. For an example of a toast notification, look at the upper area of Figure 10-2.
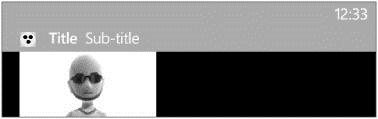
Toasts contain two properties you can manipulate: a title and a subtitle. The title is displayed in bold text, and the subtitle is displayed in regular text, immediately following the title.
In addition to the title and subtitle, a toast notification displays a tiny version of your game icon to the left. There is no method for passing a different icon.
PassTheToastSample
To help you understand how all this works, it’s time to do another sample.
This sample is conceptually similar to the PushItRawSample from the preceding section. However, in addition to receiving raw notifications in your game, you will receive toast notifications outside of your game.
For toast notifications to work, you need a URI. To get a URI, your game must be run at least once. Much like in the preceding sample, you will act as the intermediary service that communicates with the Push Notification Service.
As soon as you have a URI, you can continue sending toasts to the same URI until it changes. Several things can cause a URI to change, includ-ing receiving malformed messages. After the URI has changed, your players will be unable to receive any more toasts related to your game until they run it again.
Start by creating a new Windows Phone Game project, and name it PassTheToastSample.
Next, open the References section in Solution Explorer, and add a reference to Microsoft.Phone. This gives you access to the contents of the Microsoft.Phone.Notification namespace, which contains the HttpNotification class used in this sample.
Add the following using statements to the top of the Game1 class:
using Microsoft.Phone.Notification;
using System.Diagnostics;
As mentioned in the preceding section, if you want to use Push Notifi-cations in your game, it must have an entry for Publisher in the WMAppManifest.
In Solution Explorer, expand the Properties section and open the WMAppManifest.xml file.
The App node has a series of attributes that define your game. Scroll all the way to the right, and edit the Publisher attribute. You can put any-thing you like between the quotes, so enter PassTheToast there.
Add a class-level variable to store your HttpNotificationChannel object:
HttpNotificationChannel channel;
Next, add the CreateNotificationChannel() method, as shown in Listing 10-7.
When you have this method in place, add the following line to your LoadContent() method:
CreateNotificationChannel();
Now add the SetupDelegates() method, as shown in Listing 10-8.
Much like the raw sample, this code binds the ChannelUriUpdated event to an event handler named channel_ChannelUriUpdated(). Add the method shown in Listing 10-9 to your class.
This outputs the URI for you to copy and paste into the Windows Forms program you will create in the second half of this sample.
You’re almost done. You have only one more method to update. Ironically, it’s the Update() method. Add the following block of code to your Update() method, before the call to base.Update():
// Bind the channel to toast notifications if it’s open but still unbound
if (channel != null && !channel.IsShellToastBound)
{
    channel.BindToShellToast();
}
This code ensures that you have an open channel and binds it to toast notifications if it’s not already bound. Without this functionality, your game would not know that it has received any toast notifications.
At this point, you have everything you need in XNA to find or create a notification channel and to send toast notifications to your players when they are out of your game.
PassTheToastWindows
In this part of the sample, you will create a Windows Forms program to push a toast notification to the phone or the Emulator (wherever you ran the XNA to generate the URI).
This time, you must accept three inputs: the URI from your phone ap-plication, a title for your toast, and a subtitle. When you click the Pass The Toast! button, HttpWebRequest creates and sends a stream to the Push Notification Service via the URI specified.
Start by creating a new Windows Forms Application and naming it PassTheToastWindows.
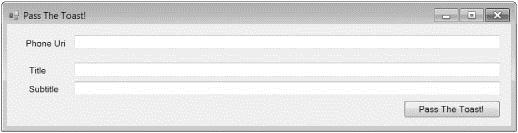
On your Form1 design surface, drag three labels, three textboxes, and a button. Configure them as shown in Table 10-2.
WARNING:
Just like in the previous sample, you can’t do this next part in the Windows Phone edition of Visual Studio 2010 Express. If you don’t have a full version of Visual Studio 2010, you can download Visual C# 2010 Express at www.microsoft.com/express.
The end result doesn’t have to be a perfect match with Figure 10-3, but it should look reasonably close. Be sure to name your textbox and button controls correctly, or the code you are about to write won’t work properly.
When you have the design surface finished, double-click the button control to create your Click event. In the handler for the Click event, add the following line of code:
SendToastNotification(txtPhoneUri.Text, txtTitle.Text, txtSubtitle.Text);
Before you start writing the SendToastNotification() method, add these two using statements to the top of the class file:
using System.Net;
using System.IO;
Of course, you don’t actually have a SendToastNotification() method defined yet, so add the code shown in Listing 10-10 to your Form1 class, right after the Click event handler.
Take a moment to go through this method. First you take the URI you pasted into the textbox and create your HttpWebRequest object.
Next, you set your request method to “POST” and set the content type to XML. In the Headers collection, you specify that you are sending a toast to the phone. Finally, you add a notification class with a value of “2”, which tells the Push Notification Service to send the message immediately.
This is a little different from the raw notifications, where you used a 3 to send immediately. Here are the values for toast notifications:
- 2 - The Push Notification Service delivers the message immedi-ately.
- 12 - The message is delivered within 450 seconds (7.5 minutes).
- 22 - The message is delivered within 900 seconds (15 minutes).
You must send your toast information as XML, as defined by the pre-vious ContentType property, so you create a notification message containing two pieces of text: a title and subtitle.
Next, you set up a byte array called toastMessage to hold the XML message. The length of this array is then used to set the length of your HttpWebRequest object.
Finally, you create a stream and feed the XML to the HttpWebRequest (which is pointed at the URI you specified), fetch the re-sponse information, and dump it into the variables at the end.
Take a look at the previous sample (PushItRawSample) for an ex-planation of what the response information means and how you can work with it in your service.
You’re finally ready to test your toast notifications. The easiest way to do this is to have two copies of Visual Studio running at the same time. Have your XNA project in one and the Windows form you just created in the other.
Build and run your XNA project on either the Emulator or the phone. Keep an eye on the Output window in Visual Studio. After 2 to 3 seconds (sometimes longer), you see the URI. Copy the URI (not the whole message, just the URI).
At this point, you can end your game. If you were using the Emulator, be sure to keep it running (the Emulator, not the game).
Now, in the other copy of Visual Studio, build and run your Windows Forms application. Paste the URI you just copied into the Phone URI textbox, type a title and subtitle into the corresponding boxes, and press the Pass the Toast! button.
After a (hopefully) brief wait, your phone or the Emulator displays a toast message containing the title and subtitle you typed into the Windows form.
Toasts will not pop up while your game is running, regardless of orientation or whether you have it set to full screen. Fortunately, there is a way to consume toast (Get it? Consume toast?) data in your game, so keep reading!
Consuming Toasts as Raw Notifications in Your Game
With a little extra code, it is possible to display information received as a toast within the context of your game, just like a raw notification.
Go back into your PassTheToastSample example (XNA) and add a SpriteFont to the PassTheToastSampleContent project. Just ac-cept the default name and set the size property to 30.
Next, add these two class-level variables:
SpriteFont font;
string notificationMessage = “No message received”;
You don’t need to add anything to the Game class constructor or the Initialize() method. So, skip both of those and add the following to the LoadContent() method:
font = Content.Load<SpriteFont>(“SpriteFont1”);
There is nothing to change in the CreateNotificationChannel() method, so skip that as well.
In the SetupDelegates() method, add the following line to add an event handler for the ShellToastNotificationReceived event:
channel.ShellToastNotificationReceived +=
    new EventHandler<NotificationEventArgs>
         (channel_ShellToastNotificationReceived);
This allows you to receive toast notification data that would otherwise be ig-nored while your game is running.
NOTE:
This still doesn’t give you the ability to have toast notifications pop up on-screen while your game is running, but you can use the toast data just like raw data.
Now, add the channel_ShellToastNotificationReceived() method shown in Listing 10-11 to your Game1 class.
When this method executes, it means that your game has received a toast notification. The NotificationEventArgs object (named e) gets converted to a string dictionary with two keys and two values. This method iterates through the values and builds the notificationMessage string, which you will write onscreen in the Draw() method.
The last thing to update is the Draw() method. Add this next block of code to write to the screen the text of the toast notification you have received:
spriteBatch.Begin();
spriteBatch.DrawString(font, notificationMessage, new Vector2(50, 200),
     Color.White);
spriteBatch.End();
Now, run both the PassTheToastSample game and the PassTheToastWindows form as before. Copy the URI over to the form, and enter a title and subtitle.
Press the Pass The Toast! button. Shortly thereafter you will see the ti-tle and subtitle appear on your game screen.
Press the Back button on the phone (or the Emulator), and click the Pass The Toast! button again without changing any other data. This time you see a toast notification at the top of your phone.
Tile Notifications
The final notification to discuss in this section is the tile notification. Every game has an assigned tile that your players can pin to the Start screen if they choose.
Tiles are more than just launch icons, though. They can display infor-mation about the state of your game, received via push notifications or updated by a schedule.
Tiles can be updated at any time in the following three ways:
- Background image - This can be updated using an image stored either locally or remotely, based on the path you provide.
- Title - The title is a string that is set via the project Properties screen in Visual Studio 2010. Titles must fit on a single line and cannot extend past the tile’s width.
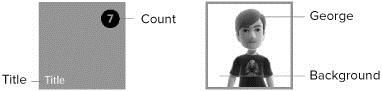
- Count - You can display an integer value with a range of 1 to 99. If you do not provide a new value, the current value continues to display. Sending a 0 clears the count and removes the circle image from the tile.
Even though you can modify the values of these items, you do not have any control over their placement at this time. Count values (if any) are displayed on the top right, and Title values (if any) are displayed on the bottom left, as shown in Figure 10-4.
When creating your own tiles, keep in mind that they must have a file size of 80 KB or less and dimensions of 173 pixels wide by 173 pixels high.
PushingTileSample
The best way to learn is by doing, so start by creating a Windows Phone Game project, and name it PushingTileSample.
Like you’ve done in the other two samples so far in this chapter, you also will create a Windows Forms program to send information to the phone or the Emulator via the URI generated by your game project.
After your project has been created, open the Properties window by right-clicking the project name in Solution Explorer and selecting Properties.
On the XNA Game Studio tab of the Properties window, find the “Tile title” and “Tile image” fields, as shown in Figure 10-5.
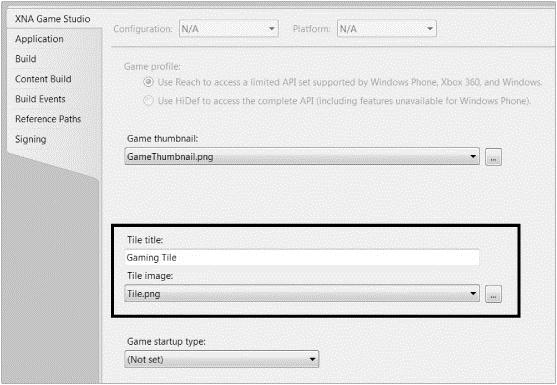
Now, change the “Tile title” field to Pushing Tile. Before you can set the “Tile image” field to anything other than one of the default values, you must add some tile images to your project.
Grab the images for this section from this book’s website, located at www.wrox.com . After you have downloaded the tile images, you must add them to your PushingTileSampleContent project. Don’t create a sepa-rate folder for the images, because that will change the path and cause the sample code to break.
NOTE:
If you provide an invalid path, the Windows Phone 7 operating system de-faults to the previous good tile background image so that your users won’t see a broken image. This is a good thing, although it can make debugging a little trickier at times.
At this point, you should have six tile images in your content project, named Tile.png and Tile10.png to Tile14.png. The images for Tile1 to Tile9 are hosted online for you, but more on that in a bit.
When pushing a tile update that includes a background change, you aren’t sending the new image to the phone as part of the notification. Instead, you send a path to the new image, which may be local or on the web.
If the path provided is for a web-hosted image, the phone downloads it. The image should be less than 80 KB in size. For best results, include images locally (as part of the game installation) where possible. Image downloads that take longer than 15 seconds may time out.
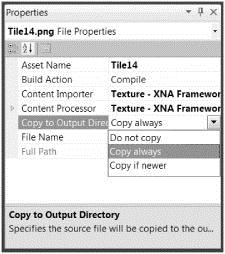
In Solution Explorer, click each of the six images in your PushingTileSampleContent project and look at the Properties window. Change the “Copy to Output Directory” property of each image from “Do not copy” to “Copy always,” as shown in Figure 10-6.
After you have added all the images and set their properties, go back to the project Properties screen and select the default tile image by clicking the ellipses next to the “Tile image” drop-down list. This allows you to browse to the content folder where your images are stored.
NOTE:
By default, the first folder to open is the project folder, so you need to navi-gate up one folder and then down into the PushingTileSampleContent folder to find the tile images you seek.
Once you have the correct folder, select the TILE.PNG image and click the Open button. (If you get an error saying that the file already exists, don’t worry. You’re good to go.) You can close the project Properties window now.
Before jumping into the Game1 class, you must do a couple more things. In Solution Explorer, under the Properties folder, open the WMAppManifest.xml file and modify the Publisher attribute, just like you did for the previous samples. You can put anything you like here, as long as you put something. Ordinarily, this would be where you would put the name of your company or your website URL.
Return to Solution Explorer and expand the References folder. Add a reference to Microsoft.Phone.
At the top of your Game1.cs class file, add the following using statements:
using Microsoft.Phone.Notification;
using System.Diagnostics;
using System.Collections.ObjectModel;
Add a class-level variable to store your HttpNotificationChannel object:
HttpNotificationChannel channel;
Next, add the now-familiar CreateNotificationChannel() method to your Game1 class, as shown in Listing 10-12.
This version is identical to the method of the same name in the previ-ous two samples, with the exception of the channel name.
With this method in place, you can now add the following line to the end of your LoadContent() method:
CreateNotificationChannel();
The SetupDelegates() method is up next, so take a look at the code in Listing 10-13 and add it to your Game1 class.
Unlike the previous notification types, no raw data is associated with tile updates, so the SetupDelegates() method in this sample is pretty sparse by comparison.
Now, add the event handler method for the ChannelUriUpdated event, as shown in Listing 10-14.
Again, nothing is new here. You will copy the URI from the Output window in Visual Studio to the Windows program (which you will create shortly).
Next, you will add the following block of code to your Update() method, just before the call to the base.Update() method:
if (channel != null && !channel.IsShellTileBound)
{
    Collection<Uri> ListOfAllowedDomains =
        new Collection<Uri> { new Uri(“http://www.xnadevelopment.com”) };
    channel.BindToShellTile(ListOfAllowedDomains);
}
This should be a familiar pattern, with a slight twist. As in the other samples, you are checking the channel to ensure that it is not null and is not already bound to a tile notification subscription.
On the inside, you are creating a collection of URI objects and adding the xnadevelopment.com domain, finally binding that list to the channel. This allows you to specify a safe list of domains from which to pull tile background images.
That’s it for the first half of the sample. If you run it at this point, you’ll get the usual URI in the Output window, but nowhere to use it.
PushingTileWindows
You know what happens next. You will create a Windows Forms pro-gram to push a tile notification to the phone or the Emulator (wherever you ran the XNA to generate the URI). This time, you need only two inputs: the URI from your XNA game, and the title to appear on the tile.
When you click the Push The Tile! button, a stream is created and is sent by HttpWebRequest to the Push Notification Service via the URI specified.
WARNING:
Just like with the previous two samples, you can’t do this next part in the Windows Phone edition of Visual Studio 2010 Express. If you don’t have a full version of Visual Studio 2010, you can download Visual C# 2010 Express at www.microsoft.com/express.
Start by creating a new Windows Forms application and naming it PushingTileWindows.
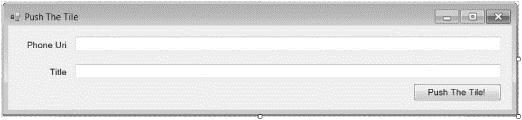
On your Form1 design surface, drag two labels, two textboxes, and a button. Configure them as shown in Table 10-3.
The end result doesn’t have to be a perfect match with Figure 10-7, but it should look reasonably close. Be sure to name your textbox and button controls correctly, or the code you are about to write won’t work properly.
When the design surface is finished, double-click the button control to create your Click event. Inside the handler for the Click event, add the following line of code:
SendTileNotification(txtPhoneUri.Text, txtTitle.Text);
Add these two using statements to the top of your class file:
using System.Net;
using System.IO;
Next up is the method where all the important stuff happens. Add the SendTileNotification() method shown in Listing 10-15 to your Game1 class.
Some of this method should be fairly familiar to you by now, but a few key pieces need to be covered, so take a good look.
In the Headers collection, you specify that you are sending a tile up-date (token) to the phone and setting the notification class “to “1”, which tells the Push Notification Service to send the message immediately.
This is a little different from the raw and toast notifications. Here are the values for tile notifications:
- 1 - The Push Notification Service delivers the message immedi-ately.
- 11 - The message is delivered within 450 seconds (7.5 minutes).
- 21 - The message is delivered within 900 seconds (15 minutes).
Next, you create a random number between 0 and 14 and grab a remote image if the number is between 0 and 9. Otherwise, you use a local image for numbers between 10 and 14. There’s really no reason to do this other than to demonstrate how to grab images from either source. You will also use the random number as your count value.
You are sending your tile message as XML, so you create a notifica-tion message containing three pieces of text: a background path, a count val-ue, and a title.
Next, you set up a byte array called tileMessage to hold the XML message. The array length is used to set the length of your HttpWebRequest.
Finally, you create a stream and feed the XML to the HttpWebRequest (which is pointed at the URI you specified), fetch the re-sponse information, and dump it into the variables at the end.
Take a look at the first sample (PushItRawSample) for an explana-tion of what the response information means, and how you can work with it in your service.
You’re finally ready to test your tile notifications. The easiest way to do this is to have two copies of Visual Studio running at the same time. Have your XNA project in one and the Windows form you just created in the other.
Build and run your XNA project on either the Emulator or the phone. Keep an eye on the Output window in Visual Studio. After 2 to 3 seconds (sometimes longer), you see the URI. Copy the URI so that you can paste it into the PushingTileWindows program.
Now, you can end your game since you have what you need. If you are using the Emulator instead of a phone, be sure to only shut down the game.
At this point, you have the URI on your clipboard but you don’t actually have a tile to update. Tap the right-arrow icon on the top right of your Start screen (this applies to the phone or the Emulator) to open the application list.
To pin the PushingTile sample to the Start screen, tap and hold the entry in the program list until you see a context menu giving you the option to “pin to start” or uninstall your game. Tap the “pin to start” option, and then go back to the Start screen.
Now, in the other copy of Visual Studio, press F5 to build and run your PushingTileWindows application. Paste the URI you just copied into the Phone URI textbox, provide a title in the Title textbox, and press the Push The Tile! button.
After a (hopefully) brief wait, the tile on your phone or the Emulator changes to a randomly selected background image, and a corresponding count number appears in the top-right corner.
Images pulled from local storage will have the word LOCAL! in the middle of the tile. If you get an image with no number, don’t panic. That just means a 0 was sent, which removes the count from the tile.
That’s it for the push notification types. Next, you will learn another way to get your player’s attention.
Good Vibrations
Vibrating the phone is an excellent way to notify your players that something important is happening in your game. It can be used for everything from a subtle nag (along the lines of “Hey, buddy, it’s still your turn”) to adding a little extra punch to explosions and collisions.
Generally speaking, vibrating the phone should be used in moderation. It’s a drain on the battery, and, of course, it loses significance if it’s used all the time. Save it for things that warrant extra attention. Also, some folks don’t like vibrating alerts (or want to preserve battery life), so be sure to give your players the option to turn them off in your game.
The Microsoft.Devices Namespace
Regardless of whether you are using Silverlight or XNA, everything you need to vibrate the phone can be found in the Microsoft.Devices namespace.
To see how this works, create a new Windows Phone Game project, and name it VibrationSample.
Add a new SpriteFont to your VibrationSampleContent project, and call it VibrationFont.spritefont. Set the size to 20.
Add a class-level variable to hold your font:
SpriteFont vibrationFont;
Now, load it into memory via the LoadContent() method:
vibrationFont = Content.Load<SpriteFont>(“VibrationFont”);
At this point, you’re ready to do something a little more interesting, so expand the References section and add a reference to the Microsoft.Phone namespace.
Now, at the top of your Game1 class, add the following using state-ment:
using Microsoft.Devices
The Microsoft.Devices namespace you just added contains the VibrateController class, which enables you to vibrate your phone. But it also has another very useful class called Environment, which you will look at next.
Environment
The Environment class provides a single property called DeviceType that returns an enumeration of the same name. The DeviceType enumeration contains two possible values:
- Device
- Emulator
Checking this property in your game tells you whether you are running on an actual device or in the Emulator, which can be pretty handy in certain cases.
You already have your project started and a SpriteFont loaded, so go ahead and add the following block of code to your Draw() method:
spriteBatch.Begin();
spriteBatch.DrawString(vibrationFont,
                       “Device Type: “ + Microsoft.Devices
                            .Environment.DeviceType.ToString(),
                       new Vector2(25,25),
                       Color.Crimson);
spriteBatch.End();
To see this in action, press F5 to build and run the VibrationSample. If you have a phone, run it there first and observe the device type being displayed onscreen. Next, select the Windows Phone 7 Emulator from the XNA Game Studio Deployment Device drop-down box, and run it again.
Where this really becomes valuable is when you are building games that depend on phone features that aren’t in the Emulator, such as GPS or the camera. You need to simulate input from those features when running in the Emulator, and that means the game must know whether you are running on actual hardware.
VibrateController
This class exposes a single property named Default that you must use to obtain an instance of the VibrateController object. Once you have an instance, two methods are available for controlling vibrations on your device: Start() and Stop().
The Start() method accepts a TimeSpan parameter, which allows you to specify how long (in seconds, minutes, or hours) the device will vi-brate. Calling this method typically looks like this:
VibrateController.Default.Start(new TimeSpan(0, 0, 5));
This code tells the phone to vibrate for 5 seconds and then stop. The TimeSpan class constructor accepts three parameters in the following order: hours, minutes, and seconds.
type=“warning”
If you want your gamers to hate you, set the vibration duration to minutes or hours. After they finish recharging their phone batteries, you can expect a few nasty calls. Seriously, don’t ever do this.
The Stop() method does exactly what you would expect. It stops the vibration, even if the duration has not elapsed yet.
Before you implement this in the VibrationSample project, you must add a few control variables. At the class level, add the following two variables:
int CurrentCount;
string VibrationStatus;
CurrentCount is used for timer control. VibrationStatus indicates whether the phone should be currently vibrating, which is handy when run-ning in the Emulator.
Next, in the Update() method, you will add the following block of code, after the if block that checks for input from the Back button, and be-fore the call to the base.Update() method:
VibrationStatus = “vibrating.”;

// The vibrations start after 4 seconds, so the starting status is “not
// vibrating”
if ((gameTime.TotalGameTime.Seconds < 2)
|| (gameTime.TotalGameTime.Seconds >= CurrentCount + 2))
    VibrationStatus = “not vibrating.”;

// Every 4 seconds, vibrate for 2 seconds
if (gameTime.TotalGameTime.Seconds >= CurrentCount + 4)
{
    VibrateController.Default.Start(new TimeSpan(0, 0, 2));
    CurrentCount = gameTime.TotalGameTime.Seconds;
}
Unfortunately, the VibrateController class doesn’t expose any properties to report whether the phone is actively vibrating, so you have to resort to a little timing trickery in this code. You know when the vibrations start and end, so you can change the value of VibrationStatus on a timer.
In the Draw() method, add this line inside the SpriteBatch block to show the vibration status:
spriteBatch.DrawString(vibrationFont,
                       “Device is “ + VibrationStatus,
                       new Vector2(25, 50),
                       Color.Crimson);
Set your XNA Game Studio Deployment Device drop-down box to Windows Phone 7 Device (if you have one), and press F5 to build and run. After a 4-second pause, your phone alternates vibrating and not vibrating in 2-second intervals.
If you do not have a phone, you can still run this code in the Emulator. The Emulator safely ignores the call to start vibrating, and the VibrationStatus variable is displayed so that you can tell when the phone would be vibrating.
The last thing to cover in this sample is stopping the vibration before the duration has elapsed. You do this by calling the Stop() method. Change the if block to look like this:
// Allows the game to exit
if (GamePad.GetState(PlayerIndex.One).Buttons.Back == ButtonState.Pressed)
{
    VibrateController.Default.Stop();
    this.Exit();
}
While you are in there, temporarily comment out the call to the this.Exit() method. Now whenever you press the Back button, the vi-bration stops, even if time remains.
Let the application keep running (since you commented out the line to kill the app). After a few seconds, the vibration restarts. The Stop() method doesn’t disable vibration; it only kills the current duration.
You can call the Stop() method from within the OnDeactivated() event to stop any active vibrations after your game los-es focus (such as when you receive a notification or incoming call).
Along the same lines, if your game terminates normally, any active vi-brations stop when your game does. So, you don’t need to put anything spe-cial in the OnExiting() event.
Unfortunately, if your game terminates unexpectedly while a vibration is running, the vibration may continue indefinitely after the game ends. The only way to get it to stop at that point is by turning off the phone (or letting the battery drain) or by running your game again so that the VibrateController instance receives a new duration.
To simulate this, run your code on a device and wait for it to vibrate. While it is vibrating, click the Stop Debugging icon in Visual Studio 2010. The code stops executing, your phone returns to the Start screen, and the vi-bration continues. Just run the code again and press the Back button on your phone to stop it.
That’s all there is to know about the code necessary to vibrate the phone in your game. But one last concept must be addressed.
If you’ve spent much time in the Xbox Live Indie Games channel, you’ve probably seen the various “massager” applications that are available. Many of them tout various features such as “strongest vibrations available” or various settings for vibration patterns. After reading this section, you should understand that those claims are patently false. There’s no way to control any aspect of the vibrations other than duration. You also can’t do subsecond vibrations. The minimum duration is 1 second.
Nothing is stopping you from taking the knowledge you have gained in this section and creating the Super Deluxe Massager App for Windows Phone 7 (that is, other than integrity and good taste). However, the authors of this book sincerely hope you’ll use your newly acquired powers for good and make some interesting and compelling games instead.
Summary
Raw notifications can be used while your game is running to let your players know what other players are doing, or when updates are available for your game.
Pop-up toast notifications are sent when your game is not running. They can be used to alert players when it is their turn or when something re-quires their attention in the game.
Tile notifications can be used to update your game’s Start tile by changing the icon or overlaying additional information on top of the tile, such as the number of active games awaiting your turn.
Push notifications are not guaranteed delivery and thus should not be used to transmit any personal information or game-critical data.
The Microsoft.Devices namespace contains methods and prop-erties for controlling phone vibrations and determining whether your game is running on an actual device or in emulation.
In Chapter 11, you will learn about creating and consuming web services for use in your game. You will also learn how to create two very important services - global scoreboards and matchmaking.
