Microsoft has added an abundance of new features and functionality to ASP.NET 4.5 and Visual Studio 2012. This article provides an overview of many of those new features and enhancements ranging from improved editors for HTML, CSS and JavaScript all the way through to publishing your work to the web.
The list of new features in ASP.NET 4.5 and Visual Studio 2012 is quite impressive. New features can be broken down into categories including ASP.NET Core Services, ASP.NET MVC 4, Web API, bundling and minification, Web Sockets, SignalR, ASP.NET Web Forms, editor enhancements, deployment and publishing enhancements, project compatibility enhancements, and the list goes on.
We won’t cover all of these new features and enhancements in this article because many of the items at the top of the list have already been covered in recent CODE Magazine issues (Table 1).
In this article we’ll cover the enhancements made to ASP.NET Web Forms, enhancements made to the HTML, CSS and JavaScript code editors, project compatibility with Visual Studio 2010, enhancements made to web publishing and deployment, enhancements made to working with Windows Azure and some tips and tricks along the way.
We will start with a quick tour of the IDE and point out some of the new features and how they work.
Visual Studio 2012 IDE
It’s pretty obvious from looking at Figure 1 that the IDE has received a facelift. Microsoft has updated the color scheme, toolbars and menus. The Start Page lists resources for the different development platforms which include Windows 8, Windows Azure, the Web, Windows Phone and Office & SharePoint development.
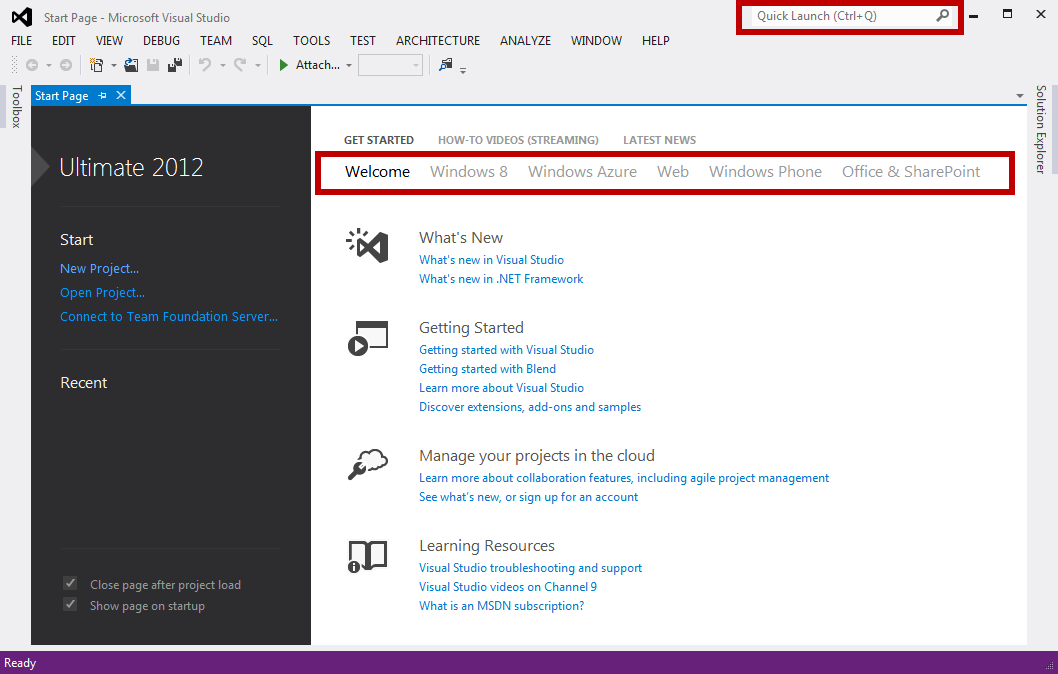
Quick Launch
Microsoft is committed to adding or improving search capabilities across all its products and Visual Studio 2012 benefits from this as well. The Quick Launch feature (CTRL+Q) makes finding things buried deep in the darkest recesses of the Visual Studio 2012 IDE simple and quick. For example, I like having line numbers displayed in the code editor. That’s a setting I turn on once after I install Visual Studio and never again so I don’t really remember where it is. Typing line numbers in the Quick Launch box displays a link to the exact section in the Options dialog box were I can update the Line numbers setting (Figure 2).

The Quick Launch feature makes finding things buried deep in the darkest recesses of the Visual Studio 2012 IDE simple and quick.
Project Compatibility with Visual Studio 2010 SP1
Often one of the challenges with upgrading a development team to a new version of Visual Studio has been that with previous versions the entire group was required to upgrade in order to continue to work together on the same projects. In Visual Studio 2012 the ability to share or “round-trip” your existing projects from Visual Studio 2010 SP1 is now supported allowing some members of your team to get started using the updated benefits of Visual Studio 2012 immediately.
Your team can move projects targeting .NET 2.0 through .NET 4.0 between these two versions of Visual Studio as well as Silverlight 4 and Silverlight 5 projects. Some older projects such as ASP.NET MVC 2, MSI Setup, and Windows Mobile projects are not supported in the 2012 version and others such as F# and Lightswitch still have a one-way upgrade path.
When importing a project from a previous version of Visual Studio, a Migration Report will be generated providing specific details on and changes that are required or issues that exist (Figure 3). Some slight modifications are made to older project files to support compatibility between the two versions.
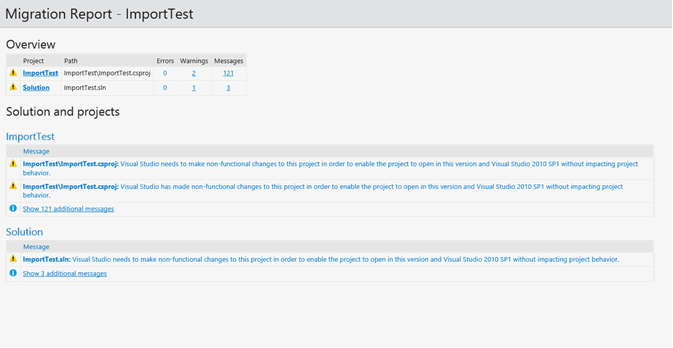
If the project type you are attempting to load is not supported in Visual Studio 2012 you will be notified of the issues.
Preview Tab View
How often do you find yourself opening a new tab just to review a block of code or some HTML markup or a specific CSS style or a web.config setting or a… well, you get the idea. I don’t like the cluttered look and feel of having lots of tabs open so the new Preview Tab View is one of my favorite new features. Clicking on a supported file type in the Solution Explorer will open the file in the Preview Tab as illustrated by Figure 4.
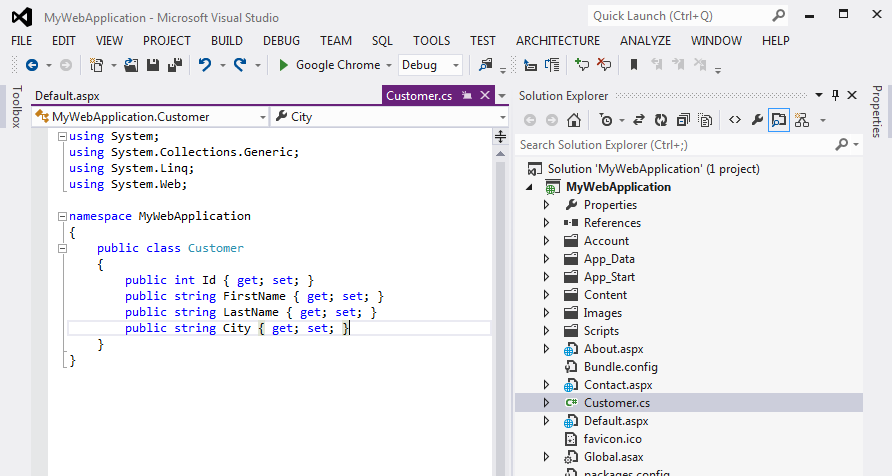
The Preview Tab is located at the far right-hand side of the other open tabs. Clicking anywhere in the file will cause the tab to turn purple so it’s easy to distinguish it from the other tabs. What if you decide you want to open the file currently displayed in the Preview Tab in a regular tab? Other than double-clicking on the file in the Solution Explorer like you’ve always done, another approach is to simply start changing the contents of the file. The CTRL+ALT+HOME keyboard shortcut when the cursor is in the file (purple tab) will also do the trick.
I could continue with a more in-depth tour of Visual Studio 2012 at this point but I want to move along to the new features and enhancements for ASP.NET 4.5.
Page Inspector
The Page Inspector tool assists you in diagnosing and troubleshooting HTML directly inside Visual Studio. It provides an integrated web browser and set of associated tools that will display the visual results of the markup and source code within the IDE. This includes support for standard HTML, ASP.NET MVC view, ASP.NET Web Forms and ASP.NET Web Pages.
You can open a file in Page Inspector by right clicking on the file and selecting View in page inspector. You can also browse directly to a URL in the browser or even set page inspector to be your default development browser.
As shown in Figure 5, the Page Inspector will display the page you have selected in the integrated web browser allowing you to interact and navigate through the site. Below the integrated web browser, Page Inspector displays additional information about the selected page.
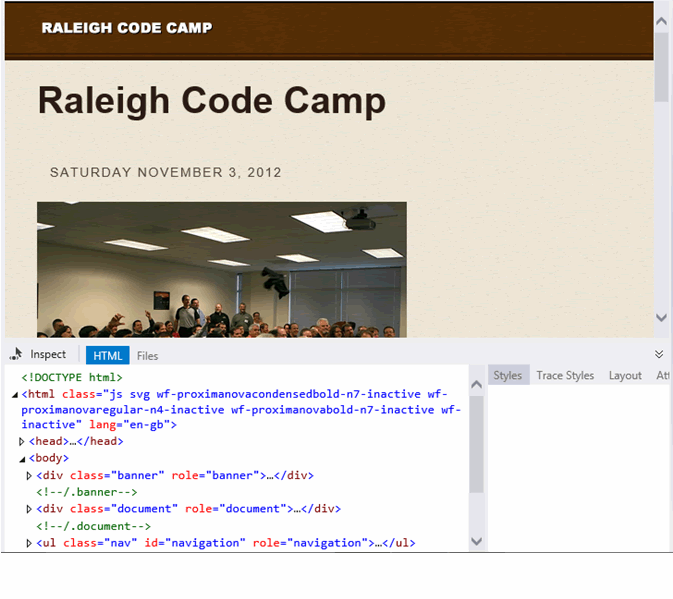
Selecting the Inspect option and hovering over content in the browser window section displays the related HTML generated in the window below. Selecting the Inspect option and hovering over any HTML element in the source will highlight the related content in the web browser window above. In the Preview Tab View you will also be shown the corresponding source of your page and map the specific HTML elements back to their exact location in source code.
The HTML tab displays the source of the selected element in the browser window above. To the right of the source are a number of additional tabs for the CSS rules associated with the selected element.
The Styles tab displays the hierarchy of all the CSS rules associated with the element and changes to these items will result in a temporary real-time preview of the changes. Selecting a specific rule will open the associated CSS file allowing you to make permanent changes.
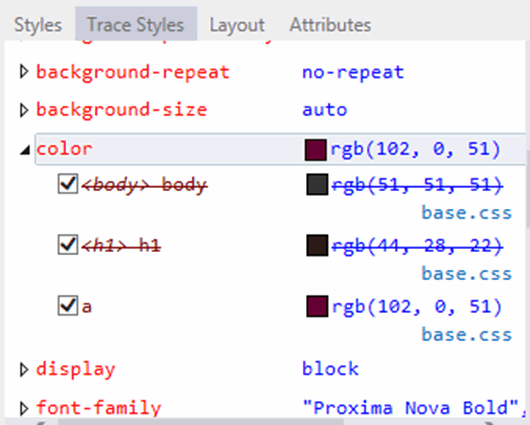
The Trace Styles tab displays a listing of all of the CSS properties for the selected element. It displays the current settings, their current values and the files in which they originate as well as tracing through styles that are overridden along the way (Figure 6).
The Layout tab visually displays the layout impact of the CSS rules applied. And lastly, the Attributes tab shows the HTML attribute values of the selected element.
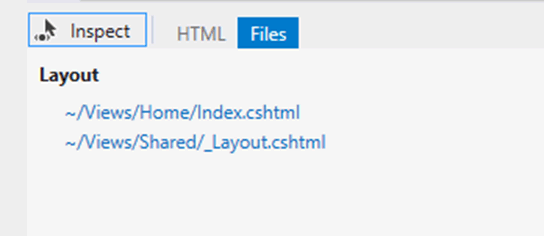
The Files tab (Figure 7) will display the files associated with the content displayed. The Files tab can be extremely helpful when looking at pages with elements rendered from a combination of layout views or master pages as a view or page file.
When a file is changed you can quickly save and refresh the view within the integrated web browser by pressing Ctrl+Alt+Enter or clicking the message that is displayed.
Editor Enhancements
One of the things I appreciate most about Visual Studio 2012 is that the code editing experience across all languages has been improved. Every language now enjoys first class editor support. As expected, that includes C# and Visual Basic but the Visual Studio team has also greatly improved the editing experience for HTML, CSS and JavaScript.
One of the things I appreciate most about Visual Studio 2012 is that the code editing experience across all languages has been improved. Every language now enjoys first class editor support.
HTML Editor
The enhancements made to the HTML editor apply across the entire ASP.NET family of products including ASP.NET MVC, ASP.NET Web Forms, and so on.
HTML5 Assimilation
If you haven’t started the move to HTML5 because HTML5 support in Visual Studio was lacking, that excuse just flew out the window. All ASP.NET templates are HTML5 based by default. IntelliSense and tag validation have been updated for HTML5 based on the latest W3C standards. Bottom line: Everything you need and would expect to see to begin working with HTML5 has been included.
Smart Tags
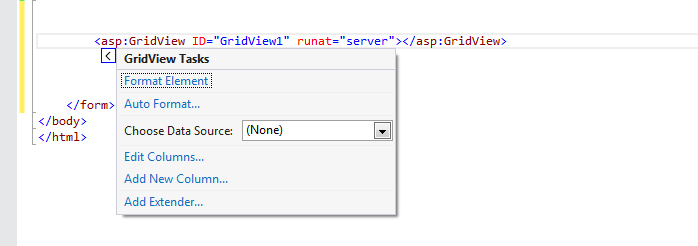
When working with HTML most ASP.NET Web Form developers I know spend nearly all their time in the Source view compared with the Design view. One popular reason to jump back to Design view is to access a control’s SmartTags to edit the control’s settings. Fortunately those days are over. Visual Studio 2012 provides access to a control’s SmartTag from within Source view (Figure 8).
Auto-Generated Event Handlers
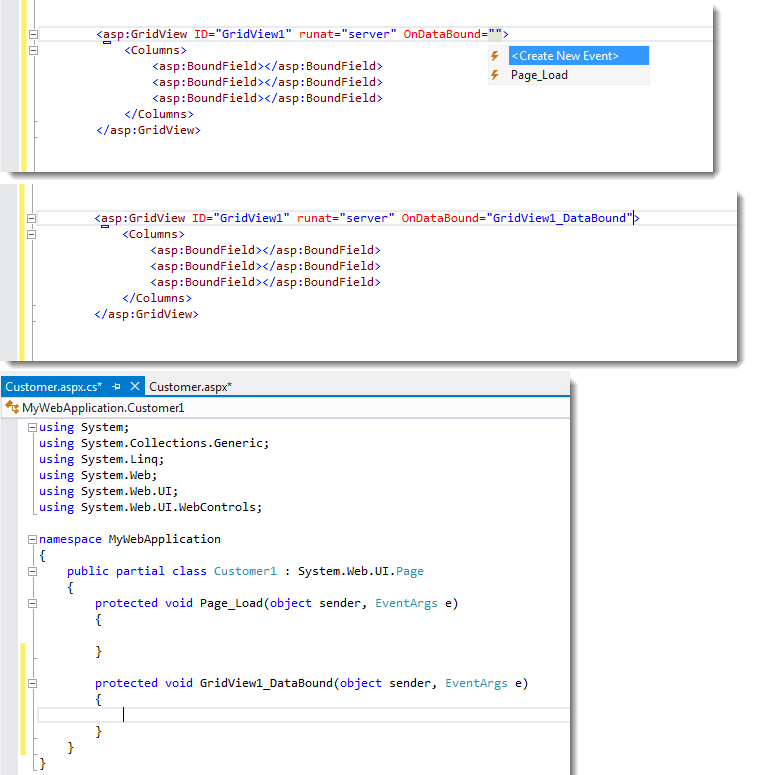
Visual Studio will also auto-generate event handlers for you from within Source view.
When you enter the name of an event, OnDataBound for example in Figure 9, you’re prompted with the option to have Visual Studio create the event handler for you or you can select from the list of existing event handlers. When you switch over to the code for the page you will see the event handler has already been created.
DOCTYPE Detection
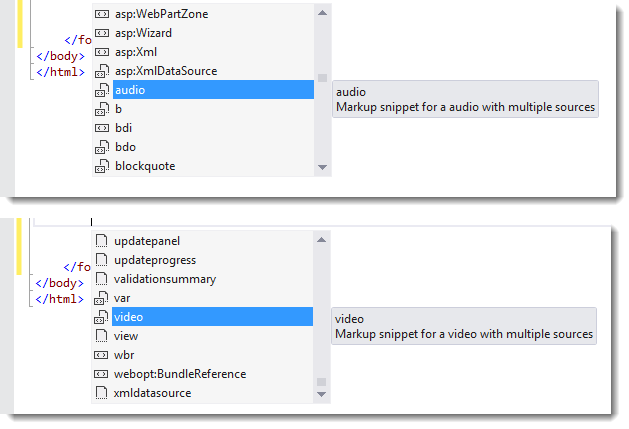
The HTML Editor detects the DOCTYPE being used and adapts to it. For example, when using <!DOCTYPE html> to specify an HTML5 document, IntelliSense includes HTML5-specific tags like <audio> and <video> in the list of available elements (Figure 10).
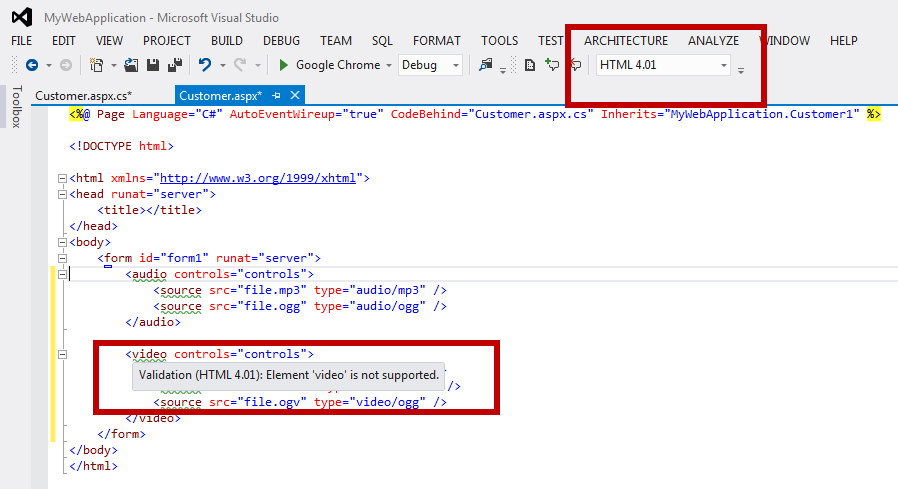
The editor will also use the DOCTYPE setting to determine if existing tags are consistent with the chosen DOCTYPE. For example, in Figure 11 I selected an HTML4.01 DOCTYPE and the <audio> and <video> tags are being highlighted as not supported.
HTML5 Snippets
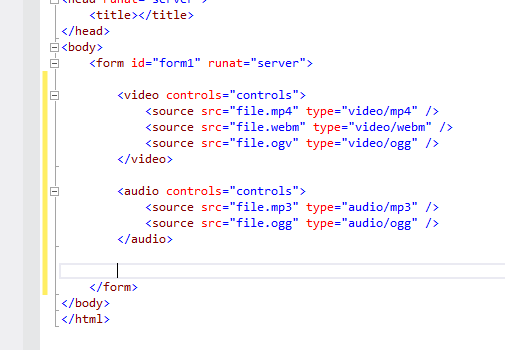
Snippets have also been included for the new HTML5 elements. Figure 12 is the result of the video and audio snippets. Type video and press Tab for the video block. Type audio and press Tab for the audio code block.
Tag Matching
The HTML editor also supports automatic tag matching. If you change the opening tag the closing tag will automatically change as well.
HTML5 Input Types
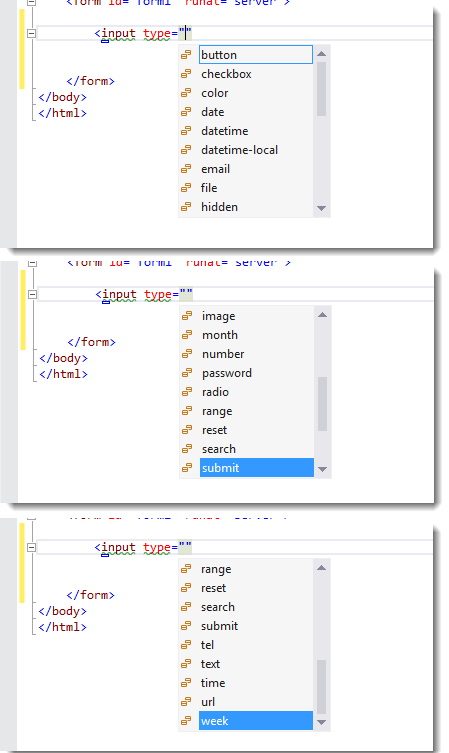
The HTML editor supports the new HTML5 input types including color, date, datetime, datetime-local, email, url and so on (Figure 13).
Extract to User Control
User controls can help keep sections of your web pages organized, can help increase a page’s readability and can simplify overall page structure. Refactoring sections of your pages into user controls has gotten much easier in Visual Studio 2012. Select the text you want to save in a user control, right-click it, and choose Extract to User Control. Enter the name in the dialog box and a reference to the new user control replaces the selected text.
CSS Editor
The enhancements made to the CSS editor apply across the entire ASP.NET family of products including ASP.NET MVC, ASP.NET Web Forms, and so on.
Collapsible Sections, Tooltips and Regions
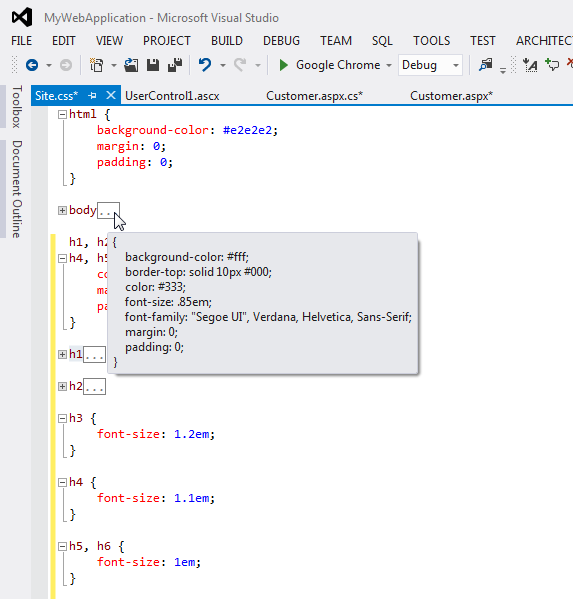
One of the most obvious new features in the CSS editor is the addition of collapsible sections and their related tooltips, illustrated in Figure 14.
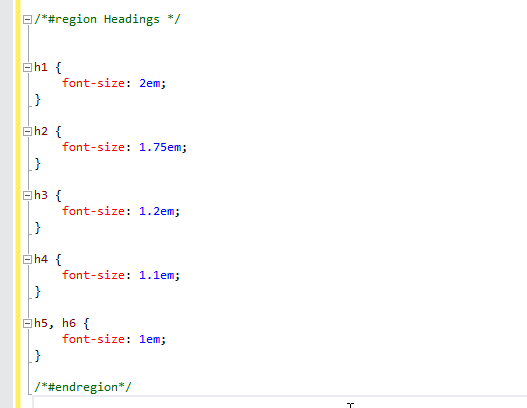
In additional to collapsible sections you can also create collapsible regions to further organize your CSS code. Regions begin with the /#region [region name]/ syntax and close with /*#endregion***/.** The region snippet makes quick work of creating regions. Simply type region and press the Tab key to have the structure of a region inserted into your CSS style sheet (Figure 15).
Vendor Specific Notation
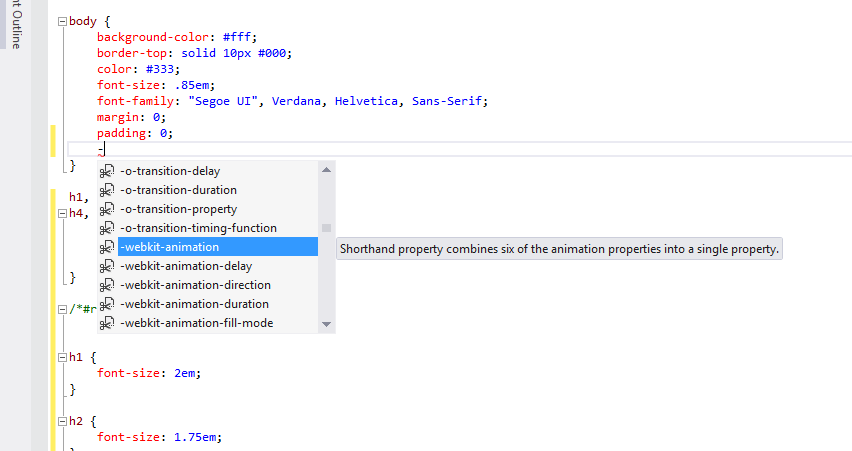
A number of the new properties that were added to CSS3 have been implemented by browser makers at different times using their own specific syntax. You will recognize them because they all start with a hyphen and then a vendor abbreviation, -moz, -ms, -o and -webkit for example. IntelliSense has been updated to include these vendor/browser specific properties as shown in Figure 16.
Color Picker
The new Color Picker feature is sure to be a quick favorite among developers.
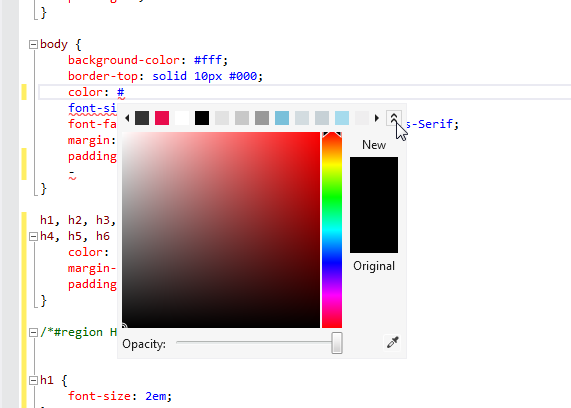
You activate the Color Picker by typing a hash (#) for any color property. You use the opacity slider across the bottom to support the CSS3 transparency feature. The color picker eyedropper in the bottom-right corner makes selecting colors from a color already on your screen very simple (Figure 17).
Hierarchical Indentations
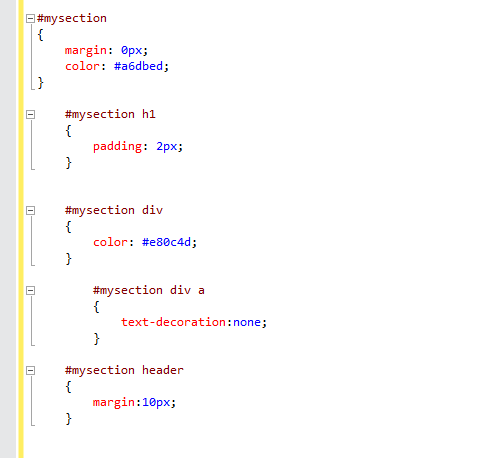
For me at least, one confusing aspect of working with CSS style sheets is keeping track of where elements fall in the cascading rules hierarchy. The new hierarchical indentation feature logically organizes things so you can visually see how the cascading rules are being applied as shown in Figure 18.
CSS Snippets
Snippets are not new to Visual Studio 2012 but the Visual Studio program team added more snippets to make writing complex CSS tags easier. A number of CSS3 properties require browser-specific settings and those have been included in the CSS snippet library. For example, the ability to animate objects has been added to CSS3 but each browser implements animations in its own way. Knowing each browser’s implementation details could be bothersome but a CSS snippet makes life easier. Type animation and press Tab twice to see the cross-browser settings for CSS3 animations (Figure 19).

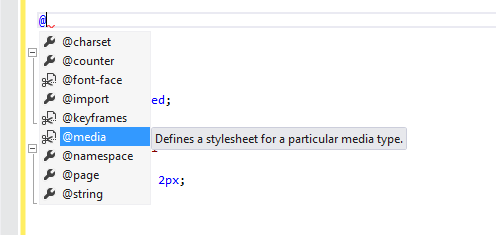
CSS snippets also make more complex properties, media queries for example, easier as well. Typing the at-symbol (@) will display the supported options in the IntelliSense list as shown in Figure 20. After selecting @media, press the Tab key twice to populate the media query settings.
JavaScript Editor
Like the HTML and CSS editors, Microsoft made enhancements to the JavaScript editor that apply across the entire ASP.NET family of products including ASP.NET MVC, ASP.NET Web Forms, and so on.
Collapsible Sections, Tooltips and Regions
Like the CSS editor, one of the most obvious new features in the JavaScript editor are the addition of collapsible sections and their related tooltips, visible in Figure 21.
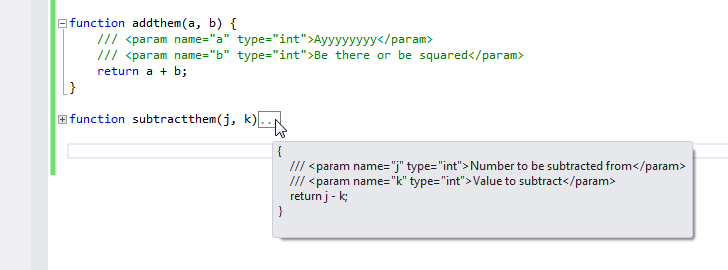
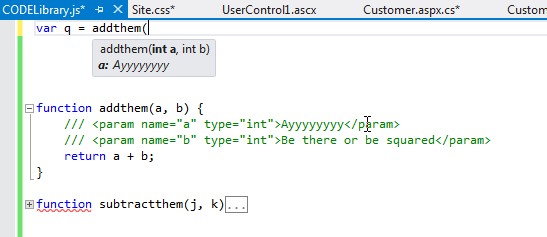
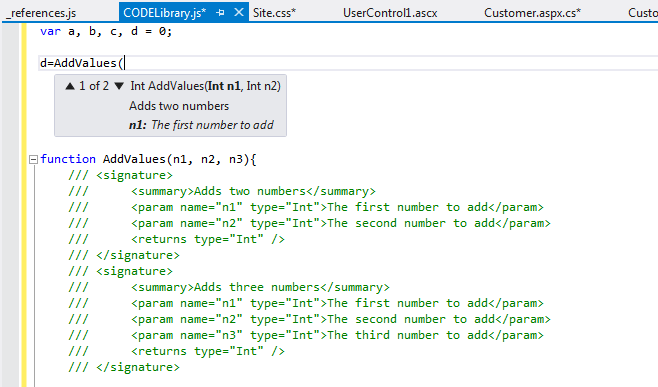
Figure 21 also highlights another new feature, the ability to add XML documentation for IntelliSense to use. In Figure 22 you can see IntelliSense displaying the parameter’s data type and description when I began using the function.
Continuing with IntelliSense improvements, IntelliSense evaluates the JavaScript code and adjusts its behavior accordingly. For example, assume a variable u is assigned an integer value. When I access the u variable, IntelliSense displays options that are appropriate for an integer variable. Switching u to a string would immediately display string-related functionality.
Visual Studio 2012 IntelliSense also supports JQuery. Figure 23 displays the overloads for the JQuery code as I began to type. You will notice that 1 of 5 overloads are available. IntelliSense is available throughout the entire JQuery library.

Signature Overloads
You can add IntelliSense overload signature support to your functions using the <signature> notation shown in Figure 24.
Brace Matching
Brace matching makes the life of a JavaScript developer a little easier by highlighting the closing bracket when you select the opening bracket.
Implicit References
Odds are you’re going to want to use the JQuery, Modernizr or other libraries in your JavaScript code. You might also want to reference additional third-party libraries or libraries your team has written. Why not tell Visual Studio so it knows to automatically reference those libraries for you? Fortunately, that is exactly what the _references.js file located in the Scripts folder does. It acts as a central list that will be automatically included for your JavaScript code to reference.
Go to Definition
Right-clicking on a function and selecting Go to Definition will take you to the function if it’s declared in the same .js file or Visual Studio will open the JavaScript file the function resides in and position you at the function’s declaration. This is very handy when you want to gather additional information about the function.
ASP.NET Web Forms Enhancements
ASP.NET 4.5 and Visual Studio 2012 have two primary enhancements to ASP.NET Web Forms: strongly typed controls and model binding.
Strongly Typed Controls
The code below depicts how you might be using a Repeater control today. Notice the use of the EVAL() function within the ItemTemplate. Values passed to the EVAL() functions are strings and the value of the expression is late bound at runtime. If you mistype the name of the field, something I’ve done too many times, you don’t find out about that bug until you run the page.
<asp:Repeater ID="Repeater1" runat="server" >
  <ItemTemplate>
    <li>
      Manufacturer: <%# Eval("Manufacturer") %>
      Model: <%# Eval("Model")  %>
      ModelYear: <%# Eval("ModelYear") %>
    </li>
  </ItemTemplate>
</asp:Repeater>
ASP.NET 4.5 introduces the ability to use strongly typed objects as the data source in the binding expression for all the data controls including Repeater, GridView, FormView and so on. In Figure 25, notice the new ItemType setting which I have pointing to the Automobile class in my data model. Using ItemType exposes the Item object for use in the data binding expressions. IntelliSense is fully aware of the Item object and provides a list of the available properties to bind to. Since the data binding references are strongly typed, incorrect values will be picked up by the editor and by the compiler.

ASP.NET 4.5 introduces the ability to use strongly typed objects as the data source in the binding expression for all the data controls including Repeater, GridView and FormView.
Model Binding
There’s no shortage of ways to bind data controls to data. For example, there is the SQLDataSource, EntityDataSource, ObjectDataSource and so on. They all have their strengths but they all have their shortcomings as well. Those shortcomings are the reason many developers manually code their control’s DataSource property and call the DataBind method.
ASP.NET 4.5 introduces another technique to bind to data called model binding. Model binding’s goal is to make working with data access code easier while at the same time providing the benefits of 2-way data binding. Its roots go back to ASP.NET MVC and the ASP.NET team has integrated it with the Web Forms model.
Model binding’s goal is to make working with data access code easier while at the same time providing the benefits of 2-way data binding.
Model binding provides the ability to specify a function to call to retrieve the data and the ability to specify a function to call to update a control’s data. The SelectMethod property is used to specify the function to retrieve the data. The UpdateMethod property is used to specify the function to update the data.
Retrieving Data
Let’s start out by displaying some data in a GridView. Listing 1 contains the code for the GridView and you can see the SelectMethod property has been set to GetDogs.
The GetDogs function shown in Listing 2 returns an IQueryable collection of dog objects from the data model. Notice I’m not using the page load to manually assign the GridView’s DataSoure property or to call the Gridview’s DataBind method. You will need to add a using statement for System.Web.ModelingBinding.
We can take this another step further by adding a dropdown to the page in order to filter the list by breed. Listing 3 shows the breed dropdown and its SelectMethod property set to GetBreeds. The key to making everything work is the change that’s been made in what the GetDogs function accepts as a parameter. In Listing 4 the GetDogs function has been decorated with a value provider attribute instructing the function where to look for the parameter value. In this case, the parameter value will be taken from a Control, the breed drop down control. There are additional provider attributes including Form, QueryString, Cookie and RouteData, among others.
Updating Data
Now that we have the page populated with data it’s time to figure out how to update it. We’ll use the GridView’s UpdateMethod property to specify the function to update the data. The GridView passes the key value into the function where the record is retrieved, validation is checked and if the data is valid, the SaveChanges method is called. Listing 5 shows the revised version of the GridView.
A few of GridView’s properties have been added to support the ability to update the data as shown in Figure 26. The UpdateMethod has been assigned the UpdateDog method to call when an update occurs. The AutoGenerateEditButton has been set to True to provide edit, update and cancel buttons, and the DataKeyNames property has been assigned to the key of the Dogs table, DogID.
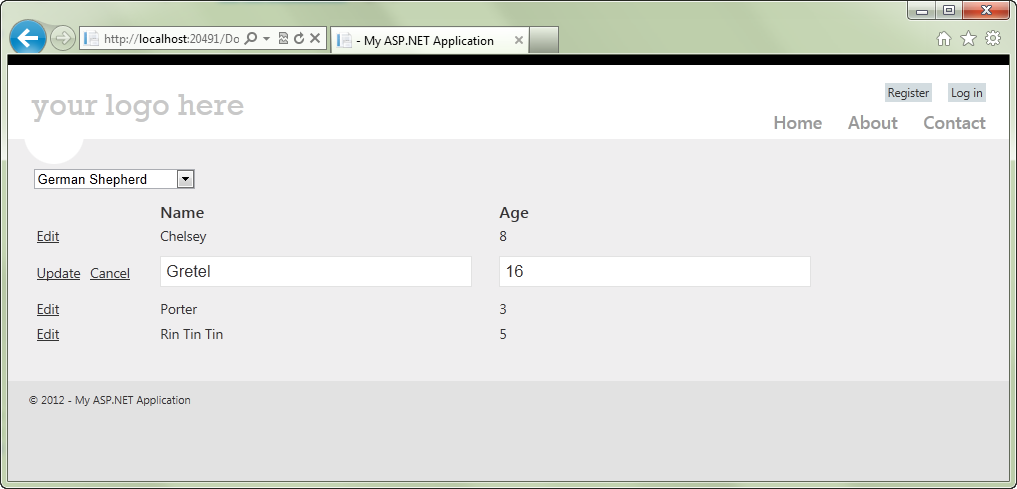
Listing 6 contains the UpdateDog function which updates the database. The DogID is passed in from the GridView and is used to access the updated record in the data model. TryUpdateModel attempts to update the model with the revised values contained in the GridView and updates the page’s ModelState property in the process. Next, the page’s ModelState property is checked and if it was successful, the database is updated via the SaveChanges method.
Web Publishing Profiles
Visual Studio 2012 includes a new and easy to use web publishing interface. Right-click on your Web Application Project and select “Publish” to easily deploy your web application into production. The publish interface lets you easily publish your site using Web Deploy, FTP, local file system, FPSE (Front Page Server Extension), or create a Web Deploy Package.
As part of the publish settings you can select a specific build configuration as shown in Figure 27. You can set connection strings in the web.config to update to production values as part of the publish process. If you have selected Web Deploying as your publishing method you may also choose to update the databases associated with the project. If you are using Entity Frame Code First context classes you may also choose to enable the execution of Code First Migrations to be run when the application first accesses the database after publishing.
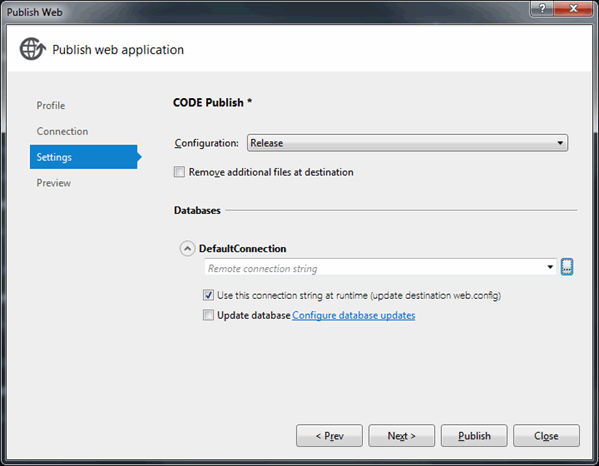
Prior to publishing you will be able to see a preview of the files being updated on the web server and choose to exclude them from the update.
You can find the publish profiles created from the wizard in the Properties\PublishProfiles folder of your project. These are actually MSBuild files giving you an extremely extensible method of adding customized tasks to the publishing process.
You can add these new Web Publishing features to Visual Studio 2010 by installing the Web Publish Update included in the Windows Azure SDK for .NET (VS 2010 SP1).
Publishing to Windows Azure Websites
Visual Studio 2012’s web publishing features also make it convenient to deploy Windows Azure websites. The Windows Azure Management Portal provides a preconfigured Publishing Profile for download which can be quickly imported and used to setup publish settings. Select “Download publish profile” from the quick glance section on the Windows Azure Website dashboard to download a configuration file containing the settings to be imported into the Web Publish wizard.
Summary
The Visual Studio and ASP.NET teams have done a wonderful job taking both platforms to the next level. The enhancements made to both products will increase developer performance and improve the experience of developing web applications on the Microsoft stack. We hope this overview of what’s new has got you excited about upgrading your development machine and your sites to ASP.NET 4.5.
Listing 1: GridView calling the GetDogs function from the SelectMethod property
<%@ Page Title="" Language="C#" MasterPageFile="~/Site.Master"
AutoEventWireup="true"
CodeBehind="<a href="http://Dogs.aspx.cs">Dogs.aspx.cs</a>"
Inherits="MyWebApplication.Dogs" %>
<asp:Content ID="Content1" ContentPlaceHolderID="HeadContent"
runat="server">
</asp:Content>
<asp:Content ID="Content2" ContentPlaceHolderID="FeaturedContent"
runat="server">
</asp:Content>
<asp:Content ID="Content3" ContentPlaceHolderID="MainContent"
runat="server">
<asp:GridView ID="GridView1" runat="server"
AutoGenerateColumns="false"
AllowSorting="true"
AllowPaging="true"
PageSize="8"
SelectMethod="GetDogs"
>
<Columns>
<asp:BoundField HeaderText="Name" DataField="Name"
SortExpression="Name" />
<asp:BoundField HeaderText="Age" DataField="Age"
SortExpression="Age" />
</Columns>
</asp:GridView>
</asp:Content>
Listing 2: GetDogs function used to populate the GridView
using System;
using System.Collections.Generic;
using System.Linq;
using System.Web;
using <a href="http://System.Web.UI">System.Web.UI</a>;
using <a href="http://System.Web.UI">System.Web.UI</a>.WebControls;
using System.Web.ModelBinding;
using MyWebApplication.Models;
namespace MyWebApplication
{
public partial class Dogs : <a href="http://System.Web.UI">System.Web.UI</a>.Page
{
public IQueryable<Dog> GetDogs()
{
var _db = new CODESampleContext();
return _db.Dogs.Select(a => a).OrderBy(a => a.Name);
}
}
}
Listing 3: GetBreeds function used to populate the DropDown
    <asp:DropDownList ID="breed" runat="server"
        DataValueField="BreedID"
        DataTextField="BreedName"
        AutoPostBack="true"
        SelectMethod="GetBreeds">
    </asp:DropDownList>

    <asp:GridView ID="GridView1" runat="server"
        AutoGenerateColumns="false"
        AllowSorting="true"
        AllowPaging="true"
        PageSize="8"
        SelectMethod="GetDogs"
        >
     <Columns>
        <asp:BoundField HeaderText="Name" DataField="Name"
     SortExpression="Name" />
        <asp:BoundField HeaderText="Age" DataField="Age"
     SortExpression="Age" />
      </Columns>
    </asp:GridView>
Listing 4: GetDogs decorated with a value provider attribute
using System.Web;
using <a href="http://System.Web.UI">System.Web.UI</a>;
using <a href="http://System.Web.UI">System.Web.UI</a>.WebControls;
using System.Web.ModelBinding;
using MyWebApplication.Models;
namespace MyWebApplication
{
public partial class Dogs : <a href="http://System.Web.UI">System.Web.UI</a>.Page
{
public IQueryable<Dog> GetDogs([Control]int? breed)
{
var _db =
new MyWebApplication.Models.CODESampleContext();
var query = _db.Dogs.Select(a => a);
if (breed.HasValue)
{
query = query.Where(g => g.BreedID == breed.Value);
}
return query.OrderBy(a => a.Name);
}
public IQueryable<Breed> GetBreeds()
{
var _db =
new MyWebApplication.Models.CODESampleContext();
return _db.Breeds.OrderBy(c => c.BreedName);
}
}
}
Listing 5: GridView updated with UpdateMethod
    <asp:ValidationSummary ID="ValidationSummary1" runat="server"
ShowModelStateErrors="true" />

    <asp:DropDownList ID="breed" runat="server"
        DataValueField="BreedID"
        DataTextField="BreedName"
        AutoPostBack="true"
        SelectMethod="GetBreeds">
    </asp:DropDownList>

    <asp:GridView ID="GridView1" runat="server"
        AutoGenerateColumns="false"
        AllowSorting="true"
        AllowPaging="true"
        PageSize="8"
        SelectMethod="GetDogs"
        UpdateMethod="UpdateDog"
        AutoGenerateEditButton="true"
        DataKeyNames="DogID"
        >
     <Columns>
        <asp:BoundField HeaderText="Name" DataField="Name"
     SortExpression="Name" />
        <asp:BoundField HeaderText="Age" DataField="Age"
     SortExpression="Age" />
      </Columns>
    </asp:GridView>
Listing 6: UpdateDog function called from the GridView
// The id parameter name should match the
// DataKeyNames value set on the control
public void UpdateDog(int DogID)
{
    var _db = new MyWebApplication.Models.CODESampleContext();
    var dog = _db.Dogs.Find(DogID);

    TryUpdateModel(dog);
    if (ModelState.IsValid)
    {
        _db.SaveChanges();
    }
}
| Article | Author | Issue | CODEMAG.com Online Quick ID |
|---|---|---|---|
| ASP.NET MVC 4 Highlights, Part 1 | John Petersen | Mar/Apr 2012 | 1203091 |
| ASP.NET MVC 4 Highlights, Part 2: Bundling and Minification | John Petersen | Jul/Aug 2012 | 1208071 |
| An Introduction to ASP.NET Web API | Rick Strahl | May/Jun 2012 | 1206081 |
| The Simplest Thing Possible: Creating Push Notifications with SignalR | John Petersen | Sep/Oct 2012 | 1210071 |
| Real-Time Web Apps Made Easy with WebSockets in .NET 4.5 | Rick Garibay | Sep/Oct 2012 | 1210051 |


