


Mobile gaming has seen explosive growth in recent years and doesn't show signs of slowing down. Its revenue topped console gaming software revenue (not including console hardware sales) in 2015 and looks to expand to a 45 billion dollar market by 2018 (Digi-Capital). With the current success and the projected growth, it's safe to say that developers will continue to focus on new and exciting hand-held gaming experiences for consumers.
Although it may seem that you need big development company-level resources and capital to pour into a game project, indie developers have proven again and again that you can produce meaningful and popular content without endless resources. Even the lone developer in his/her home office can publish a game to the App Store. It may appear daunting, but toolsets exist to simplify and streamline the game development process, allowing developers to take advantage of existing functionality instead of having to figure out how to build it from scratch.
The Game Center for iOS helps developers by providing base functionality and social components that mobile games can use. Developers can take advantage of this toolset, limiting the overhead needed to build a robust gaming experience, all while getting the reliability and support that comes with a maintained framework.
What is Game Center?
Game Center is Apple's social gaming network. It comes in the form of a native iOS framework that can be imported into any iOS project. It has a host of various features and functionalities that you can tap into. For instance, with the Game Center framework, called GameKit, you can do the following:
- Leaderboards: With the leaderboard functionality, you can post your user's scores to the Game Center service. Your application can then call the Game Center leaderboard displays at any time for your users to view how they stack up against the rest of the player-base. Additionally, they can compare their scores against their other Game Center friends who also play your game.
- Achievements: The achievement functionality lets you create a series of unlockable challenges that your users can complete to earn points. These points accumulate across all games that integrate with Game Center to make up the players' overall point total. Additionally, players can compare achievements with their friends.
- Challenges: The challenge system is automatically available to any application that uses either the leaderboard or the achievement functionality. It allows players to challenge other players within the game. For instance, you could send a challenge to a friend to beat your high score. When they do, you will get a push notification that the other player completed the challenge.
- Matchmaking: Game Center supports three types of matchmaking: a real-time match, a hosted match, or a turn-based match. In a real-time match, Game Center connects the players and can automatically handle the low-level networking code needed to allow devices to communicate back and forth. In a hosted match, the developers implement the low-level networking infrastructure themselves. In a turn-based match, the game can save a snapshot of the game data on the Game Center's servers for the other device to consume when it goes to perform the next turn.
These features make up the core functionality for a large majority of the games you're likely play or would likely build. Game Center gives you the ability to tap into that functionality without having to handle the traditional overhead involved. You can build a networked game without having to set up or code any custom backend. That opens the door to many developers who otherwise might not have the means or skill required to build complex games.
With Game Center, you can build a networked game without having to set up or code any custom backend.
So how do you work with Game Center? To demonstrate the ease with which you can integrate with the Game Center and use its functionality, this article demonstrates the integration as well as the set up of a leaderboard and achievements.
Coding an Integration with Game Center
Now that you've had a high-level introduction to the Game Center, let's code a sample integration with a leaderboard and a few achievements. In order to do a meaningful integration, you need a game that you can use to post scores and demonstrate the unlocking of achievements. I've created a very simple game for you to work with called Super Tap. The source code for this application has been provided via the code download link associated with this article.
Super Tap essentially gives the user 30 seconds to tap the screen as much as they possibly can. Their score reflects how many taps they completed when the timer expires. Figure 1 demonstrates the UI for the sample game.

Getting Started
To get started, open the Super Tap project code provided with this article on the website. You'll notice the rather simple structure of the application. It contains the app delegate and a single view controller. The view controller, GameViewController, has all of the application and game logic. You'll eventually create a GameKit helper class that interfaces with the Game Center via the GameKit Framework, and then use that to process the game data generated within GameViewController. You can then adapt and port that class into any project in which you wish to use similar Game Center functionality. However, before you start coding anything, you need to provision the application appropriately and enable the Game Center capabilities. That is a multistep process that is outlined in the following sections.
Enable Game Center Capabilities
In order to set up and enable the Game Center, you'll need a registered Apple developer account (see the sidebar for additional details). Xcode can automate most of the provisioning tasks associated with enabling the Game Center once you associate the developer account with the application. To do this, you first need to add your developer account into the Xcode preferences. Click on Xcode > Preferences and then select the Accounts menu. Once there, select the plus icon at the bottom left and choose Add Apple ID. Fill in the appropriate details relative to the ID and press Add.
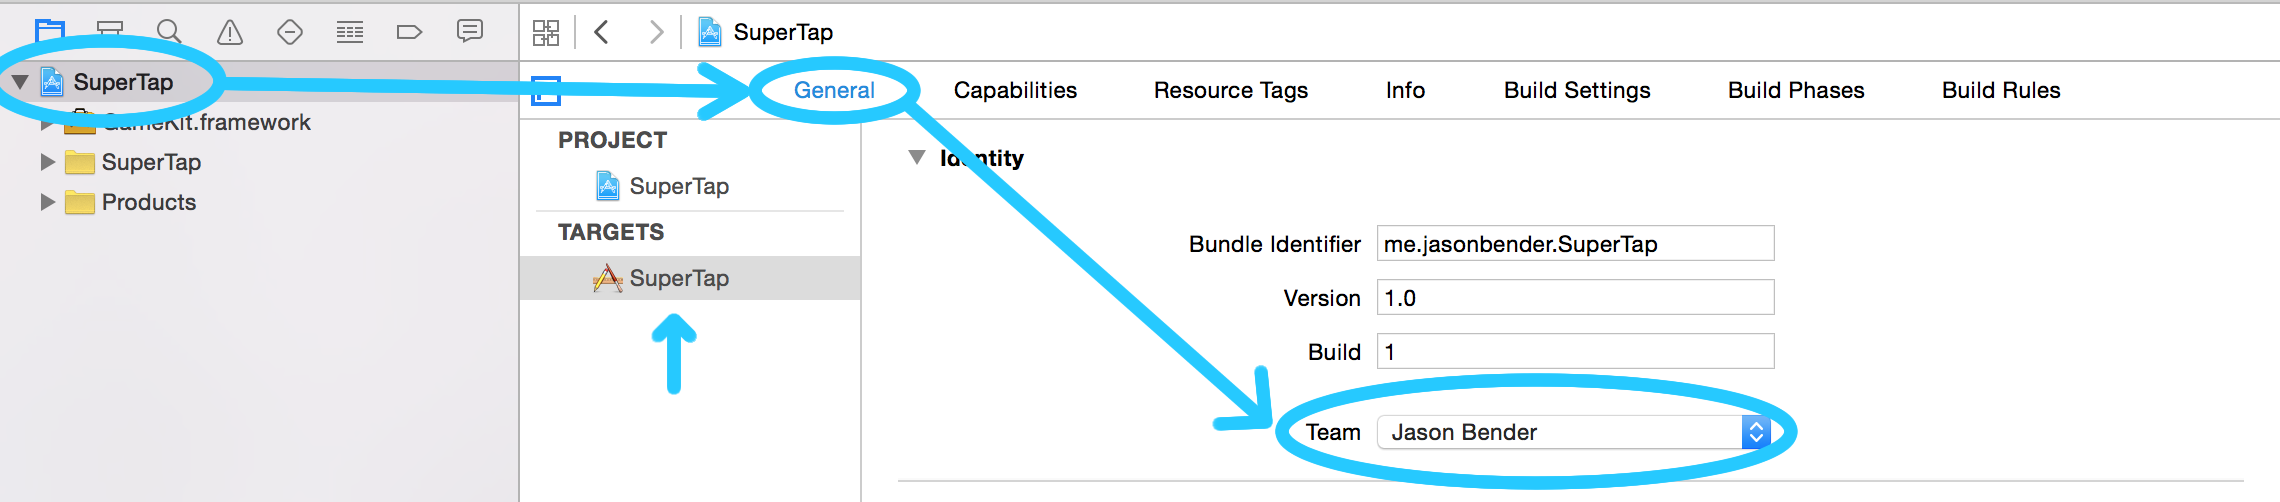
Now that you've configured the account in the preferences, you need to associate that account with this application. To do this, leave the preferences menu and return to the project navigator. You need to click the project target, which is accessible via the top-level blue project icon in the project tree on the left-hand side. Once done, you'll see a tabbed display of project information. Navigate to the General tab and focus on the Identity section. At the bottom of that section, you'll see a field entitled Team. Drop down the menu and choose the developer account that you just added in the preferences. This associates the application with that account (Figure 2).
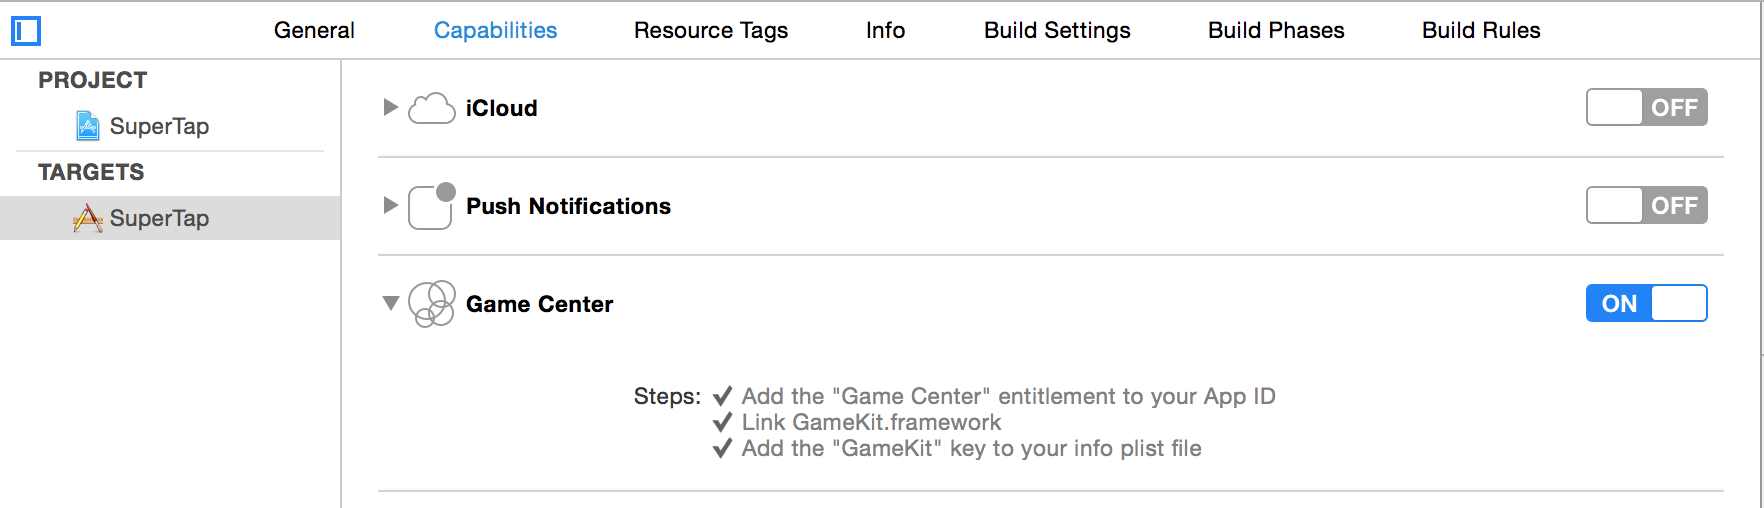
With a team now selected, Xcode can automate the creation of an App ID and entitlements that you would otherwise have to do manually via the developer Member Center. To do this and enable the Game Center during the process, navigate to the Capabilities tab next to the General tab that you previously selected. Find the section titled Game Center and turn the switch to On. If done correctly, the end result should look like Figure 3.
Create an iTunes App Record
You now have an App ID that is Game Center-enabled. The next step involves creating a corresponding app record in iTunes Connect that links with the App ID. Once created, you can then configure the various leaderboard and achievements you wish to have in your game. The first step is to navigate to http://itunesconnect.apple.com and log in with the same Apple ID and password you previously configured in the Xcode account preferences. After logging in, go to My Apps. Click the plus icon at the top left and choose New App to create a new application record. Fill in the appropriate fields. Bundle ID should already be in the drop-down list because Xcode automatically generated that entry when you enabled the Game Center in the project settings. Keep in mind that an app record eventually gets used to submit the application to the App Store, so whatever name you choose here has to be something that doesn't currently exist in the store (you can always change it later).
Configure Your Leaderboard and Achievements
The last step to complete before you dive into the code implementation involves configuring the desired leaderboards and achievements in the iTunes Connect portal. From the log in menu, go to My Apps and then click into the application record you created in the previous step. Once inside, go to the Features tab near the top. Within that tab, there will be a Game Center option in the left-hand menu. Click that. You'll see two sections: Leaderboards and Achievements. Click the plus icon next to the leaderboard header to create a new leaderboard. Select Single Leaderboard from the available options. The next screen requires you to fill in the configuration options for this leaderboard. The top section contains general leaderboard options and the bottom section deals with localization of the leaderboard. You'll need to configure at least one language in the localization section to continue. For the purpose of this demonstration, Figure 4 illustrates the options chosen for localization and Figure 5 indicates what the completed configuration should look like.
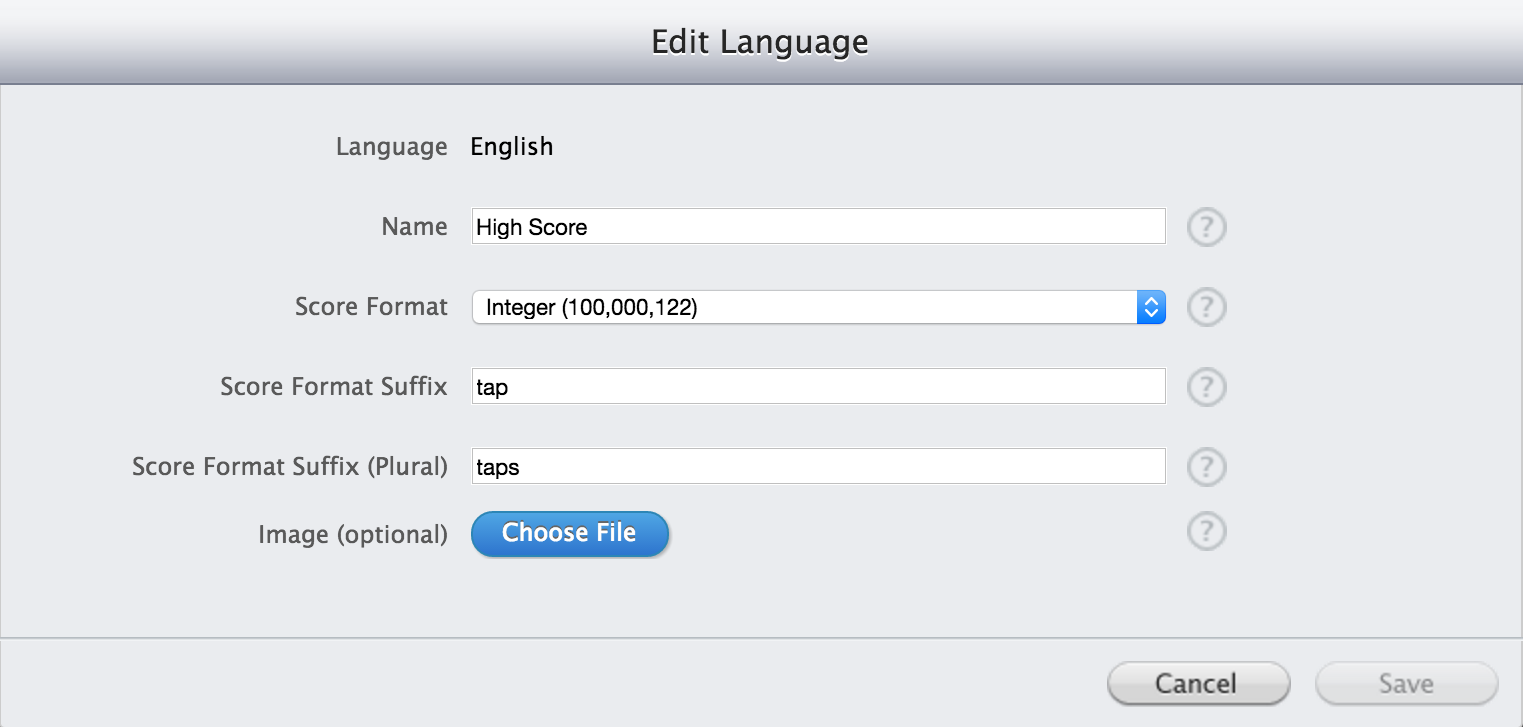
The score suffix, from the language settings, defines a context indicator that can follow the score in the leaderboard. For instance, rather then looking at a bunch of arbitrary numbers with the configuration options from Figure 4, the user sees the number followed by the word “taps” on the scoreboard. This creates a more meaningful leaderboard metric.
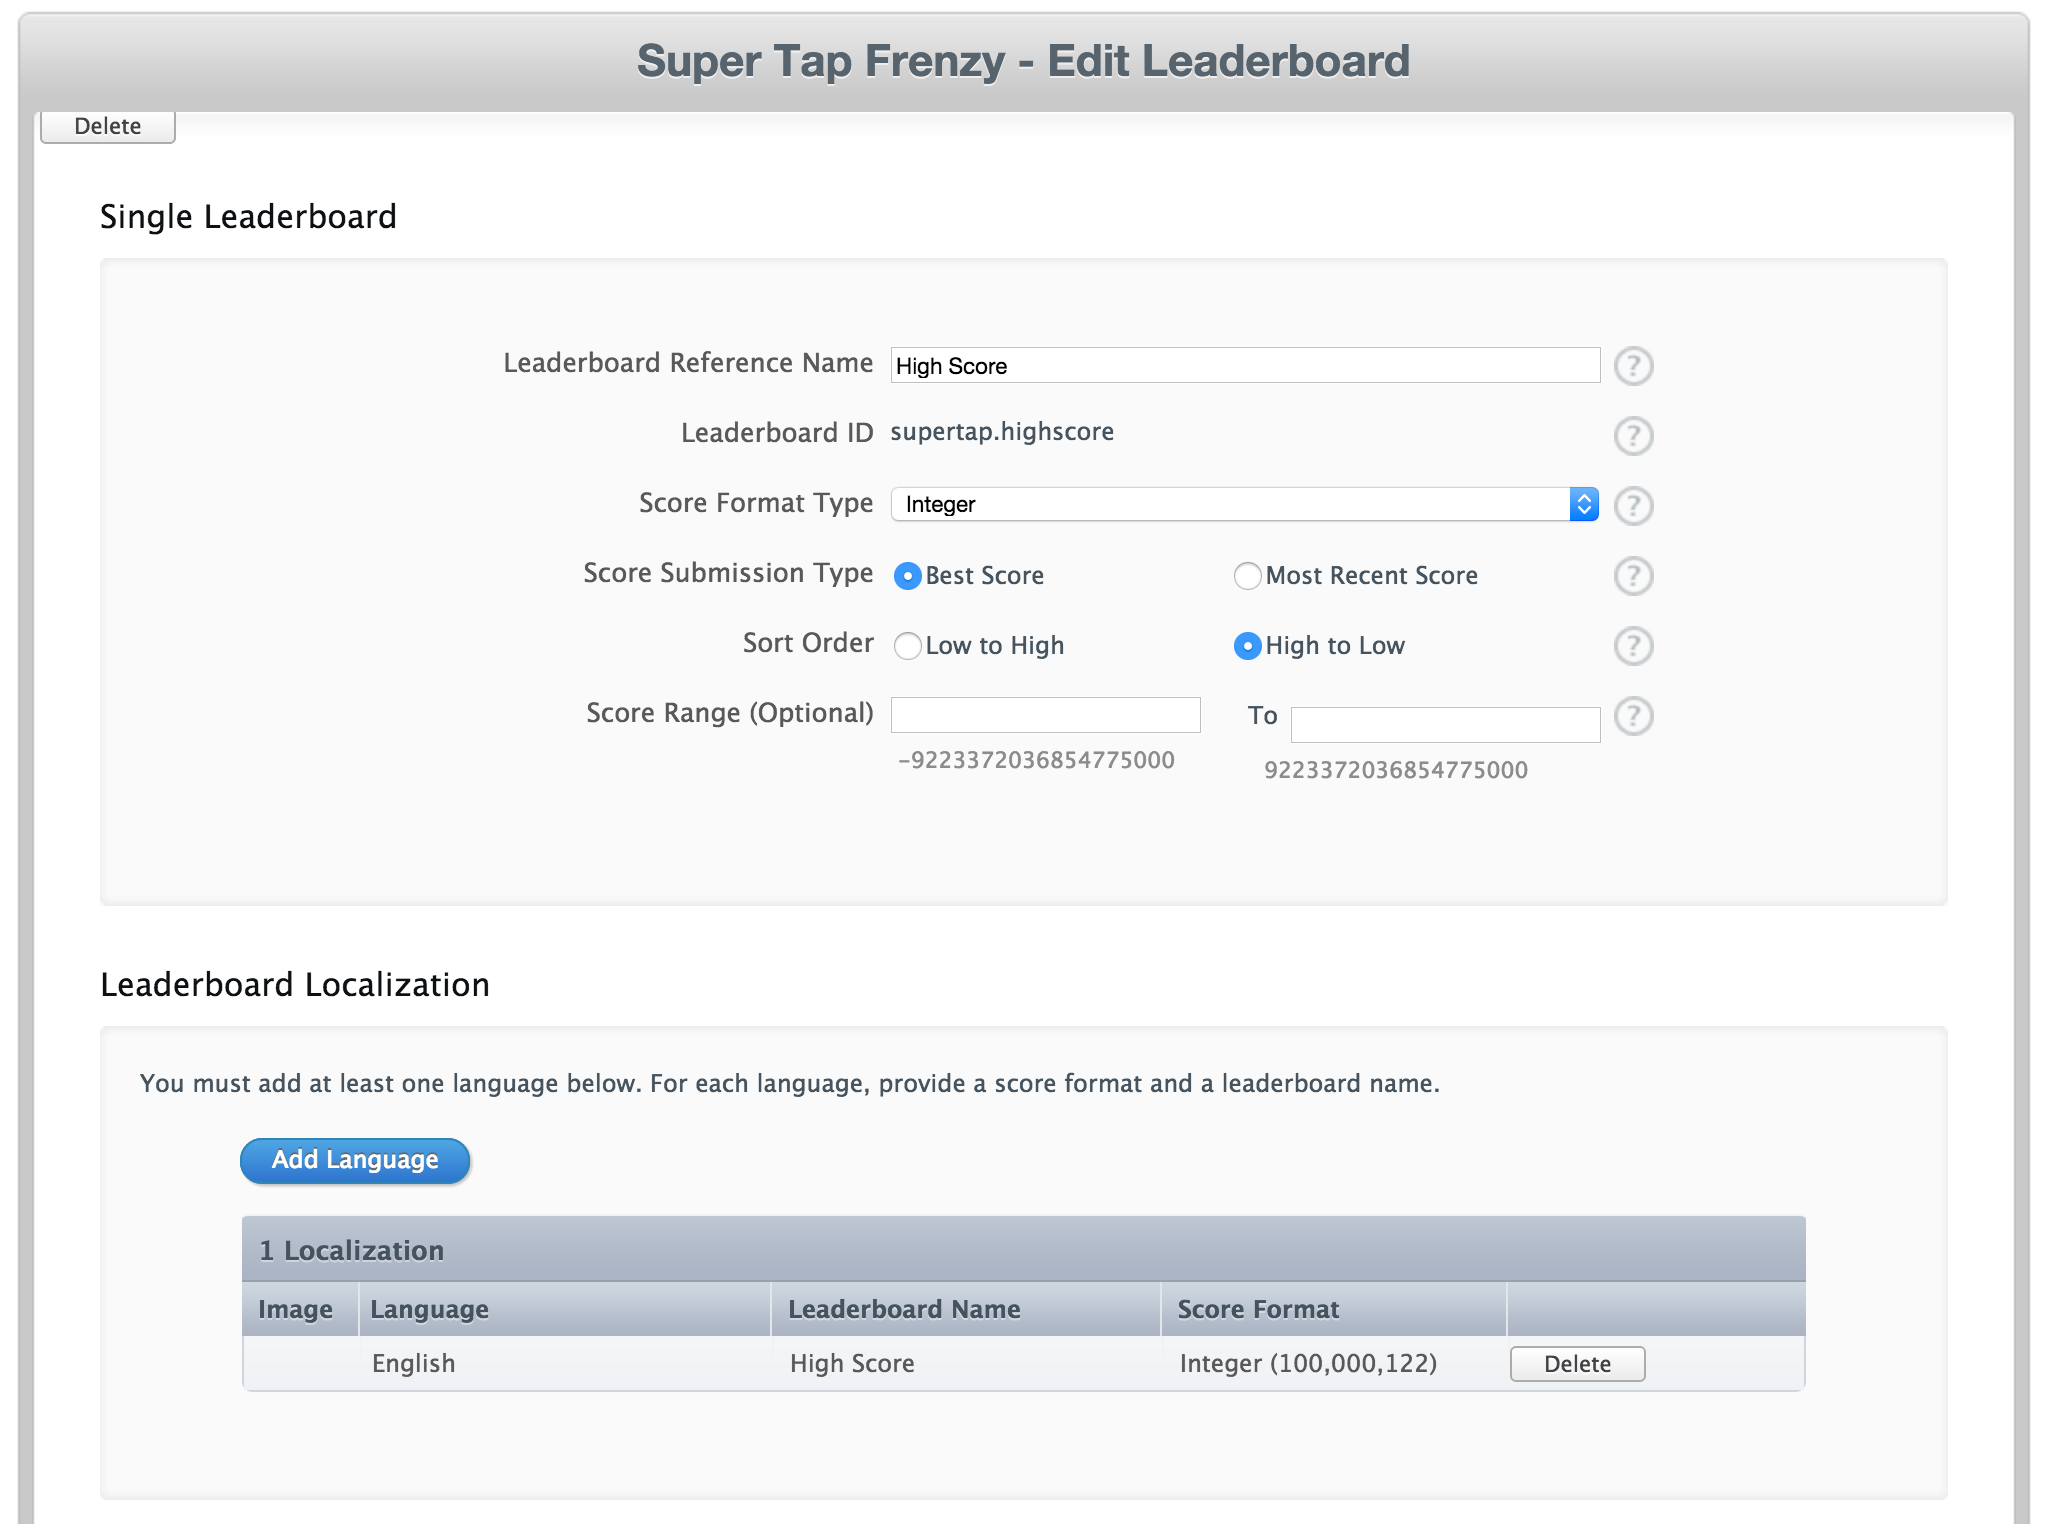
In this demonstration, the higher the user's score (number of taps), the better that score is. Therefore, you want to sort the leaderboard from high to low, as shown in Figure 5, showing the best players at the top. A user can't have a fractional-tap, so the format type gets set to Integer. Make sure to take close note of the “Leaderboard ID” that you assigned as you created this entry. That ID gets used to send scores from the application to this leaderboard you just configured. Lastly, the optional image field allows you to use a custom leaderboard icon within the Game Center's default UI that you'll use later in this demonstration.
Now that you've completed the leaderboard configuration, let's shift to achievements. Navigate back to the top-level Features section that you were previously on before creating the leaderboard. This time, look to the Achievements sub section and select the plus icon to begin creating an achievement. For this demonstration, you'll create three achievements:
- Tap Novice: Score 100 taps before the time runs out.
- Tap Intermediate: Score 150 taps before the time runs out.
- Tap Expert: Score 200 taps before the time runs out.
Similar to the leaderboard creation, creating an achievement consists of two sections of content that must be configured: the general settings and the language localization. In the top section, you must assign an ID that gets used in order to mark the achievement as completed from the application. Each application has a maximum of 1000 points that it can spread across all its achievements so that the player can earn those points as they complete them. Assign a value of points and make sure that the achievement isn't hidden, for the purposes of this example. Next, you need to configure the localization settings. Figure 6 demonstrates the setup for one of the achievements. You can use it as a guideline to create the other two.
Each application has a maximum of 1000 points that it can spread across all its achievements so that the player can earn those points as they complete them.

Once completed, the “Game Center” section under the Features tab for the application record you created should reflect one leaderboard and three achievements.
Back to the Code
At this point, you've completed all of the necessary set up and can move back to Xcode to work on the logic needed to integrate with the configurations you just created. Start by creating a new class to manage the Game Center logic. Navigate to File > New File > Cocoa Touch Class. Name the class GameCenterManager and select NSObject as the subclass. Click Next and then Create. Start by navigating to GameCenterManager.h and declaring the methods that you'll need to manage the object, scores, player authentication, and achievements. Listing 1 demonstrates these declarations.
Listing 1: GameCenterManager.h – method declarations
#import <GameKit/GameKit.h>

@interface GameCenterManager : NSObject
<GKGameCenterControllerDelegate>

/**
*  Singleton
*
*  @return shared instance of self
*/
+ (instancetype)sharedManager;

/**
*  Makes sure player is authenticated currently
*  if not, it will present the Game Center login
*  screen for the user's convenience
*/
- (void)authenticatePlayer;

/**
*  Presents the Game Center leaderboard UI
*/
- (void)showLeaderboard;

/**
*  Reports score to Game Center and checks
*  if any achievements have been unlocked
*
*  @param score The user's score
*/
- (void)reportScore:(NSInteger)score;

@end
Make sure to import the GameKit framework at the top of the file, as the majority of the remaining code you'll write depends on it. Additionally, you'll notice that this object can act as a GKGameCenterControllerDelegate, which helps manipulate the Game Center canned UI that gets presented. Furthermore, the class adheres to the singleton pattern as seen with the inclusion of the sharedManager function. Accessing the object via this method instead of manually initializing it when it's needed ensures that the same instance of the object gets returned no matter how many times the developer requests it. You can read more about the singleton pattern and its uses via the information included in the sidebar.
The next question you might ask is “what credentials do I use to log in to the Game Center?” In a production environment, your Apple ID and password that you use to download applications from the App Store is the same log in that your Game Center account associates with. However, in a development environment, you'll likely want to have several test users to experiment with various scenarios. In the iTunes Connect portal, you can create test users that have the capability of logging into the Game Center. To create a test user, log into iTunes Connect and then navigate to Users & Roles > Sandbox Testers. From there you can click the plus button to add and configure a new user.
Implementing the Core Game Center Logic
Navigate to GameCenterManager.m to implement the functions that you previously declared in Listing 1. Listing 2 demonstrates what the final implementation looks like.
Listing 2: Game Center integration logic for Super Tap
#import "GameCenterManager.h"
#import "AppDelegate.h"

#define LEADERBOARD_ID          @"supertap.highscore"
#define ACHIEVEMENT_NOVICE_ID   @"supertap.novice"
#define ACHIEVEMENT_INT_ID      @"supertap.intermediate"
#define ACHIEVEMENT_EXPERT_ID   @"supertap.expert"

@interface GameCenterManager()

@property (nonatomic, strong) UIViewController
*presentationController;

@end

@implementation GameCenterManager

#pragma mark Singelton

+ (instancetype)sharedManager {
     static GameCenterManager *sharedManager;
    static dispatch_once_t onceToken;
    dispatch_once(&onceToken, ^{
        sharedManager = [[GameCenterManager alloc] init];
    });
    return sharedManager;
}

#pragma mark Initialization

- (id)init {
    self = [super init];
    if (self) {
        [self authenticatePlayer];
        AppDelegate *del = (AppDelegate*)
        [[UIApplication sharedApplication] delegate];
        self.presentationController = del.window.rootViewController;
    }
    return self;
}

#pragma mark Player Authentication

- (void)authenticatePlayer {
    GKLocalPlayer *localPlayer = [GKLocalPlayer localPlayer];

    [localPlayer setAuthenticateHandler:
     ^(UIViewController *viewController, NSError *error) {
        if (viewController != nil) {
            [self.presentationController
            presentViewController:viewController
            animated:YES completion:nil];
        } else if ([GKLocalPlayer localPlayer].authenticated) {
            NSLog(@"Player successfully authenticated");
        } else if (error) {
            NSLog(@"Game Center authentication error: %@", error);
        }
    }];
}

#pragma mark Leaderboard and Achievement handling

- (void)showLeaderboard{
    GKGameCenterViewController *gcViewController =
    [[GKGameCenterViewController alloc] init];
    gcViewController.gameCenterDelegate = self;
    gcViewController.viewState =
    GKGameCenterViewControllerStateLeaderboards;
    gcViewController.leaderboardIdentifier = LEADERBOARD_ID;

    [self.presentationController
    presentViewController:gcViewController
    animated:YES completion:nil];
}

- (void)reportScore:(NSInteger)score {
    GKScore *gScore = [[GKScore alloc]
    initWithLeaderboardIdentifier:LEADERBOARD_ID];
    gScore.value = score;
    gScore.context = 0;

    [GKScore reportScores:@[gScore]
    withCompletionHandler:^(NSError *error) {
        if (!error) {
            NSLog(@"Score reported successfully!");

            // score reported, so lets see if it
            // unlocked any achievements
            NSMutableArray *achievements =
            [[NSMutableArray alloc] init];

            // if the player hit an achievement threshold,
            // create the achievement using the ID and add
            // it to the array
            if(score >= 100) {
                GKAchievement *noviceAchievement =
                [[GKAchievement alloc]
                initWithIdentifier:ACHIEVEMENT_NOVICE_ID];
                noviceAchievement.percentComplete = 100;
                [achievements addObject:noviceAchievement];
            }

            if(score >= 150) {
                GKAchievement *intAchievement =
                [[GKAchievement alloc]
                initWithIdentifier:ACHIEVEMENT_INT_ID];
                intAchievement.percentComplete = 100;
                [achievements addObject:intAchievement];
            }

            if(score >= 200) {
                GKAchievement *expertAchievement =
                [[GKAchievement alloc]
                initWithIdentifier:ACHIEVEMENT_EXPERT_ID];
                expertAchievement.percentComplete = 100;
                [achievements addObject:expertAchievement];
            }

            // tell the Game Center to mark
            // the array of achievements as completed
            [GKAchievement reportAchievements:achievements
            withCompletionHandler:^(NSError *error) {
                if (error != nil) {
                    NSLog(@"%@", [error localizedDescription]);
                }
            }];
        }
        else {
            NSLog(@"Unable to report score");
        }
    }];
}

#pragma mark GameKit Delegate Methods

- (void)gameCenterViewControllerDidFinish:
    (GKGameCenterViewController *)gameCenterViewController {
    [gameCenterViewController
    dismissViewControllerAnimated:YES completion:nil];
}
Let's go over that implementation so you can better understand it. Starting at the top of the file, you'll notice the following snippet of code:
#import "AppDelegate.h"

#define LEADERBOARD_ID
@"supertap.highscore"
#define ACHIEVEMENT_NOVICE_ID @"supertap.novice"
#define ACHIEVEMENT_INT_ID
@"supertap.intermediate"
#define ACHIEVEMENT_EXPERT_ID @"supertap.expert"

@interface GameCenterManager()
@property (nonatomic, strong) UIViewController
*presentationController;

@end
You need to import the main application delegate in order to present the various Game Center controllers. Because this class is an NSObject and not a controller itself, you can't present a modal controller from its own context. Therefore, you'll use a reference to the application delegate's root controller as the context needed to present the screens. The property presentationController gets assigned to the delegate's root controller when the singleton is first initialized so that it's always available for use.
The various #define variables represent the IDs that you previously configured in the iTunes Connect portal for your leaderboard and achievements. These IDs won't change, thus they get declared as constants. When you call for [GameCenterManager sharedManager], as you'll see later in this demonstration, the class configures a new instance of itself if one doesn't already exist. If it exists, the existing instance is returned. The initialization method contains variable setups to make sure that any initialized instance always has the same available information accessible. In this case, it ensures that the user is authenticated and that the presentationController has been assigned.
Next, there's the player authentication method. Game Center authentication handling works by first getting an instance of the local player on the device and then assigning an authentication handler to that local player. If not currently authorized, the authentication handler passes back an authentication view controller that can get presented to the user so that they can input their username/password (this demo uses the main app delegate's root controller to present it). If authenticated, no controller is returned and the player is either already authenticated or there was an error.
The remaining code deals directly with displaying and updating the leaderboard and achievements. Take the following function, for instance.
- (void)showLeaderboard{
    GKGameCenterViewController *gcViewController =
        [[GKGameCenterViewController alloc] init];
    gcViewController.gameCenterDelegate = self;
    gcViewController.viewState =
        GKGameCenterViewControllerStateLeaderboards;
    gcViewController.leaderboardIdentifier =
        LEADERBOARD_ID;

    [self.presentationController
        presentViewController:gcViewController
        animated:YES completion:nil];
}
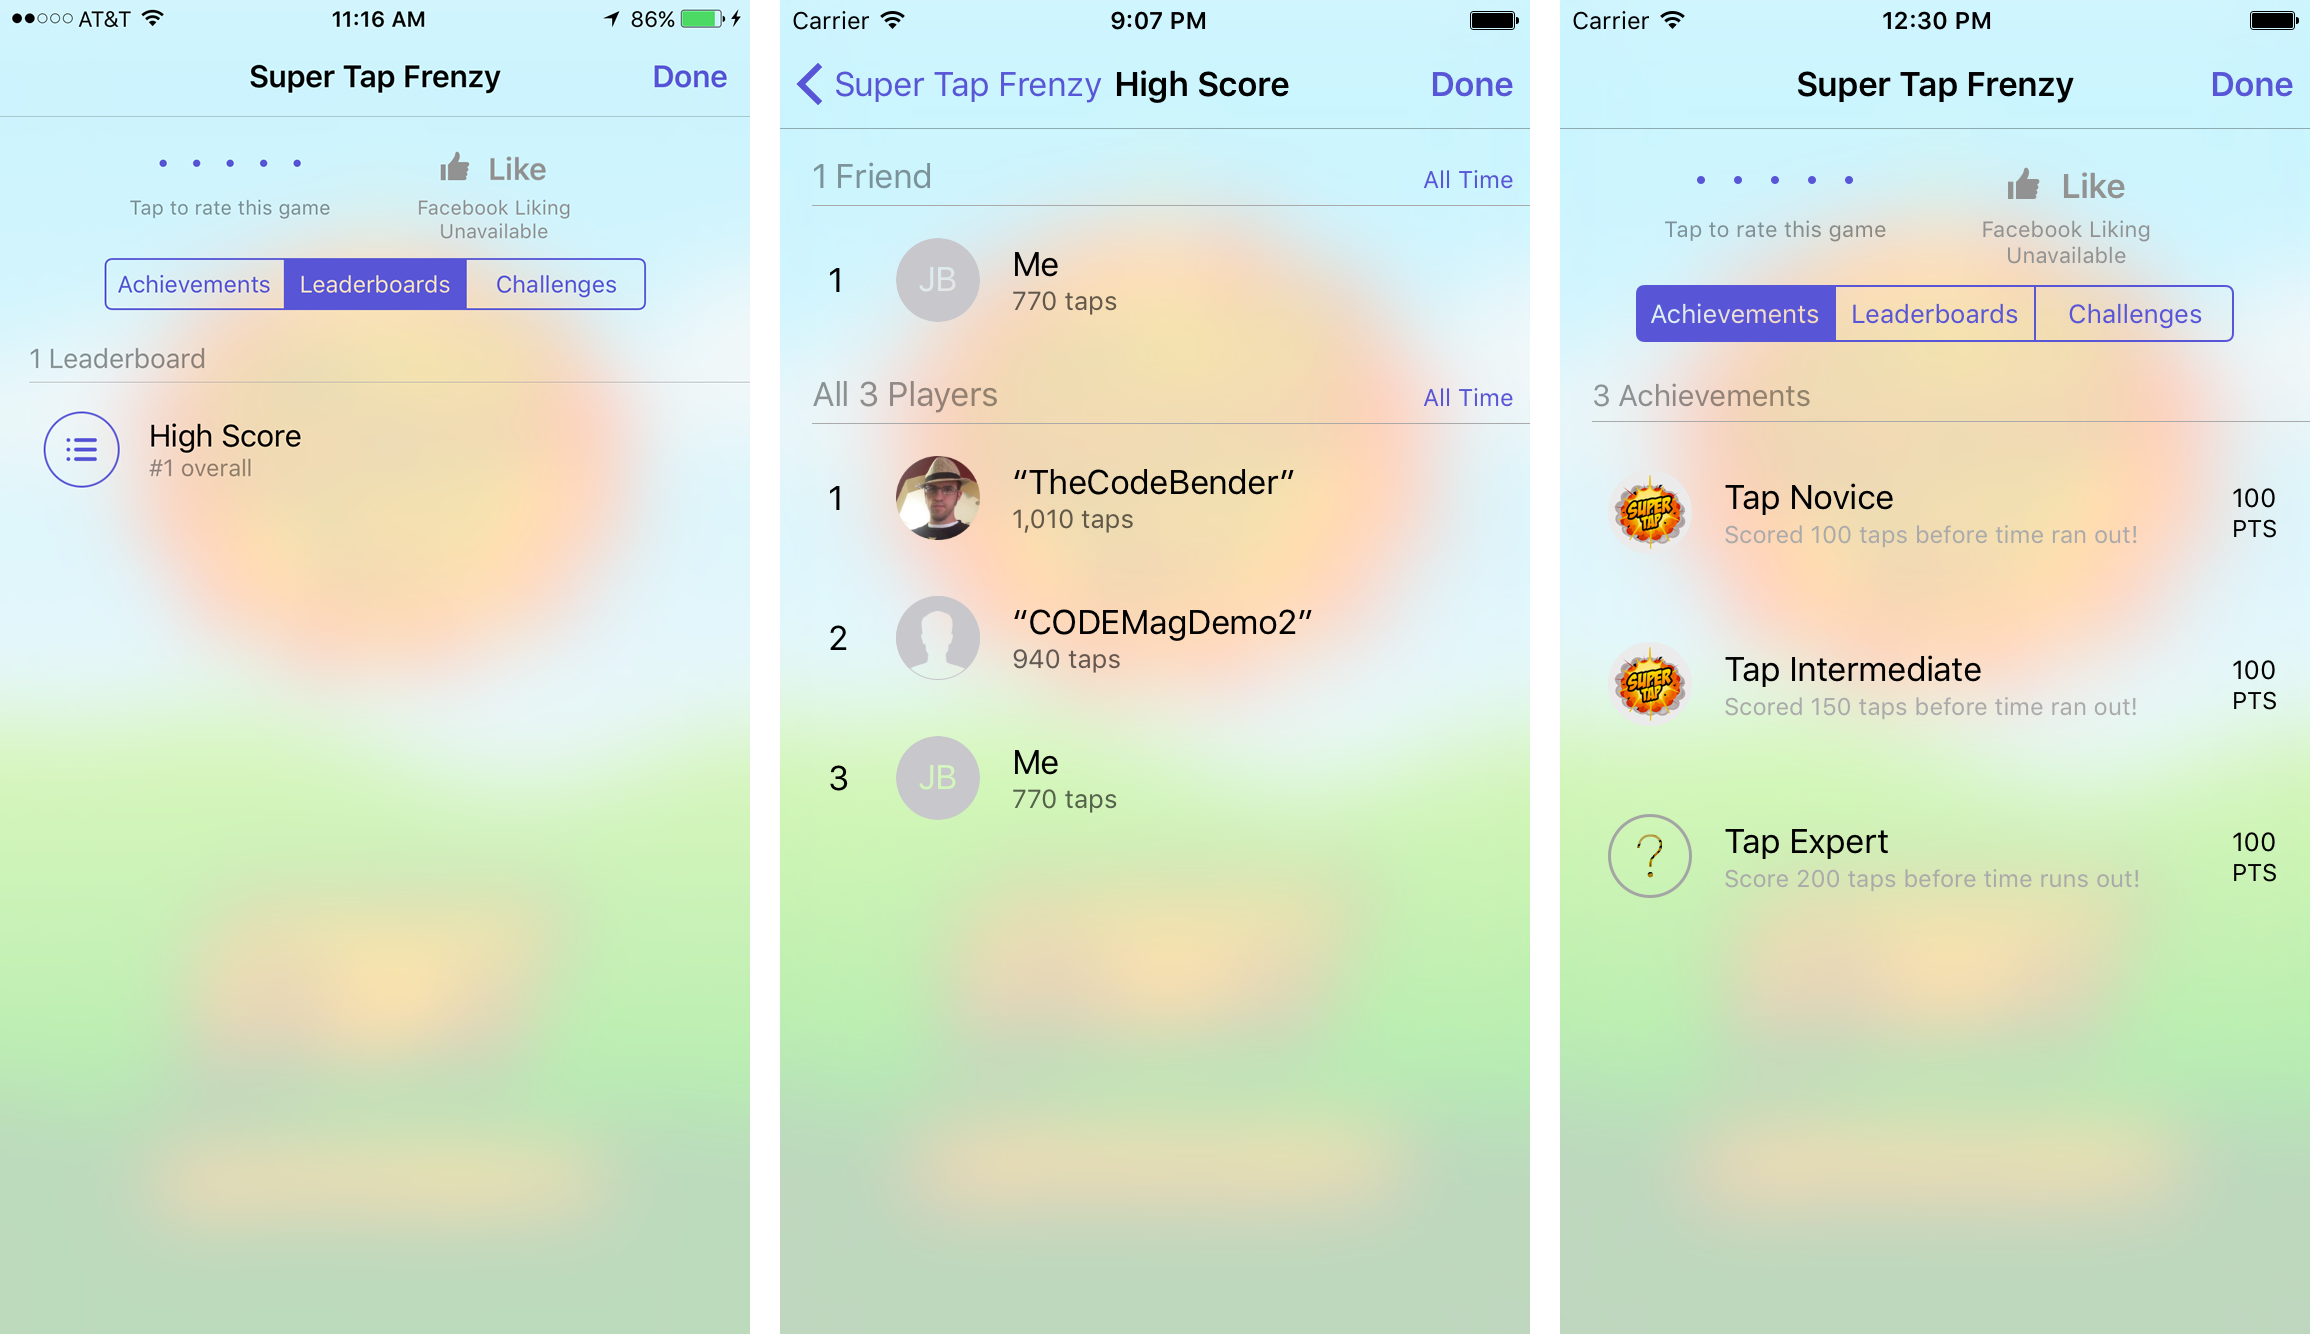
It first initializes an instance of the custom Game Center controller called GKGameCenterViewController. You can use that GameKit controller to present a number of different Game Center default views to the user. You can change what gets displayed by updating the viewState property on the object. In this instance, you set it to GKGameCenterViewControllerStateLeaderboards, which shows a list of active leaderboards for this game as shown in the left side of Figure 8.
However, you could change the viewState to:
GKGameCenterViewControllerStateDefault: presents the default Game Center screen for your gameGKGameCenterViewControllerStateLeaderboards: shows the leaderboard content for your game (what's used in this sample)GKGameCenterViewControllerStateAchievements: opens directly to the un-lockable achievements defined for this game (demonstrated in the far-right screen of Figure 8).GKGameCenterViewControllerStateChallenges: opens directly to the screen that shows all active challenges for this game.
The last function from Listing 2 contains the logic needed to report a score to the leaderboard and also mark achievements completed. To report a score, you must first set up an instance of GKScore for the corresponding leaderboard, as shown in the following code snippet.
GKScore *gScore = [[GKScore alloc]
    initWithLeaderboardIdentifier:LEADERBOARD_ID];
gScore.value = score;
Once you have a score object configured using the ID of the leaderboard that you want that score to post to, you use the GKScore reportScores method, as shown in Listing 2. That method has a completion block indicating if the score reported successfully.
In this demo, if the score posts properly, next you'll check to see if that score unlocks any achievements. The achievements that you set up earlier in iTunes Connect unlock if the player's score is higher then the achievement threshold. Notice that in the iTunes Connect set up for the achievements, it didn't ask for a threshold value, only a plain text description of the achievement. Therefore, you have to account for when an achievement should unlock within your custom application logic. Consider the following code example, taken from Listing 2.
// if the player hit an achievement threshold,
// create the achievement using the ID and add
// it to the array
if(score >= 100) {
    GKAchievement *noviceAchievement =
        [[GKAchievement alloc]
        initWithIdentifier:ACHIEVEMENT_NOVICE_ID];

    noviceAchievement.percentComplete = 100;
    [achievements addObject:noviceAchievement];
}
Notice that you manually check for achievement completion. If the player earned the achievement, you create an instance of GKAchievement using the ID for the corresponding achievement that they unlocked. You can indicate full or partial completeness using the percentComplete property of the object. In this case, the user could unlock multiple achievements at once, so you add the completed achievements to an array, collect all the completed GKAchievement objects, and then notify the Game Center of the completed achievements using a single call. Similar to reporting a score, reporting an achievement involves calling reportAchievements, as shown in Listing 2. The completion block indicates if the call succeeds or if an error occurred.
Last Piece of the Puzzle
Now that you completed the GameCenterManager class for this example, one step still remains. You need to link up the GameViewController so that it calls the appropriate methods from the GameCenterManager. This ensures that the player's score within the game gets sent to the leaderboard. Let's start by making sure that the player is authorized. In the viewDidLoad method of the view controller, add the following:
//authenticate Game Center user if not already
[[GameCenterManager sharedManager] authenticatePlayer];
Then take a look at the progressTimer method. This method gets called whenever the timer fires. The timer counts down from 30 to 0. When it hits zero, the timer stops and the game is over. At this point, you want to report the user's score to the Game Center. Add the following call in the "if " block that triggers once the timer has reached zero, in order to send the score.
If (self.gameTime <= 0) {
    // game over,
    // report final score to the Game Center
    [[GameCenterManager sharedManager]
    reportScore:self.tapCount];

    ...
}
Lastly, the main menu for Super Tap has two options: Start and Leaderboards. You need to link the Leaderboards option with logic that triggers the Game Center UI for leaderboards to display. Find the empty IBAction called Leaderboards in GameViewController.m. Change it to resemble the following snippet. Now link that action to the Leaderboard button in the storyboard and you have completed the Super Tap demo.
- (IBAction)leaderboards {
    // launch the Game Center leaderboard UI
    // and present it to the user
    [[GameCenterManager sharedManager]showLeaderboard];
}
Wrapping Up
The Game Center can prove to be a powerful ally when building iOS games. Although you've only scratched the surface of what GameKit has to offer, you now have an idea of what it takes to configure and integrate the Game Center at a basic level. Various online tutorial content exists to take you deeper into GameKit's offerings and how to take advantage of them. Additionally, all of the code covered in this sample is included in runnable form via the article's download link on CODE Magazine's website.
