


Docker Desktop has gone through a lot of changes over the years. In fact, the name is a relatively new change as the single moniker for both the Windows and macOS versions of Docker's developer offering. And in 2022, we can look forward to a Linux version of Docker Desktop as well.
This article assumes that you have some familiarity with Docker, and with .NET, Visual Studio Code, and source control. I'll be using GitHub for source control. But I also want to make sure that you understand what Docker Desktop is. My lack of familiarity with Dev Environments in general meant that I had to go through a steep learning curve. This wasn't just to understand how to use the feature, but also why. I harassed the very kind Docker engineers to no end and spent a lot of time experimenting and testing things out. In this article, I'll spend some time sharing my gleanings and observations with you, as well as showing you how to perform the tasks.
Docker Desktop originated as a developer-focused version of the Docker Engine that you can use on your development computers. In the past, this was just referred to as Docker Community Edition. When you chose to download this version from Docker's website, you got a Docker Toolbox installer. This installed a native Docker engine (Windows or macOS), the docker-compose CLI, and a simple UI for managing images and containers, called Kitematic.
In 2019, Docker encapsulated the engine, docker-compose, and their own UI, referred to as a dashboard, into Docker Desktop. Docker Desktop for Windows continues to install the native Windows version of the engine and Docker Desktop for Mac installs the native version of the engine for macOS.
Although there are other ways to get Docker onto your development computer, this is certainly the simplest.
The Elephant in the Room: Licensing
I think it's a good idea to address the licensing change that came to Docker Desktop in 2021 while I have your attention.
Docker Desktop was always free to use. In mid-2021 Docker switched to a mix of licensing scenarios. The free usage continues via a Personal License, which applies to most of us, as it's for individuals, education, open-source, and small businesses. Docker defines small businesses as those with fewer than 250 employees or less than $10 million annual revenue. For users in those larger orgs, one of the commercial subscriptions (Pro, Team, or Business) is required. Each of those subscriptions offers advanced features and support (docker.com/pricing). You may even determine that the benefits of these paid subscriptions are right for you even if it's not required. Getting some revenue from Docker Desktop will enable Docker, the company, to continue to invest in further development. You can read more about Docker Desktop licensing in their FAQ: docker.com/pricing/faq.
Enhancing Docker Desktop
Some great examples of investing in the Docker platform are new features that arrived in Docker Desktop in 2021. Although this article will focus on Docker Dev Environments - one of those new features - there are others to be aware of.
For example, Compose V2 can talk directly to Azure and AWS so that you don't have to switch between CLIs for a series of related tasks. Initially, I didn't understand why a docker-compose feature was considered part of Docker Desktop. But then I realized that I'd been tightly associating Docker Desktop with the dashboard UI rather than the full experience of Docker on the desktop for developers - the engine, docker-compose and the dashboard. I'm almost a little embarrassed to share that confusion now. However, I always assume that if something confused me, it must have also confused someone else. Therefore, I think it's worth exposing myself at the risk of having some readers think “Well duh, Julie!” You can read more about this feature (referred to as contexts) in the ACI integration docs (https://docs.docker.com/cloud/aci-integration/) and the ECS integration docs (https://docs.docker.com/cloud/ecs-integration/).
There's more that gets installed as part of Docker Desktop such as docker scan and even Kubernetes.
Another nicety I want to point out that arrived in the dashboard is volume management. Although I'd been able to manage images and containers in the dashboard in the past, I'd relied on either the CLI or the Visual Studio Code Docker extension to make sure I wasn't forgetting about volumes running on my system. Along with this “one-stop shopping,” the dashboard provides a lot more details about the volumes, containers, and images than I can get from the extension.
Why Docker Dev Environments?
Docker Dev Environments allows you to define the tooling, dependencies, and runtime stack to develop your app inside a container. And it's a container that you can use yourself or share with others. In the end, it's all about collaboration. But you aren't sharing an image that you have to push and pull. You're sharing what's needed to build the image and Docker Desktop will build it locally for each user.
There are a few ways to take advantage of this. You can create and share a dev environment on its own. For example, one might have a particular version of .NET installed along with all of the dotnet tools you need for your project. The environment may already have Git and other tooling that you need as well. Pre-created dev environment images are also a fantastic way to get new team members up and running.
The next level is to incorporate the development environment details with your code. Folks grabbing your code can be ready to roll without having to install tooling onto their computers. Docker Desktop clones the repository into a Docker volume and uses the dev environment details to build the environment locally, then mounts the Docker volume that contains the code into the container. Visual Studio Code then connects to the dev container and opens the project. Imagine you're working on .NET 5 code so .NET 5 is the highest version installed on your computer. But you want to look at something a team member or even a friend in the .NET community, is working on in .NET 6. You can run their dev environment inside a dev container and it won't impact the state of your computer. Otherwise, you'd have to install .NET 6 then add nuget.config files to your working projects to make sure they still target .NET 5 instead of defaulting to the new highest version on your computer.
Yet another level is available to Team and Business subscribers where you can take a snapshot of the dev environment and easily share it as a Docker image with other members of your team. Docker Desktop makes this a fully integrated workflow, giving you a simple click-of-the-button way to share your dev environment, pushing it to your Docker hub so that other team members can grab that environment and code from their own Docker Desktop dashboards.
Isolated Programming Environments
The isolation of the dev environment gives you a number of benefits. I already mentioned the ability to have different default .NET runtimes available. In fact, you can run a number of dev environments concurrently without worrying about having to switch contexts. With respect to your code, by working in a dev environment, you can focus on a specific repository branch or, in the case of the advanced sharing, code that came directly from someone's computer without impacting the code you're working on. Consider how this could reduce merge conflict issues when you need to switch tasks quickly. You could be working on one branch and have another in a dev environment. Or possibly a teammate's uncommitted code from the same branch. And it won't mess with the state of your own work.
The person you're collaborating with may be working on a completely different project - maybe golang or something with an entirely different set of dependencies. You don't have to install anything or pull and run images and then shell into them. The dev container puts you directly into the environment, with the code and the developer tooling necessary, ready to go. Without impacting what you're working on, you can grab a copy of a dev environment with all of the dependencies and code and it won't override anything you are doing.
As a .NET developer, my aha! moment with Docker dev environments was opening one up on a computer that doesn't have .NET 6 installed and being able to use the .NET CLI to make changes to source code for a .NET 6 API and run it from the dev container. The .NET SDK always targets the latest installed version. If you installed a newer version of .NET on your computer, you have to add a global.json file to each project that targets an earlier runtime. In this case, an isolated development environment for .NET 6 for R&D provides another advantage. There are so many interesting benefits.
What About Other Ways to Create and Use Dev Environments?
If you're familiar with GitHub Codespaces or GitPod, which also rely on development environments, there's a very big difference. Docker Dev Environments run on your computer, not in the cloud. Fellow Docker Captain, Ajeet Raina, talks about these differences in this blog post https://collabnix.com/getting-started-with-docker-dev-environments/.
Visual Studio Code's Remote Container's extension also lets you create development environments. I'm a huge fan of VS Code and its extensions. Docker Desktop just does things differently and when you escalate your use into its dev environment sharing features, it does provide a clear advantage.
When you share a dev environment via Docker Desktop, pushing, the tool copies the content of the source code volume inside the container, then performs a docker commit and pushes the resulting image to the shared repository. Then your collaborator can create a dev environment by just pulling the ready-to-go image and get to work.
But when you create a dev environment from local source or a source code repository, Docker Desktop builds the environment locally and does so in Docker volumes, which avoids any tax on file system performance. Visual Studio Code Remote Containers is doing the same thing.
Docker Development Environments can be created manually by writing a Dockerfile or much more easily through a wizard in the Docker Dashboard. Guess which way I prefer?
.NET Currently Needs a Custom Build
When Docker first introduced this feature in Docker Desktop, I heard the magic words: Point this to your project and it will figure out what development tools need to be included and create the dev environment for you. I tried this magical path and failed, even though it noted my C# code and even when it containerized the app itself. Finally, someone explained to me that the current iteration of this capability supports Golang, Ruby, Java, and JavaScript. It's quite possible that by the time this article is published, .NET support will be added. But in the meantime, it was a breeze for me to assist Docker Desktop in its effort. And there's a lot of value in creating your own customized dev environments anyway. For example, consider if you have to install any dotnet CLI tools, such as dotnet-ef. Those won't be in a generic .NET dev environment anyway. On top of that, by focusing on creating a custom dev environment, I've learned so much in a short time.
For the sake of leaving you with a decent understanding of how these dev environments work, I'm going to walk you through a few scenarios finishing with the simplest path as the end result. Before you decide to skip to that end result, I'll warn you that it didn't make sense to me until I had gone through the first steps.
From Hello Code to a Dev Environment
To create a self-contained environment for my project, I needed a sample project. I used dotnet new console to create a new project called Hello Code and then opened the folder in Visual Studio Code.
Docker can create Dev Environments from your local source code or from a Git repository. There are two benefits to basing it on a Git repo. Maintaining a container continuously from your local source code is resource intensive, so by basing the environment on a code stored in a repository such as GitHub, Docker can create the dev environment much more quickly as a one-off when it's time to share. Another benefit is that if you've sent your dev environment to someone and they want to tweak your code, they can push from the dev environment right to your repository/branch. Remember that the environment is isolated in a Docker volume, so they can do this without impacting anything they're working on using their own computer, whether that's on metal or in a separate running (and isolated) dev environment.
With that in mind, I'll keep my source code in a GitHub repository. I also want to point out a hiccup I ran into. I hadn't updated Git in a while on the laptop I'm using for this and Docker Desktop couldn't access my repos unless they were public. You need to be at least on Git version 2.29.0. Once I updated to the latest version of Git, Docker Desktop was able to create dev environments from private repos as well. You can check your version with git –version and compare it to the current version shown at git-scm.com/downloads.
Once I updated to the latest version of Git, Docker Desktop was able to create dev environments from private repos.
With a working app ready to go, I'll push it to my GitHub account. My laptop is already authorized to my account. So from VS Code I can easily do this from the Source Control tab. It knows that the project is not initialized and provides buttons to init the repository and one to publish to GitHub. I initialized the repository and published it to GitHub. One [known] bug (that may be gone by the time you're reading this article) that you won't see until further along is that the Docker Desktop tool for creating the dev environment doesn't like upper case letters in the repository. So I name my repo with all lower case letters: codemagdevenvdemo.
Notice that at this point, I haven't done anything to containerize this application. That isn't required for creating the dev environment.
If I were coding in golang, Java, JavaScript, or Ruby, I could head to Docker Desktop to create the dev environment because it has the ability to detect those for project types and reference its own pre-defined dev environments. But I'm a .NET developer, so for this preview, I have to feed some info into the project that Docker Desktop will read in order to set up the development environment.
The dev environment is a Docker image, so the info for creating that image goes into a Dockerfile just as you would do for any other custom image. If you've created Docker images before, this will be familiar. However, as it's for special purposes, the file needs to be tucked into a special subfolder named .docker that must be present at the root of the repository. Note the period in front as well as the fact that it's lower case. Currently, the Dev Environment builder won't see that folder if it's not named using all lower case, so be sure to do that up front.
As I mentioned earlier, dev environments aren't new. People have been using Dockerfiles to create .NET dev environments for a few years already. If you think about it, the .NET SDK image is a dev environment! It's .NET with a whole bunch of other things added in. For the curious, take a look at the Dockerfile on the .NET team's GitHub site to see how the SDK images is built. They start with a runtime image and then add in things like Curl and PowerShell. That file is at github.com/dotnet/dotnet-docker/blob/main/src/sdk/6.0/bullseye-slim/amd64/Dockerfile.
For the Docker Dev Environment, you need a few more things, which means using your own Dockerfile that starts with the SDK image and then adds only four lines. I'm grateful to Felipe Cruz (@felipecruz on Twitter), an engineer on the Docker team who worked all of this out (https://github.com/felipecruz91/docker-dev-env-dotnet-demo/blob/main/.docker/Dockerfile.devenv) and explained it to me.
The contents of the Dockerfile are:
# https://hub.docker.com/_/microsoft-dotnet-sdk/
FROM mcr.microsoft.com/dotnet/sdk:6.0-bullseye-slim

RUN useradd -s /bin/bash -m vscode
RUN groupadd docker && usermod -aG docker vscode

USER vscode

ENTRYPOINT ["sleep", "infinity"]
The first line is just a comment, so I didn't count it among the four. It's pointing to the Docker Hub URL where you can read the description of the SDK image.
The FROM command says to use this particular .NET 6 SDK image as the base for your new image. It then creates a user named vscode and a group called docker, then adds the vscode user to the docker group. Next it sets the current user to vscode. Then it tells the Dockerfile that when the container is spun up, just hang around forever (or until someone shuts it down). Otherwise, the container will think it's finished with its tasks and shut down immediately.
You may be wondering why you're setting up this vscode user. This grants Visual Studio Code the necessary rights to install its server APIs in the container
The outcome of this Dockerfile is an image that, when run as a container, allows you to code, build, and run .NET apps and even use the dotnet CLI. Docker uses this image as a basis for the final contained environment that it builds for you. Docker Desktop also pushes the code for the Hello Code app into the image.
You can copy the full Dockerfile from Felipe's repo or find it in this article's downloads.
You're almost there! Now you need one more little itty bitty file also in the .docker folder. This is to guide the Docker Desktop dev environment builder to find the source of the image, which, in this case, is defined by your Dockerfile. You'll add a new file called config.json and in it, reference the Dockerfile by name. It's also possible to point to a pre-existing image and you'll get to do that later on in this article.
{
    "dockerfile": "Dockerfile"
}
Okay, that's it (for round one)! In the [hopefully near] future, you may not need to create any of this. Docker Desktop will see your .NET language code and provide its own dotnet-based dev environment container. Keep in mind that you still may want to create your own custom environment if there's additional tooling that you require.
Because you've made changes to the project, it's time to commit them and push the updates to the GitHub repository.
Creating the Dev Environment Image
Now that the code and the needed instructions for creating the dev environment are in the repository, anyone with access (mine is public) can create a local dev environment from it. I'll do that from the same computer I'm coding on but I could do it from any computer where Docker Desktop is running. Note that Docker Desktop is also coming to Linux in 2022!
As mentioned earlier, you can create Dev Environments from a local folder, from a GitHub repository or (with the advanced subscriptions) using Docker Desktop's sharing feature. Why would you create one from a local folder? This is useful for isolating something that you are working on so that you can have other dev environments running concurrently. Creating it from a local folder can impact performance inside the container (read more about that at https://docs.docker.com/desktop/dev-environments/#start-a-dev-environment-from-a-local-folder). I'll create mine from the repository into which I've pushed my project and its environment-savvy Dockerfile.
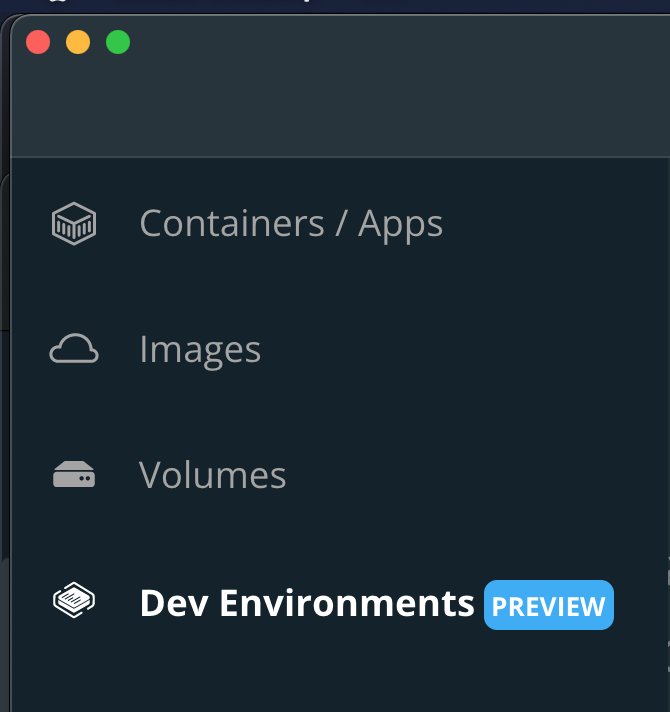
In the Docker Desktop dashboard, there's a new menu shortcut for Dev Environments. As I'm writing this in early 2022, you'll notice the PREVIEW icon attached to the menu in Figure 1.
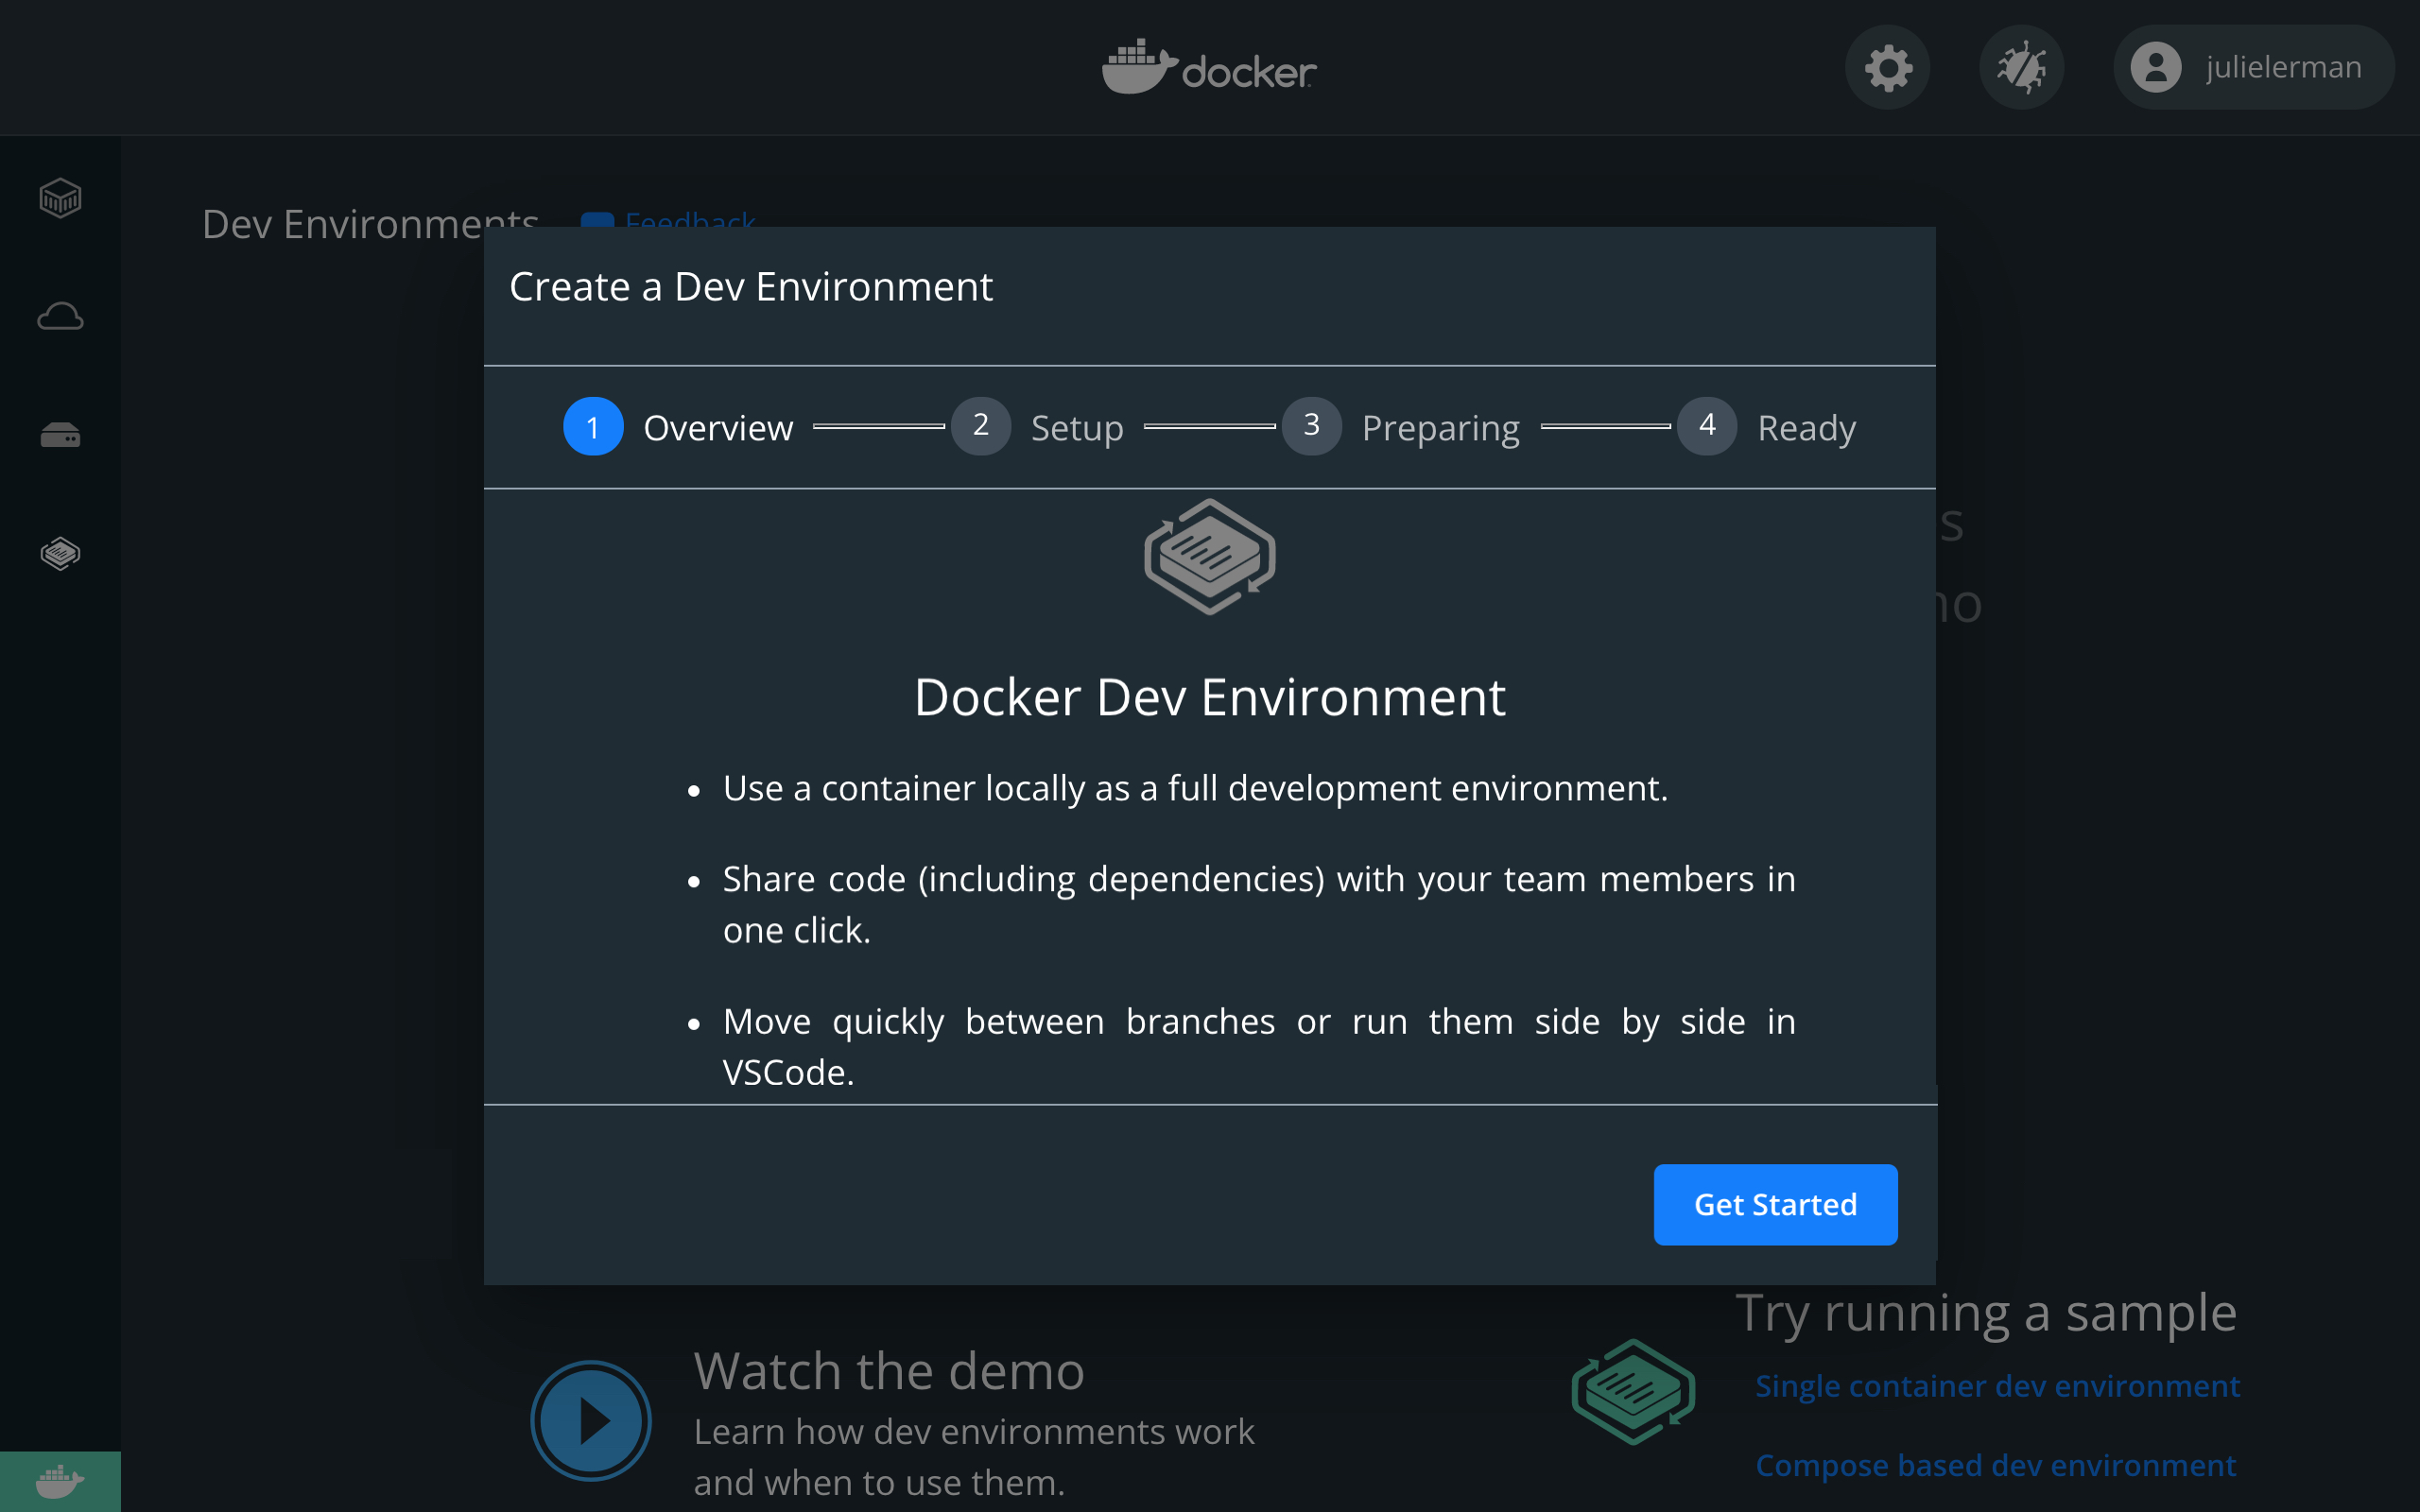
On the Dev Environments page, click Create a New Environment and, on the next page, Get Started. Note that you may have to scroll down to see the Get Started button shown in Figure 2. Note that you may get prompted to install the Remote Containers extension in VS Code.
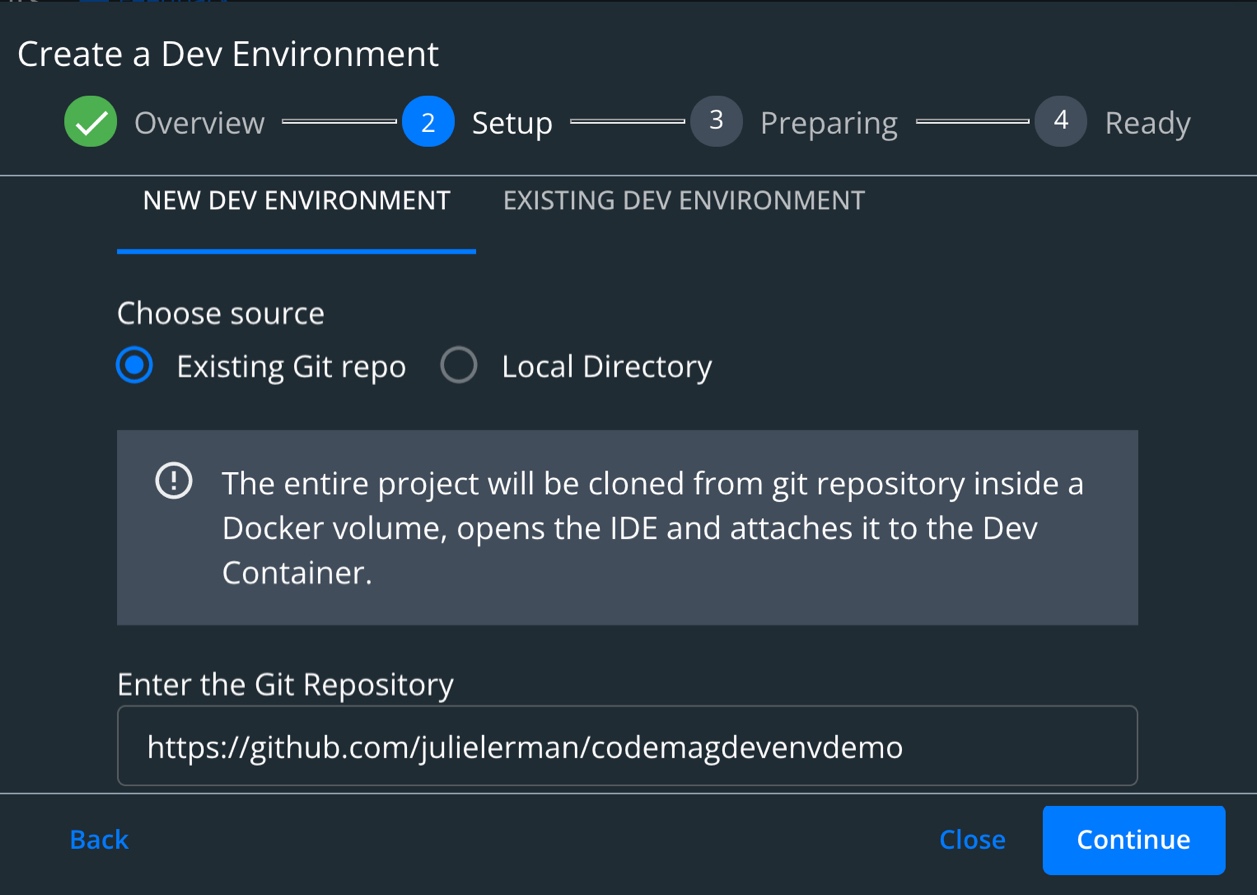
The next page is where you specify the source for the Dev Environment. It defaults to creating a new dev environment from an existing Git repo. That's the option I want. And you can see in Figure 3 that I've pasted in the URL of my repository. You can specify a particular branch if you prefer by adding @branchname to the end of the URL.
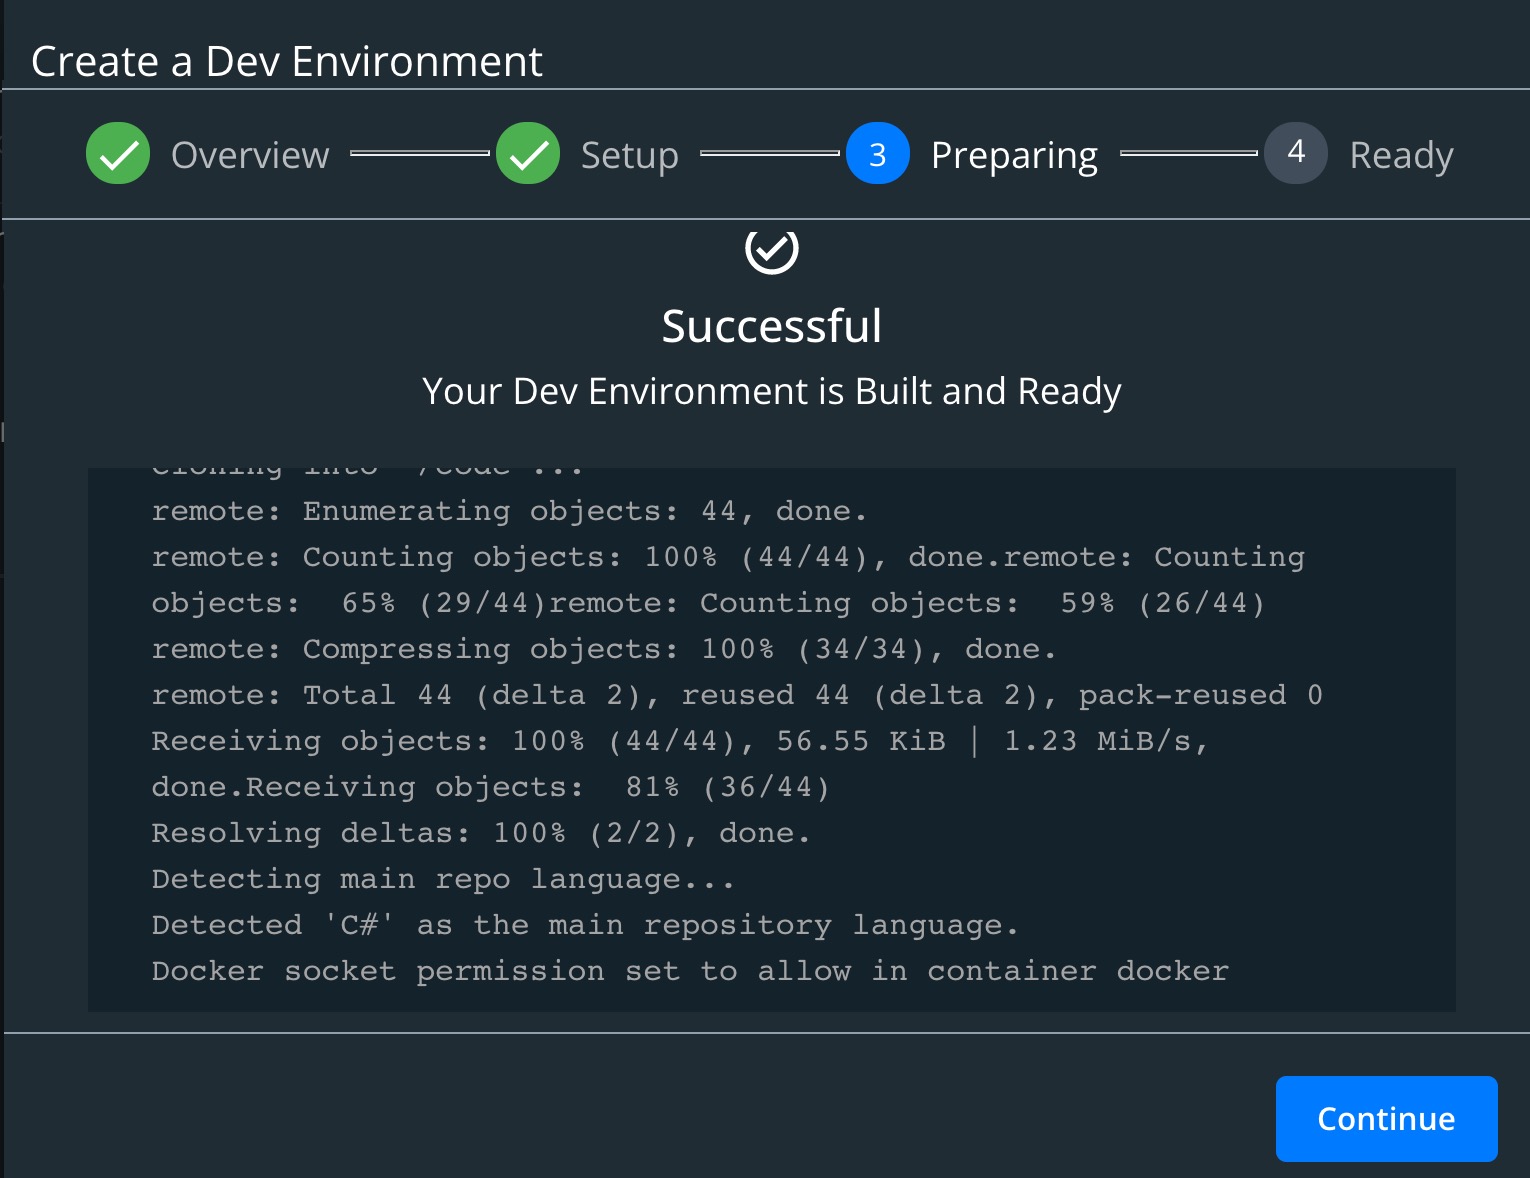
Because the dev environment needs to include the .NET image, although a very small version of the image, this process may take a few minutes. You can watch the log and when it's complete, you'll get another continue button, as seen in Figure 4. As I was learning and hadn't done some things correctly, resulting in .NET not getting added into the dev environment, I reached this stage rapidly - in less than 10 seconds. It should take a bit longer than that when it's also creating the dev environment with .NET. If the base .NET image is already on your system, that will be quicker than having to pull the .NET image during the process. Additionally, there's a lot more information in the log window when that dev environment Dockerfile is being acted on.
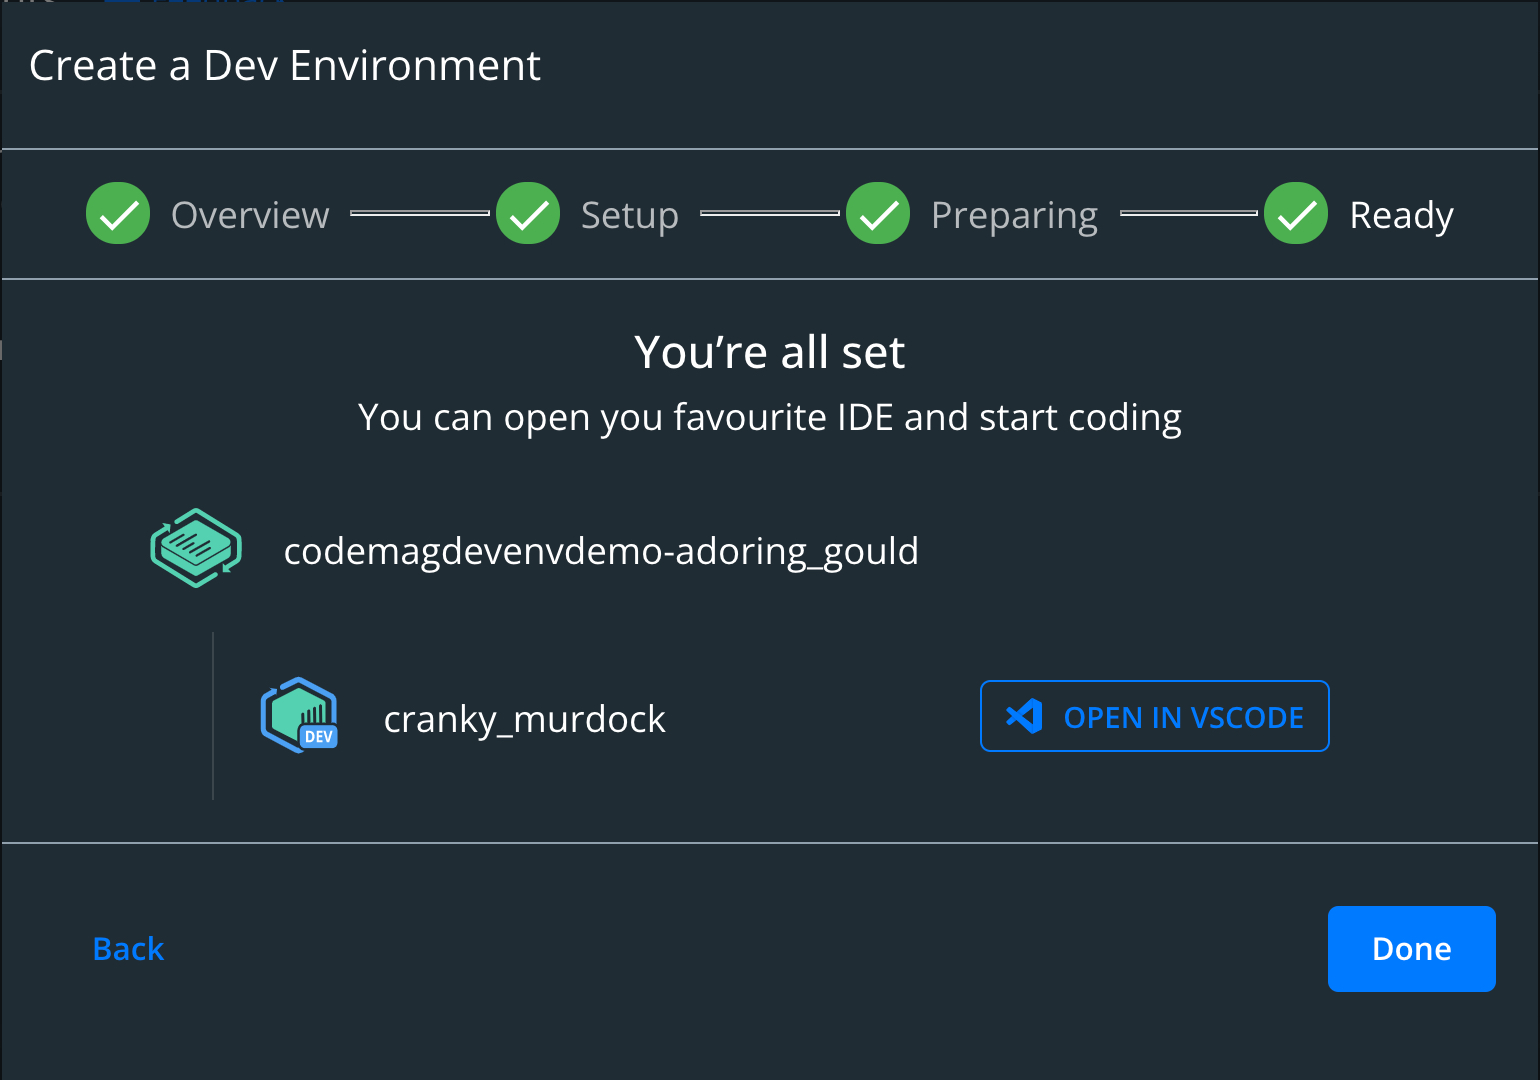
After hitting continue, you'll get one last page that shows you the randomly generated name of the environment and, below it, the randomly generated name (they can be funny) of the container with an Open in VS Code button, as shown in Figure 5.
When you open the environment in VS Code, you will be working with a volume that has its own instance of the VS Code server in it. VS Code then connects to the container running the environment, starts it up, and opens the project.
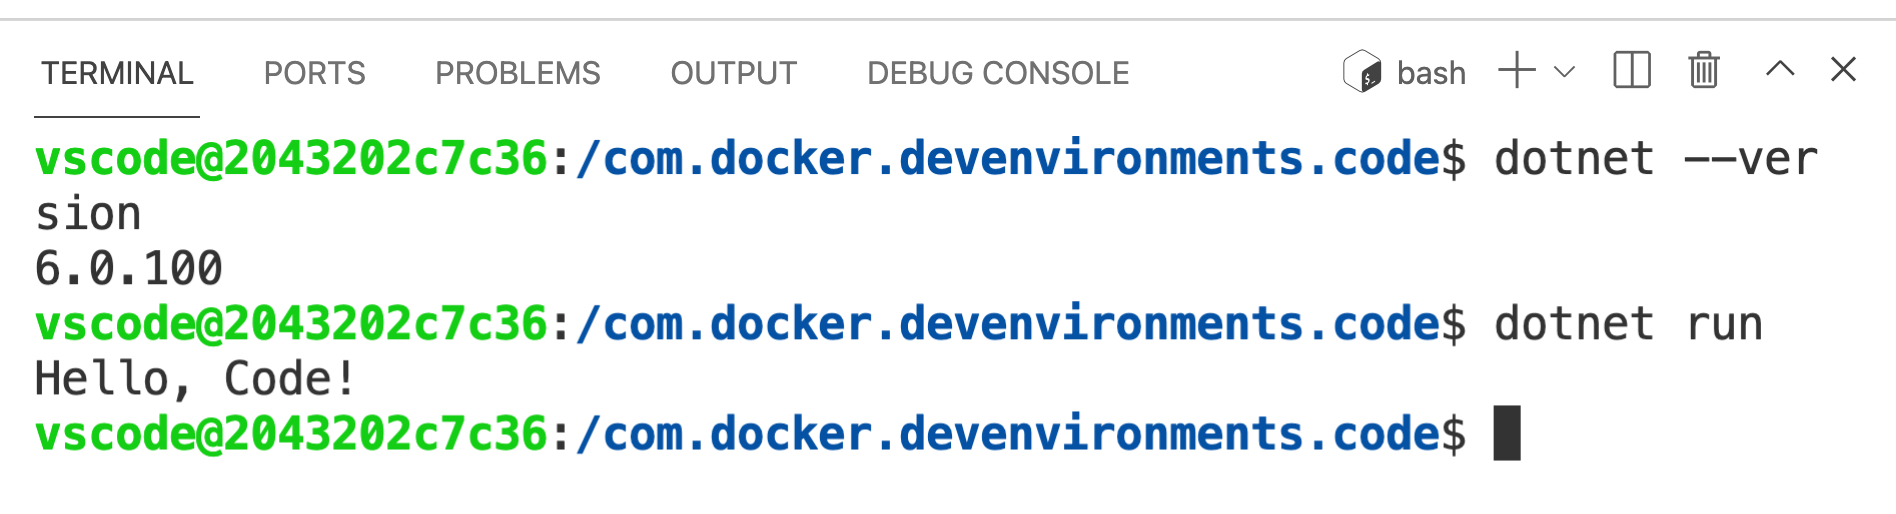
If you check the .NET version in the terminal (dotnet –version) you should get a response of whatever latest version of .NET 6 is available. And you can run the app however you run from VS Code: F5, dotnet run, etc.
What Did Docker Create?
I love looking under the hood to see what's going on. What Docker Desktop created for this environment was:
- 716MB image that provides the .NET environment
- Small volume (<1MB) that contains the code from the repository
- 176MB volume that contains the instance of VS Code server
Note that when I created the environment using VS Code's Remote Container, the image it created for the .NET 6-based container was 1.5GB. One reason is that it isn't using the same base image but there may be others. I didn't dig into that too deeply.
I also wanted to relay some timings, but please keep in mind that this is just on my little MacBook and I have slow Internet! The point here is more about the differences between the first time using the dev environment and the second.
Starting with a clean Docker system (no images, no volumes), it took about 1.5 minutes for Docker Desktop to create the assets. That includes pulling the .NET SDK image referenced in Dockerfile. Keep in mind that I have slooooow Internet at my house in the countryside so if you have decent speeds, it will be much faster! Once my dev environment base image existed on my computer, subsequent iterations of creating a new dev environment for this or other .NET 6 projects took less than 10 seconds.
When I clicked Open in VS Code, it took 20 seconds until everything was ready for me to work with. During this time, VS Code was connecting to the Dev Environment container, running the container, and opening up the code.
Then I closed VS Code and deleted the environment in Docker Desktop but I left the Dev Environment image in place and the two volumes.
Next, I started the Create Dev Environment a second time. Docker recognized that the needed image was already available and this time it only took 15 seconds for the Open in VS Code message to pop up. Opening the VS Code with the container and code ready to roll again took 20 seconds.
In scenarios when you need the same environment repeatedly, just as with any Docker image, you will certainly benefit from that initial pull.
Coding in the Container
You may want to do more than run and debug the code that came in this environment and once again, as a .NET developer, well, in this case C#, you will hit another small and surmountable snag. You may have a number of extensions installed in VS Code, but they aren't all installed in this isolated instance of VS Code. Most notably, mine was missing the C# (OmniSharp) extension. Extensions that affect the UI are installed but heavy-duty extensions like C# need to be installed into the container directly. You'll notice a button to install the extension into the container, such as that in Figure 6. When you hover over any of these extensions, a short explanation is displayed saying that the extension needs to run in the Remote Extension Host. There's also a link to a deeper explanation at http://code.visualstudio.com/api/advanced-topics/remote-extensions#architecture-and-extension-types.
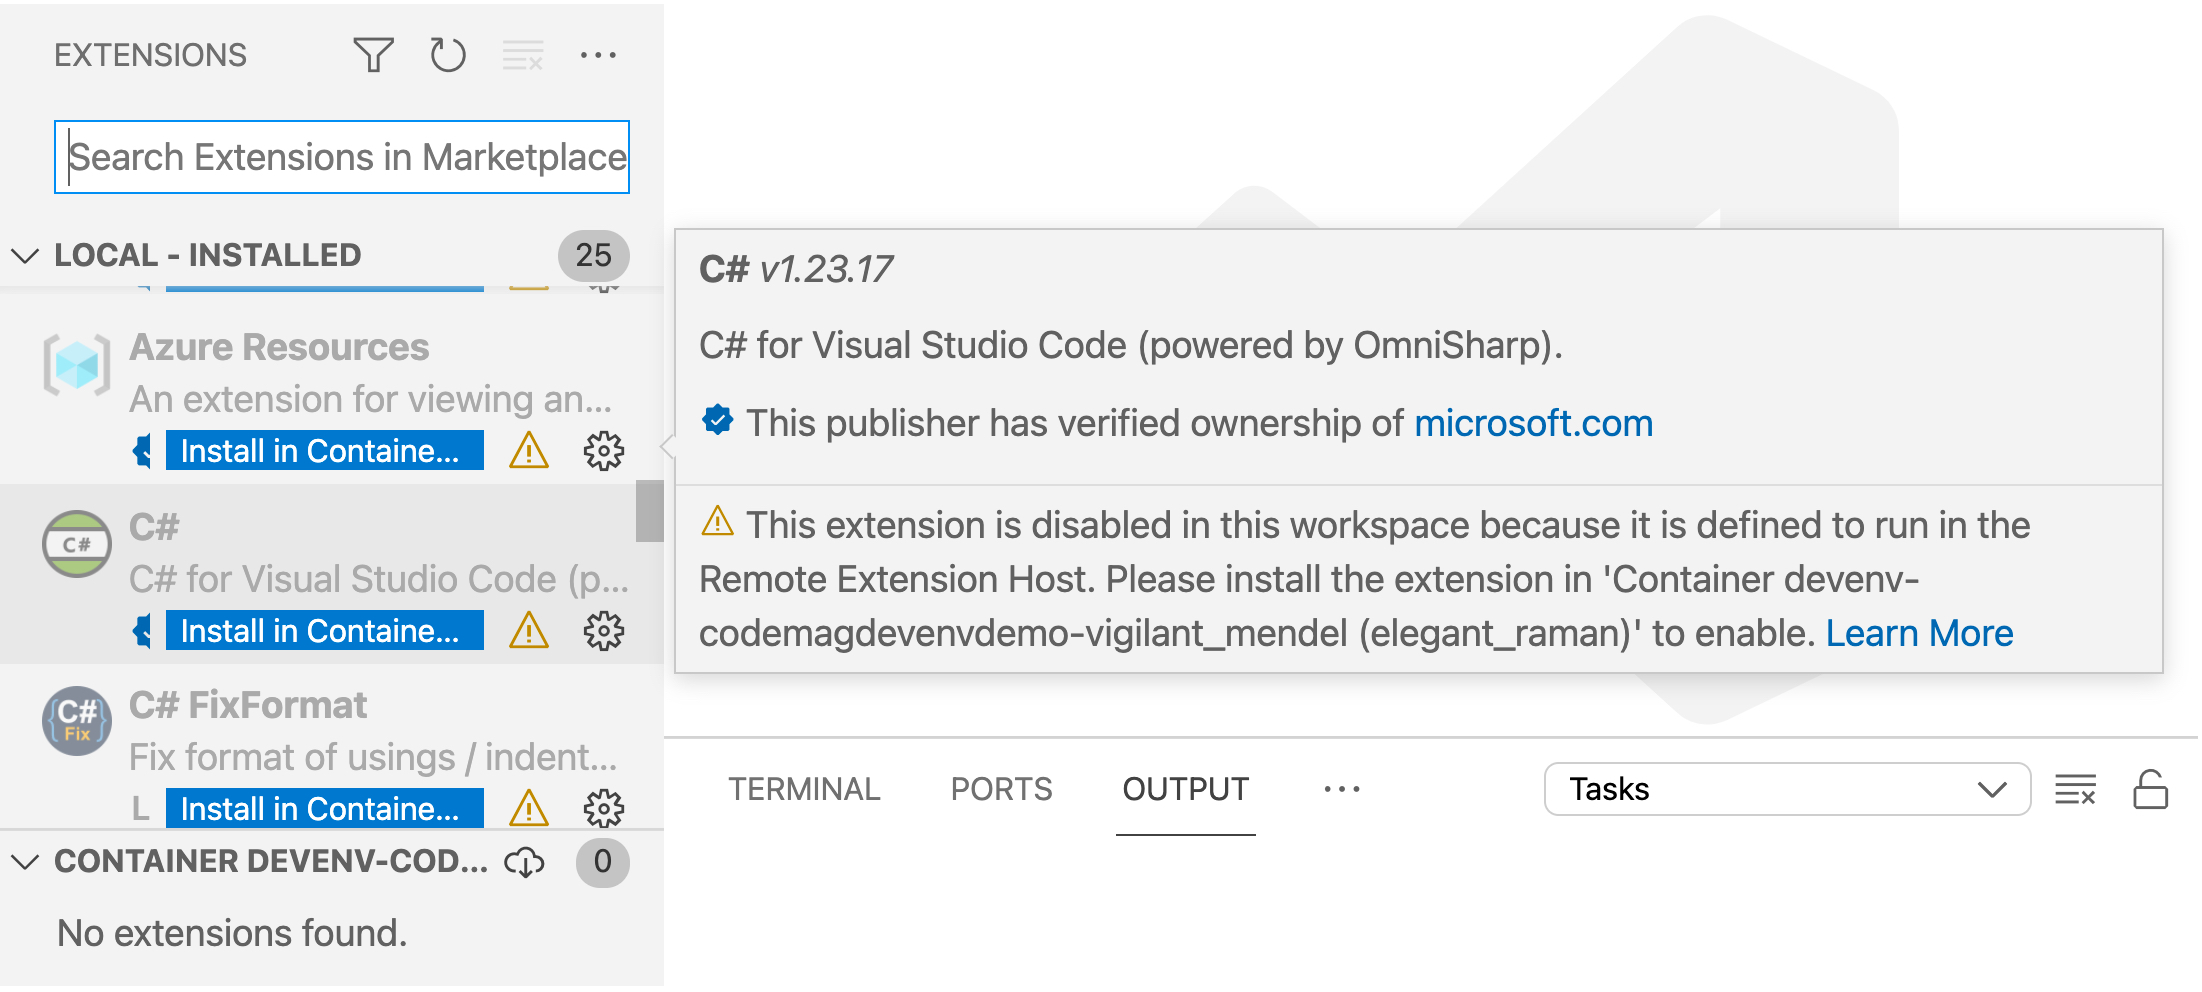
Without the C# extension, you might as well be coding in Notepad or TextEdit. OmniSharp brings you IntelliSense, snippets, CodeLens, debugging support, and many other features that enhance coding in C#. It's a must for C# developers.
And because this gets installed in the container, not in the VS Code volume, you have to re-install it in every new Dev Environment you create.
Suddenly the promise of a ready-to-go development environment seems misleading. There's no way that Docker can achieve this when building a dev container. In fact, there are licensing issues that prevent them from taking care of this for you.
Suddenly the promise of a ready-to-go development environment seems false.
However, VS Code provides a solution. There's a feature that allows you to list recommended extensions for a project and VS Code prompts you to install them when you open the folder in VS Code. Let's get that working.
You can even make and push that change from this container if you want. But for a view on setting up your original project correctly, let's go back to the local Hello Code project.
The way to trigger this feature is to add an extensions.json file into the .vscode folder.
In that file, you list the extensions you'd like the user to install. You can find the extension names by their VS Code Marketplace URL item name. For example, here's the URL for the C# extension:
marketplace.visualstudio.com/items?itemName=ms-dotnettools.csharp
My extensions.json file lists that under recommendations.
{
  "recommendations": ["ms-dotnettools.csharp"]
}
You can comma separate as many extensions as you like. This is all I want.
After making this change, I commit and push the project back to GitHub and then, in Docker Desktop, create a new Dev Environment from the repository.
When I open the new Dev container in VS Code, I'm prompted to install the recommended extensions (Figure 7)
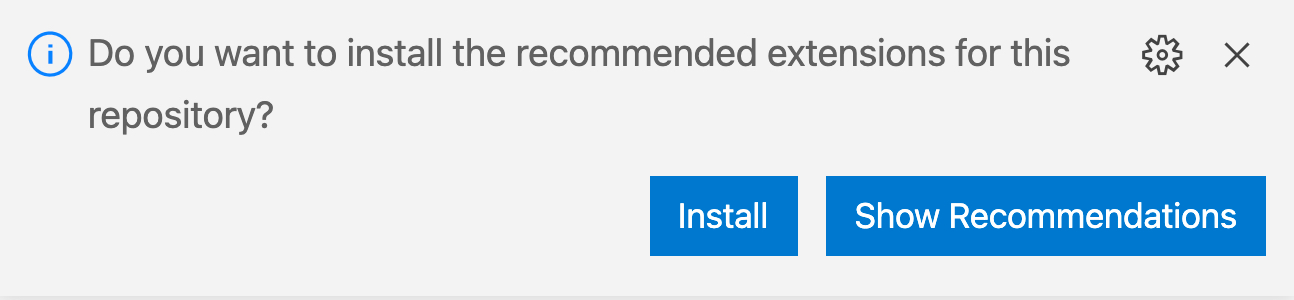
Note that if you don't see this prompt, it could be for the same reason that I wasn't getting prompted at first: I'd disabled this feature in the VS Code setting, “Extensions: ignore Recommendations”.
Create a Reusable Dev Environment Image
Now that you see what goes into creating the Dev Environment, it may seem silly to add Dockerfile to every .NET 6 project you may want to share with others. There's an easy solution!
You can create the Dev Environment explicitly, build its image, and then push the image to a Docker repository. With that in place, your .docker/config.json file can point to the image instead of to your Dockerfile.
The Docker extension for VS Code allows you to right-click on the Dockerfile and choose Build Image. Doing so prompts you to provide a name for the image. I named mine julielerman/net6devenvironment:latest. Be sure you're doing this in your non-containerized instance of VS Code so that you aren't trying to build the image inside of a container. And keep in mind when naming that you need to have your repository name included (i.e., julielerman/) otherwise you won't be able to push it up. I forget that almost every time and wonder why I get access issues when I'm trying to push.
Then you can pop back to Docker Desktop, find the new image (mine is about 700MB) in the list of images, and push it to the hub where your repository lives.
Now I can delete the .docker/Dockerfile from my project and change the config.json file to point to the new image instead of referencing the Dockerfile.
{
  "image": "julielerman/net6devenvironment:latest"
}
I'll commit and push these changes back to my GitHub repository.
One last time, I'll go back to Docker Desktop and create a new dev environment from the latest iteration. I don't mind doing this because it's such a quick task.
When that's complete and I open up VS Code, once again, I'm prompted to install the recommended extensions. Once again, I can verify that .NET 6 is in my environment with dotnet –version. And finally, I run my very wonderful app to reveal the Hello, Code! message.
Integrated Collaboration
Docker already gave us a way to spin up our development environments relatively quickly and for duplicating a teammate's environment, a docker-compose file that referenced the needed images has always been a great way to share. I'll never forget the first time I used a container for SQL Server instead of having to install SQL Server on my computer!
But the Docker Desktop-integrated Dev Environments takes this collaboration to the next level by removing the disruptive nature of switching gears, development environments, and your source control workflow when you want to take a look at something that your teammate is working on.
Being able to automatically use the dev environments that are already available for Golang, Ruby, Java, and JavaScript is definitely a bonus. But with a little knowledge and a little advanced planning, we .NET developers can benefit from the feature just as easily.
